
- Shop Fly Fishing
-
Shop Needlework
- Metallic Threads
- Silk Threads
- Kits & Sets
- Accessories
- Free Patterns
- How To
72 products found
Sort by:
Recommended
Shop Needlework > Accessories > Custom Corder
-
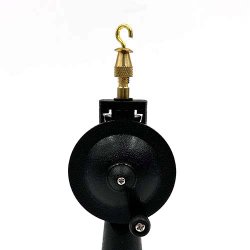
Kreinik Custom Corder
Make customized cording, piping, straps, and trim to decorate pillows, table runners, candles and more. Cord jewelry items, friendship bracelets, ropes to applique onto designs...the sky is the limit. Use any fibers, yarns, or strips of material. Combine your favorite colors, team colors, school colors, or colors to coordinate with a project.
-
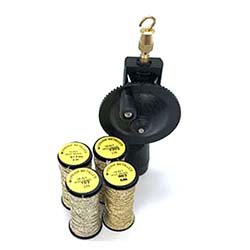
Custom Corder Gold Set
Get started making gorgeous trims, cords, and jewelry with the hand-held Kreinik Custom Corder and four gold metallic threads.
-
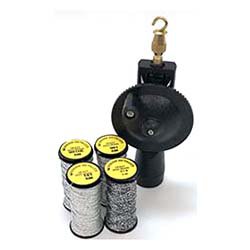
Custom Corder Silver Set
Get started making gorgeous trims, cords, and jewelry with the Kreinik Custom Corder and silver metallic threads.


Shop Needlework > Accessories
-
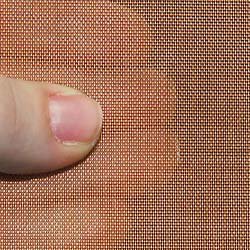
Copper Wire Canvas
A stitching "fabric" for applique. Originally used by Kimberly Smith to make the dragonfly wings in a needlepoint design (available through Bedecked and Beadazzled online). Use it to stitch wings, flower petals, and other dimensional elements. Carefully cut into the applique pieces, then attach to your design.
-

Polysil™ canvas in frames
This is a 34-count white mesh made of 100% polyester used for needlepoint, applique or string art. The advantage of buying Polysil canvas in frames is that it is ready-to-stitch. Buy just the right size you need, already mounted in a frame that you can remove later or keep as a border of your design. Dimensions refer to the exposed area of Polysil.
-
Polysil™ canvas by the yard
Polysil is a less expensive and more readily available alternative to silk gauze for needlepoint. It is 34-count canvas made of polyester. It's also ideal for string art or making applique designs. Available in 1-yard, 1/2-yard or 1/4-yard amounts.


Shop Needlework > Free Patterns > Crafts > Christmas
-
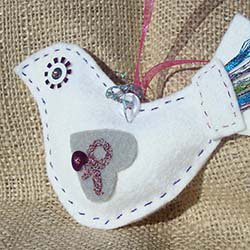
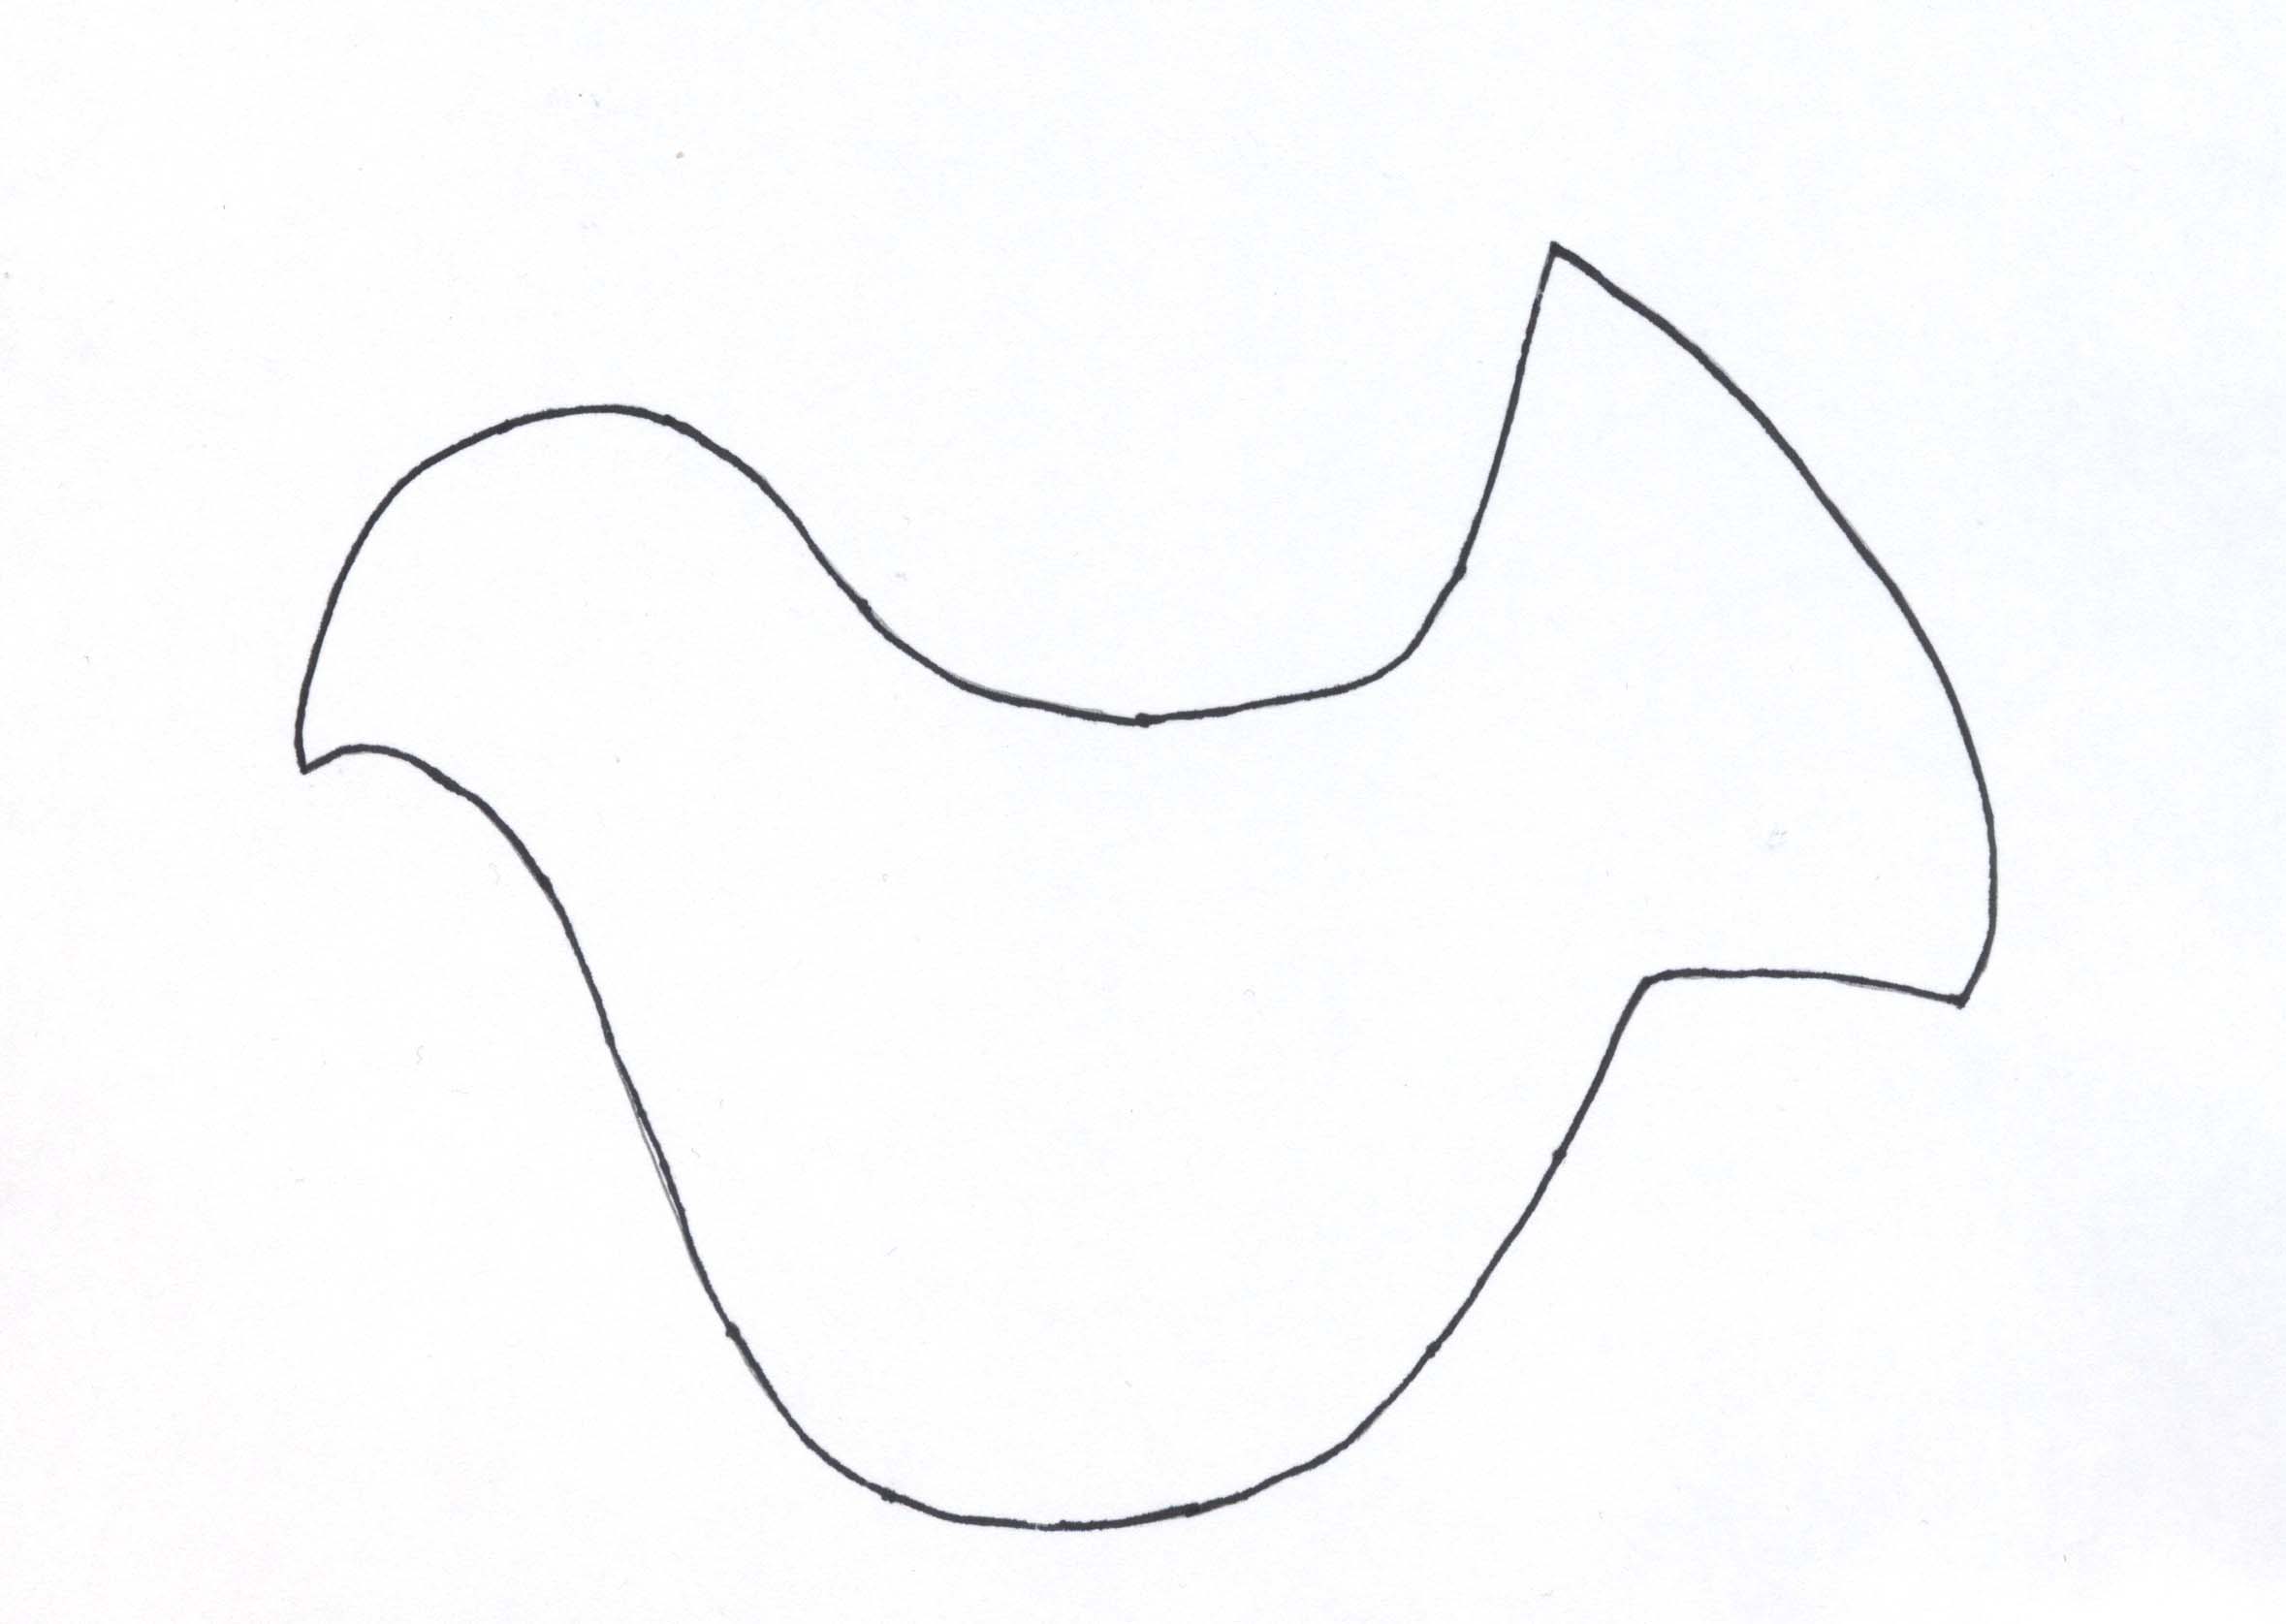
Felt Dove Ornament
Note: this item is not shipped
Materials needed:- dove template below, reduced or enlarged as desired
- white felt
- scrap of gray felt
- sequins or buttons as desired
- Kreinik holographic thread colors in Fine #8 Braid for any stitching, and 1/8" Ribbon for the tail—the holographic colors have an "L" in the color number, such as 002L, 001L, 005L etc.
- sewing needle, stuffing or fiberfill, scrap of ribbon
Instructions:
Note: we decorated only one side of the dove, but feel free to decorate both sides if desired.Enlarge or reduce the size of the template as desired.
- Using the dove template, cut out two dove shapes from your white felt. Place them together.
- Using a color of Fine #8 Braid, Tapestry #12 Braid, or Very Fine #4 Braid, straight stitch (or running stitch) around the inside edge of the doves. Leave a small opening, insert stuffing, then finish sewing closed.
- Use sequins or buttons for the eye, securing onto your felt using your Kreinik Braid or Blending Filament.
- Cut your gray felt into the shape of a small heart. Set it on its side and position it near the middle of the dove to look like a wing. Stitch down using a color of Kreinik Braid or Filament. We stitched a breast-cancer awareness ribbon on the gray wing, then attached a heart sequin right next to it.
- Attach your ribbon scrap to thte dove as an ornament hanger. We covered the spot where we knotted the ribbon onto the dove by placing a button there, embellished with Kreinik Braid.
- Cut 2” pieces of holographic threads and lay at the taiil. Secure with fabric glue or hold with your hand as you cover the base ends with a small white rectangle of felt. Sew it onto the front of the dove just at the base of the
- If desired, add a poem or message by writing or typing it on paper, then inserting the paper between the felt layers at the tail.

Shop Needlework > Free Patterns > Embroidery
-

Embroidered Flower Motif
NOTE: This item is not shipped. Click the link below to download the PDF.
Embroidered Flower Motif
Designed by J.Marsha Michler
Marsha has written terrific how-to books on crazy quilting, including the popular “The Magic of Crazy Quilting.” Her latest book (“Motifs for Crazy Quliting”) showcases specific spot motifs to use in quilting projects. These designs are suitable for wall hangings, wearables, and anything fabric-related — think album covers, sachets, etc. They are embroidery patterns that can be used in many ways.
We asked Marsha to share a special motif with Kreinik web site visitors. She created this rose motif from Kreinik Silk Bella, Mori and Serica. The result is a beautiful, heirloom rose—we’re sure it would take the prize in any garden scene.
Materials needed:
- use 100% cotton muslin, 100% cottonbatiste, or silkl organza, depending on how you will use this design
- Kreinik Silk Mori in 4203 Light Sage, 4073 Light Dusty Green, 2013 Light Gold, 2014 Medium Gold, 1103 Light Mauve, 1031 Baby Pink
- Kreinik Silk Bella in 4206 Dark Sage, 1098 Wood Rose
- Kreinik Silk Serica in 4073 Light Dusty Green, 7086 Dark Straw, 8000 Soft White, 8084 Medium Gray, 8073 Light Charcoal
- Kreinik Tapestry (#12) Braid 001J Japan Silver
- Kreinik Japan #1 001J Japan Silver
- Embroidery needles to fit the threads
- tracing paper
Instructions:
Click here to download the FREE instructions for this design.You will need the Adobe Reader to view and print this file.
Our model includes the following stitches:
- Backstitch in Silk Mori for filling in the stems
- French Knots in Silk Serica for the rose
- Coral Stitch in Silk Serica for the leaves
- Seed Stitch in Silk Serica for the bow
-

English Bouquet Embroidery Pattern
NOTE: this item is not shipped. Click the link below to download the PDF.
English Bouquet
- Designed by Sharon Coxhead
Sharon shares this design with us out of her love for embroidery on fabric. She found the Silk Mori to be a beautiful thread for designing this type of needlework. Use this as a stand-alone embroidery, or as an embroidery on a crazy quilt.
Materials needed:
- A piece of fabric of your choice approximately 9 inches by 9 inches. I used Dupion silk and put some waste fabric on the back, thus sewing through both pieces of fabric to stop any puckering on the stitching.
- Silk Mori for bullion roses: 0323, 0324, and 0325. For the rose stems and leaves, use Silk Mori 4037. For the daisy’s middles use 2027 and for the petals use 2024. For the daisy’s stems use 4034. For the bow use 0303 and 9032. (all Silk Mori colors)
- Kreinik Very Fine (#4) Braid 092 Star Pink for edging the bow and highlighting.
- A milliners/straw needle for bullion knots and French knots. A sharp embroidery needle with a suitable size of eye to allow 2 single strands together of Silk Mori to pass through for all other stitches.
Instructions:
- Click here to download the FREE instructions for this design.You will need the Adobe Reader to view and print this file.


Shop Needlework > Free Patterns > Iron-On Thread > General card and papercraft ideas
-
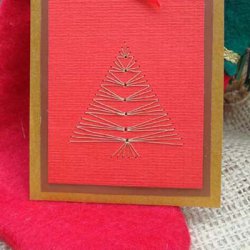
Stitched Christmas Tree Card Embroidery on cards
Designed by: Erica Fortgens
Skill level: All
Beautiful shimmering threads set against beautiful rich papers, stitched in beautifully symmetrical patterns...and as easy to do as dot-to-dot puzzles!
Embroidery on paper is grown-up fun and elegance thanks to talented designers like Erica Fortgens, who create patterns, books and stencils that show you how to easily create stunning embroidered cards, tags and other paper projects. You stitch with fine metallic threads like Kreinik Cord through pre-punched holes, making the designs as simple or as elaborate as you like.
Here, Erica shares two project ideas from one of her books so you too can make a beautiful holiday card, ornament or gift tag. These projects are a unique way to share your love of embroidery with others and make something absolutely stunning!
Materials needed:- Cardstock to make the card, tag or ornament as desired
- Kreinik Cord in colors to match your project
- computer mouse pad, cardboard section, or Erica Punch Matt (#4050510)
- very fine and fine punch pen, needle, or Erica Punch Pens (#4050506)
- scissors
- adhesive tape
- needle slightly thinner than the punch pen you have used
Instructions:
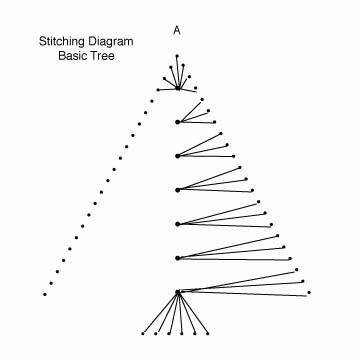
1. SET THE DESIGN: Make a copy of the design (scroll down to see templates), cut it out in a square, place it on the chosen spot on the card, fix it with two pieces of adhesive tape, and place the card with the design on the punch mat. Punch the design accurately with the very fine punch pen (or needle) for the small dots, and a fine or slightly larger needle for the larger dots-the larger dots will be holes with more than one thread going into them repeatedly. Hold the needle/punch pen straight and upright as you are punching for the cleanest hole. Hold the card against the light to see if you have punched everything. Remove the design. Now your design is punched into the card.
2. BEGIN EMBROIDERY: Thread your needle with Kreinik Cord. Follow the instructions for this particular shape according to the stitching diagram (see below) and the model; for example, start at A. Pull the needle through with your Kreinik Cord and leave a small amount of thread on the back as a tail. Fix this with a piece of adhesive tape. Continue stitching, following the diagram.
3. FINISHING: To hide the back of your work, cover it with a card of the same size and color. For a more elegant result, cut the edges with decorative scissors.
More information:
Like these ideas- These projects and many more can be found in these books:
Basics of Embroidery, EF 2000, ISBN: 90 384 1591 5
Extraordinary Embroidery on Paper, EF 2010, ISBN: 97 8802 1337 838
Embroidery on paper is a technique in which holes are pierced in a card following a pattern of pre-printed dots, after which threads are drawn through to create a design. To learn more and see all of Erica's tips and designs, visit www.ericafortgens.nl. Look for Erica's tool package, which contains 3 piercing tools with different sizes (Erica's item number 4050506), and piercing mat (Erica's item number 4050510); for more information, visit http://www.ecstasycrafts.com/.
Printing Instructions:
To print the instructions for this project click on the on the link above "Printable version" and then print the page using your web browser.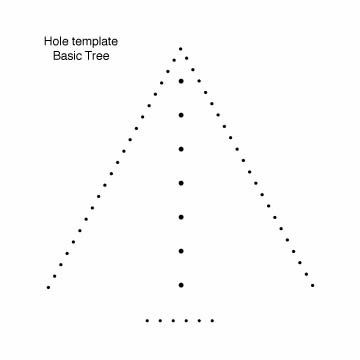

Shop Needlework > How To > Metallic Thread
-
How To Use Kreinik Micro Ice Chenille
Quick! Name five things that are fuzzy (bonus points for fuzzy metallic things). How about: garland on Christmas trees, legs on spiders, flower centers, bushy eyebrows, other, ahem, hairy things, peaches, caterpillars, lots of bugs actually, baby chicks, moldy cheese, your brain after a long weekend. How many could you list? Nature and life itself are full of texture. It makes things visually interesting and tactile.
You can recreate the fuzzy factor of true life objects with Kreinik's Micro Ice Chenille in your favorite hobby: needlepoint, cross stitch, embroidery, fly fishing, crochet, knitting, weaving. It adds whimsy, dimension, texture, and just plain visual interest to a design.What is Micro Ice Chenille and where can you use it?
- it's a fuzzy metallic
- couch in needlepoint, cross stitch, quilting, crazy quilting for surface embroidery (couch it with a Kreinik Cord or Very Fine #4 Braid, rather than stitch in and out)
- can also use it in long stitches in needlepoint if the canvas is not densely stitched (Micro Ice Chenille just doesn't like going in and out of fabric very much)
- combine it with any other fiber for cording and trims on stockings, ornaments, etc
- crochet little accessories and appliques (wreaths, flowers)
- use it in duplicate stitch in knitting (like a spider!)
To use in weaving:
- Can be used in weft, not for warp (too much stress)
- Weight/Yardage: Kreinik metallic yarns are not measured in terms of weight like wool or cotton yarns are, so measure by yard or meter. Purchase 50-meter cones; or cones of any amount by special order.
- Sett = 5 epi
- Care: Kreinik metallics don't felt, and are inelastic compared to some other types of yarns, so for best results, we recommend testing the threads with the weaving yarns you plan to use before beginning your project.
- Tips from weaver Deb Essen of DJE Handwovens: 1. Pull the thread off the cone horizontally, not from the top, to avoid adding twist to the fiber. 2. Combine with other yarns (rather than use a metallic exclusively) as an accent yarn for best results ("It makes a great, fun fabric"). 3. Test how the textures work together before making your main project: make test swatches if using stretchy yarns with the inelastic metallics, for instance, then use a warm-water wash for the wet-finishing. 4. You may want to experiment with looser sett to vary drapability. 5. Play! Have fun! "I love how the colors pop in sunlight or lamplight and shimmer as the piece is moved."
Content:
Cotton core, polyester metallic
-
Secrets of Blending Filament revealed!
Blending Filament is a one-of-a-kind thread that gives you a unique effect in your stitching. "There is nothing that can add more sparkle and pizzazz to your cross stitch than blending filament," says stitcher Bonnie Morrow. The hint of metallic adds light, interest and a 3-D effect. Is your project looking dull or flat? Blending Filament adds visual flavor without being over-the-top, just like a little spice adds flavor to your cooking.
One myth about Blending Filament is that it's difficult to use. While it may seem crazy to stitch with something akin to Christmas tree tinsel, the truth is that when you follow a few steps, it's not so hard. After all, a little time and effort IS worth the amazing results, whether you're starting a diet, crocheting an afghan, constructing a building, or adding sparkle to a stitched angel.
If you don't know how to use Blending Filament or if you get frustrated while using it, read on. Just a few tips will put the *sparkle * in your eyes.
5 Truths about Blending Filament
- It is actually two threads: the metallic part, and a thin string wound "within" the metallic that lends support. You may notice these two threads at the end of your Blending Filament, where they separate slightly. Any "frayed" ends can be hidden into your stitches as you start and stop, or clipped off once your starting point is secured. If the separation bothers you, use a product called Fray Check to seal the end.
- You CAN stitch with Blending Filament without the core string. Officially, we don't recommend it because it can make the filament prone to static and breaking. However, stitchers and designers tell us they occasionally remove the core from the flatter Hi Lustre colors and just take extra care to reduce static and breaking. So if the core REALLY bothers you, carefully separate it from the metallic and proceed with stitching.
- It is made of a different material than cotton floss. It may sound obvious, but sometimes we expect all thread types to behave the same way — and most of us hate to slow down. Blending Filament has a different consistency and thus requires more patience. You cannot stitch as quickly with it as you can cotton floss because of the slippery-ness of the metallic material. That's the nature of the unique filament. If it continuously slips off your needle while you're stitching, knot it to the needle.
- It's a delicate material, which is why some stitchers may find that it snaps or stretches. Blending Filament is a thin polyester material with slight elasticity. It is not as strong as silk. If your filament breaks or stretches while you are stitching, just adjust your tension (relax). This applies whether you are using Blending Filament for hand or machine embroidery.
- If you prefer, you can use Blending Filament by itself, rather than combined with cotton floss in one needle. Blending Filament was designed to be combined with another thread type; that is what produces the random metallic effect in a design. However, if you don't like stitching with two different threads at once, then don't. Simply stitch your area in one type first (like cotton floss), then overstitch with Blending Filament by itself. It may sound like double work, but actually this is the easiest way to control the filament, control how much highlight or shimmer you want in your design, and control exactly where you want it. This way, you're the one in control, not the thread.
10 Things you May Not Know About Blending Filament
- How do you get it started? The thread end is secured in a notch in the spool. Unwind the thread from the notch to start, and when you're done, secure the end in the notch again.
- How do you control it? Stitch slowly and use short lengths, which are easier to manage.
- Why did the designer call for it? It adds a SUBTLE metallic shimmer that makes a design more realistic or interesting. Use it in a design to replicate anything shiny in nature, or to add a HINT of whimsy, visual interest, and "bling."
- Is Balger the same as Blending Filament? "Balger" was the name Kreinik used when it started manufacturing threads in the 1970s. We've gone beyond Blending Filament with many thread types now, so we use distinct names, like Very Fine #4 Braid. Blending Filament refers to our thinnest, tinsel- or cord-like metallic threads.
- How many colors? Blending Filament comes in basic metallic, glow-in-the-dark, vintage, corded, and hi lustre colors. The hi lustre and vintage versions are flat for maximum light exposure. All together, we have over 100 Blending Filament colors available to you and designers.
- Blending Filament can be affected by humidity. Is your climate very dry? Then your filament may have more static in it as you stitch. Some stitchers recommend using a product called Thread Heaven, or a slightly damp cosmetic sponge, to "tame" flyaway filament.
- Don't try to use more than 2 strands of Blending Filament in one needle. There's just no need to. If you want a bolder metallic look, simply move up to a thicker thread, like Very Fine #4 Braid. Braid is used by itself rather than combined with another thread type in one needle.
- It's not just for cross stitch and needlepoint. Its thinness and blending qualities make it useful in tatting, crochet, knitting, crazy quilting, fly fishing, collage art, even stitching on paper.
- It's ideal for punchneedle. Use Blending Filament by itself in a 1-strand needle, or 1 strand of Blending Filament + 1 strand of cotton or silk floss in a 3-strand needle.
- Blending Filament is sold worldwide. From Australia to Alaska, South Africa to Saskatchewan and everywhere in between, Blending Filament is used by creative people everywhere. Kreinik has a US and international Store Locator listing on www.kreinik.com.

