
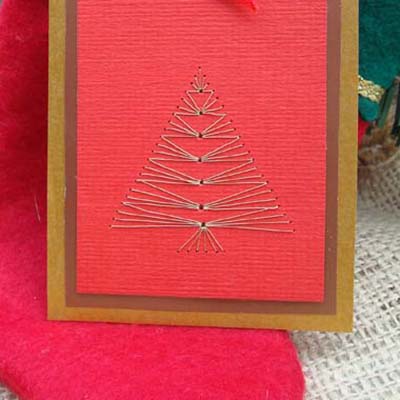


Stitched Christmas Tree Card Embroidery on cards
Designed by: Erica Fortgens
Skill level: All
Beautiful shimmering threads set against beautiful rich papers, stitched in beautifully symmetrical patterns...and as easy to do as dot-to-dot puzzles!
Embroidery on paper is grown-up fun and elegance thanks to talented designers like Erica Fortgens, who create patterns, books and stencils that show you how to easily create stunning embroidered cards, tags and other paper projects. You stitch with fine metallic threads like Kreinik Cord through pre-punched holes, making the designs as simple or as elaborate as you like.
Here, Erica shares two project ideas from one of her books so you too can make a beautiful holiday card, ornament or gift tag. These projects are a unique way to share your love of embroidery with others and make something absolutely stunning!
Materials needed:
- Cardstock to make the card, tag or ornament as desired
- Kreinik Cord in colors to match your project
- computer mouse pad, cardboard section, or Erica Punch Matt (#4050510)
- very fine and fine punch pen, needle, or Erica Punch Pens (#4050506)
- scissors
- adhesive tape
- needle slightly thinner than the punch pen you have used
Instructions:
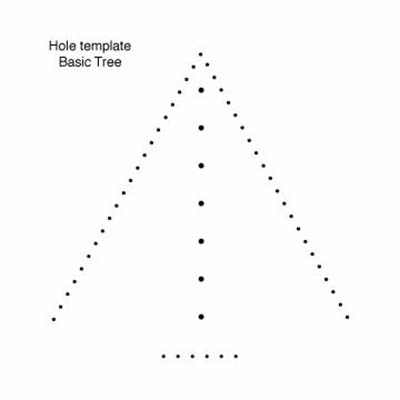
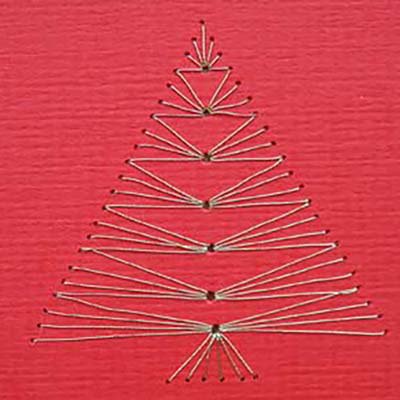
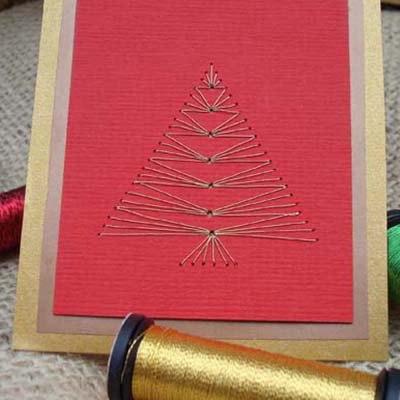
1. SET THE DESIGN: Make a copy of the design (scroll down to see templates), cut it out in a square, place it on the chosen spot on the card, fix it with two pieces of adhesive tape, and place the card with the design on the punch mat. Punch the design accurately with the very fine punch pen (or needle) for the small dots, and a fine or slightly larger needle for the larger dots-the larger dots will be holes with more than one thread going into them repeatedly. Hold the needle/punch pen straight and upright as you are punching for the cleanest hole. Hold the card against the light to see if you have punched everything. Remove the design. Now your design is punched into the card.
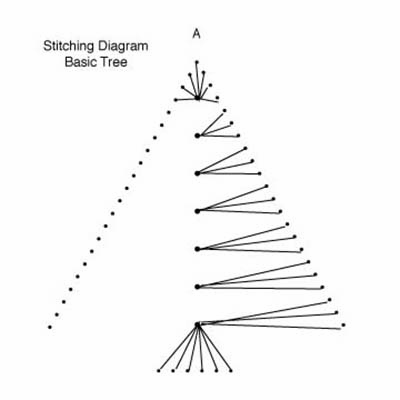
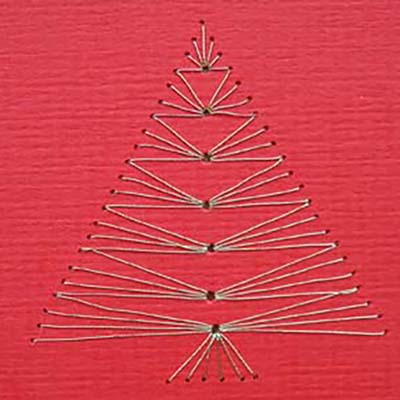
2. BEGIN EMBROIDERY: Thread your needle with Kreinik Cord. Follow the instructions for this particular shape according to the stitching diagram (see below) and the model; for example, start at A. Pull the needle through with your Kreinik Cord and leave a small amount of thread on the back as a tail. Fix this with a piece of adhesive tape. Continue stitching, following the diagram.
3. FINISHING: To hide the back of your work, cover it with a card of the same size and color. For a more elegant result, cut the edges with decorative scissors.
More information:
Like these ideas- These projects and many more can be found in these books:
Basics of Embroidery, EF 2000, ISBN: 90 384 1591 5
Extraordinary Embroidery on Paper, EF 2010, ISBN: 97 8802 1337 838
Embroidery on paper is a technique in which holes are pierced in a card following a pattern of pre-printed dots, after which threads are drawn through to create a design. To learn more and see all of Erica's tips and designs, visit www.ericafortgens.nl. Look for Erica's tool package, which contains 3 piercing tools with different sizes (Erica's item number 4050506), and piercing mat (Erica's item number 4050510); for more information, visit http://www.ecstasycrafts.com/.
Printing Instructions:
To print the instructions for this project click on the on the link above "Printable version" and then print the page using your web browser.


