
- Shop Fly Fishing
-
Shop Needlework
- Metallic Threads
- Silk Threads
- Kits & Sets
- Accessories
- Free Patterns
- How To
6 products found
Sort by:
Recommended
Shop Needlework > Free Patterns > Crochet & Knitting > Flowers
-
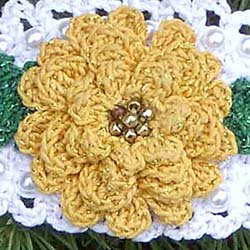
Crocheted Calendula (Marigold) Pattern
- Note: This item is not shipped
October's Flower: Calendula (Marigold)- Design by Maggie Petsch
Materials Needed:- Crochet cotton size 20: Small amounts each dark yellow (A) and dark green (B)
- Crochet cotton size 10: Small amount white (C)
- Kreinik Blending filament (50m per spool): 1 spool each #028 citron (BFA), #008 green (BFB) and #093 star mauve (BFC)
- Sizes 7 and 9 steel crochet hooks or sizes needed to obtain gauge
- Tapestry needle
- 3-inch long barrette
- 29 (1/8)-inch in diameter pearls
- 7 gold seed beads
- Sewing needle and sewing thread
- Starch
Instructions:
Click here to download the FREE instructions for this design or see written instructions below.
GAUGE:
Flower = 1-1/2 inches in diameter with smaller hook and A
Check gauge to save time.
PATTERN NOTE: Join rnds with a sl st unless otherwise stated.
PATTERN STITCH:
Beaded ch (bch): Slide bead up against hook; wrapping thread from front to back, ch 1 tightly to secure.
FLOWER:
Rnd 1 (RS): With smaller hook and one strand A and one strand BFA held tog, ch 2, 7 sc in second ch from hook, join in first sc. (7 sc)
Rnd 2: Ch 1, sc in same st as joining, ch 1, [sc in next sc, ch 1] rep around, join in first sc. (7 ch-1 sps)
Rnd 3: Sl st in first sp, [ch 2, 2 dc, ch 2, sl st] in same sp, [sl st, ch 2, 2 dc, ch 2, sl st] in each rem sp around. Do not join. (7 petals)
Rnd 4: Working behind petals of last rnd, sc in next unworked sc of Rnd 2, ch 2, [sc in next unworked sc of Rnd 2, ch 2] rep around, join in beg sc. (7 ch-2 sps)
Rnd 5: Sl st in first sp, [ch 3, 2 tr, ch 3] in same sp, [sl st, ch 3, 2 tr, ch 3, sl st] in each rem sp around. Do not join. (7 petals)
Rnd 6: Working behind petals of last rnd, sc in next unworked sc of Rnd 4, ch 3, [sc in next unworked sc of Rnd 4, ch 3] rep around, join in beg sc. (7 ch-3 sps)
Rnd 7: Sl st in first sp, [ch 3, 3 tr, ch 3] in same sp, [sl st, ch 3, 3 tr, ch 3, sl st] in each rem sp around. Do not join. (7 petals)
Rnd 8: Working behind petals of last rnd, sc in next unworked sc of Rnd 6, ch 4, [sc in next unworked sc of Rnd 6, ch 4] rep around, join in beg sc. (7 ch-4 sps)
Rnd 9: Sl st in first sp, [ch 3, 2 tr, ch 3, sl st] twice in same sp, [{sl st, ch 3, 2 tr, ch 3} twice, sl st] in each rem sp around, join in first sl st. Fasten off. (14 petals)
With sewing needle and sewing thread, sew 7 gold seed beads into center of Flower.
BACK PIECE
Rnd 1 (RS): With larger hook and one strand C and one strand BFC held tog, ch 25, 2 sc in second ch from hook, *sc in next ch, hdc in each of next 2 chs, dc in each of next 2 chs, tr in each of next 12 chs, dc in each of next 2 chs, hdc in each of next 2 chs, sc in next ch*, 3 sc in last ch; working in rem lps across opposite side of foundation ch, rep from * to *, sc in same ch as first sc, join in first sc.(50 sts)
Rnd 2: Ch 1, 2 sc in same st as joining, sc in each of next 24 sts, 3 sc in next st, sc in each rem st around, ending with sc in same st as first sc, join in first sc. Fasten off. (54 sc)
String 29 pearls onto one strand C only.
Rnd 3: With RS facing, attach one strand C only with a sl st in last sc of last rnd, ch 1, (sc, bch, sc) in same st, [bch, sk next sc, sc in next sc] 13 times, [bch, sc in next sc] twice, [bch, sk next sc, sc in next sc] 12 times, bch, join in first sc.
Rnd 4: With one strand C and one strand BFC held tog, ch 1, sc in same st as joining, ch 4, [sc in next sc, ch 4] rep around, join in first sc. Fasten off.
LEAF (make 2)
Rnd 1: With smaller hook and one strand B and one strand BFB held tog, ch 8, [sc, p, 2 sc, p] in second ch from hook, *dc in each of next 2 chs, p, tr in next ch, dc in next ch, p, dc in next ch*, (sc, p, 2 sc, p) in last ch; working in rem lps across opposite side of foundation ch, rep from * to *, join in beg sc. Fasten off.
FINISHING (as a barrette):
With sewing needle and green sewing thread, using photo as a guide, sew leaves to Back Piece. With sewing needle and yellow sewing thread, sew flower to center of Back Piece over inner ends of leaves.
With paper towel or small sponge, apply starch to Flower, Leaves, and Back Piece. Let dry thoroughly.
With sewing needle and white sewing thread, sew Back Piece to top of barrette.
- Note: This item is not shipped

Shop Needlework > How To > Metallic Thread
-
Secrets of Blending Filament revealed!
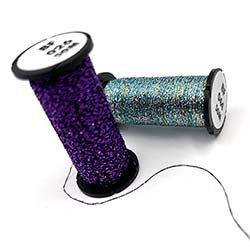
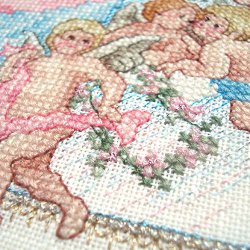
Blending Filament is a one-of-a-kind thread that gives you a unique effect in your stitching. "There is nothing that can add more sparkle and pizzazz to your cross stitch than blending filament," says stitcher Bonnie Morrow. The hint of metallic adds light, interest and a 3-D effect. Is your project looking dull or flat? Blending Filament adds visual flavor without being over-the-top, just like a little spice adds flavor to your cooking.
One myth about Blending Filament is that it's difficult to use. While it may seem crazy to stitch with something akin to Christmas tree tinsel, the truth is that when you follow a few steps, it's not so hard. After all, a little time and effort IS worth the amazing results, whether you're starting a diet, crocheting an afghan, constructing a building, or adding sparkle to a stitched angel.
If you don't know how to use Blending Filament or if you get frustrated while using it, read on. Just a few tips will put the *sparkle * in your eyes.
5 Truths about Blending Filament
- It is actually two threads: the metallic part, and a thin string wound "within" the metallic that lends support. You may notice these two threads at the end of your Blending Filament, where they separate slightly. Any "frayed" ends can be hidden into your stitches as you start and stop, or clipped off once your starting point is secured. If the separation bothers you, use a product called Fray Check to seal the end.
- You CAN stitch with Blending Filament without the core string. Officially, we don't recommend it because it can make the filament prone to static and breaking. However, stitchers and designers tell us they occasionally remove the core from the flatter Hi Lustre colors and just take extra care to reduce static and breaking. So if the core REALLY bothers you, carefully separate it from the metallic and proceed with stitching.
- It is made of a different material than cotton floss. It may sound obvious, but sometimes we expect all thread types to behave the same way — and most of us hate to slow down. Blending Filament has a different consistency and thus requires more patience. You cannot stitch as quickly with it as you can cotton floss because of the slippery-ness of the metallic material. That's the nature of the unique filament. If it continuously slips off your needle while you're stitching, knot it to the needle.
- It's a delicate material, which is why some stitchers may find that it snaps or stretches. Blending Filament is a thin polyester material with slight elasticity. It is not as strong as silk. If your filament breaks or stretches while you are stitching, just adjust your tension (relax). This applies whether you are using Blending Filament for hand or machine embroidery.
- If you prefer, you can use Blending Filament by itself, rather than combined with cotton floss in one needle. Blending Filament was designed to be combined with another thread type; that is what produces the random metallic effect in a design. However, if you don't like stitching with two different threads at once, then don't. Simply stitch your area in one type first (like cotton floss), then overstitch with Blending Filament by itself. It may sound like double work, but actually this is the easiest way to control the filament, control how much highlight or shimmer you want in your design, and control exactly where you want it. This way, you're the one in control, not the thread.
10 Things you May Not Know About Blending Filament
- How do you get it started? The thread end is secured in a notch in the spool. Unwind the thread from the notch to start, and when you're done, secure the end in the notch again.
- How do you control it? Stitch slowly and use short lengths, which are easier to manage.
- Why did the designer call for it? It adds a SUBTLE metallic shimmer that makes a design more realistic or interesting. Use it in a design to replicate anything shiny in nature, or to add a HINT of whimsy, visual interest, and "bling."
- Is Balger the same as Blending Filament? "Balger" was the name Kreinik used when it started manufacturing threads in the 1970s. We've gone beyond Blending Filament with many thread types now, so we use distinct names, like Very Fine #4 Braid. Blending Filament refers to our thinnest, tinsel- or cord-like metallic threads.
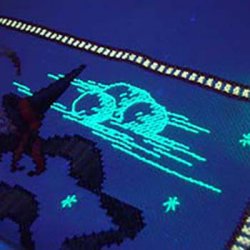
- How many colors? Blending Filament comes in basic metallic, glow-in-the-dark, vintage, corded, and hi lustre colors. The hi lustre and vintage versions are flat for maximum light exposure. All together, we have over 100 Blending Filament colors available to you and designers.
- Blending Filament can be affected by humidity. Is your climate very dry? Then your filament may have more static in it as you stitch. Some stitchers recommend using a product called Thread Heaven, or a slightly damp cosmetic sponge, to "tame" flyaway filament.
- Don't try to use more than 2 strands of Blending Filament in one needle. There's just no need to. If you want a bolder metallic look, simply move up to a thicker thread, like Very Fine #4 Braid. Braid is used by itself rather than combined with another thread type in one needle.
- It's not just for cross stitch and needlepoint. Its thinness and blending qualities make it useful in tatting, crochet, knitting, crazy quilting, fly fishing, collage art, even stitching on paper.
- It's ideal for punchneedle. Use Blending Filament by itself in a 1-strand needle, or 1 strand of Blending Filament + 1 strand of cotton or silk floss in a 3-strand needle.
- Blending Filament is sold worldwide. From Australia to Alaska, South Africa to Saskatchewan and everywhere in between, Blending Filament is used by creative people everywhere. Kreinik has a US and international Store Locator listing on www.kreinik.com.
-
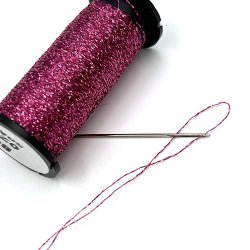
Blending Filament Threading Technique
Since this is a thin, tinsel-like thread, knot Blending Filament onto your needle for greater control, whether you are using Blending Filament alone or combined with another thread type in one needle. Note: This technique can also be used with Kreinik Cable, Cord, Ombre & Japan Thread #1.First, cut the required length of Blending Filament and fold about 2 inches (5 cm) from one end.Insert the loop through the eye of the needle and pull the loop over the needle's point.
Tighten the loop at the end of the eye to secure the thread to the needle.
Gently stroke the knotted thread once to 'lock' in place.
Note: when using two strands of Blending Filament, cut double your required length, fold in half, and pass the center (loop) through the eye of the needle and over its point.
-
Glissen Gloss Rainbow Thread TO Kreinik Blending Filament Conversion Chart
Rainbow Blending thread color = Kreinik Blending Filament color- 000 Bright White = 100 White
- 001 Multi White = 042 Confetti Fuchsia
- 002 White Flame = 041 Confetti Pink
- 003 Iridescent White Flame = 032 Pearl
- 004 Pink flame = 041 Confetti Pink
- 107 Royal Blue = 033 Royal blue
- 108 Blue Green = 029 Turquoise
- 109 Midnight Blue = 051HL Sapphire Hi Lustre
- 111 Pale Blue = 014 Sky blue
- 115 Iridescent Pale Blue = 094 Star Blue
- 116 Iridescent Blue = 006 Blue
- 200 Dark Teal Green = 009 Emerald
- 201 Teal blue = 029 Turquoise
- 202 Light Teal Green = 029 Turquoise
- 204 Seafoam Green = 008 Green
- 302 Green = 008 Green
- 306 Emerald Green = 009 Emerald
- 308 Lime Green = 015HL Chartreuse Hi Lustre
- 309 Olive Green = 015HL Chartreuse Hi Lustre
- 400 Soft gold = 013 Beige
- 403 Iridescent Pale Yellow = 091 Star yellow
- 407 Brass = 202HL Aztec Gold Hi Lustre
- 605 Brick Red = 061 Ruby
- 609 Iridescent Pale Pink = 092 Star Pink
- 610 Blue Red = 061 Ruby
- 611 Iridescent Pink = 092 Star Pink
- 612 Pink = 007HL Pink Hi Lustre
- 615 Azalea = 024 Fuchsia
- 617 Red = 003HL Red Hi Lustre
- 618 Purple Red = 024HL Fuchsia Hi Lustre
- 620 Grey Pink = 093 Star Mauve
- 630 Iridescent Salmon = 007 Pink
- 640 Iridescent Apricot = 027 Orange
- 700 Iridescent Violet = 012HL Purple Hi Lustre
- 701 Violet = 026 Amethyst
- 703 Lavender = 023 Lilac
- 705 Iridescent purple = 006HL Blue Hi Lustre
- 710 Double Violet = 026 Amethyst
- 808 Copper = 021 Copper
- 810 Orange = 027 Orange
- 811 Pumpkin = 021HL Copper Hi Lustre
- 812 Dark Brown = 022 Brown
- 900 Multi Black = 034 Confetti
- 901 Silver = 001HL Silver Hi Lustre
- 902 Black = 005HL Black Hi Lustre
- 903 Charcoal = 010HL Steel Grey
- 904 Black Flame = 034 Confetti
- 905 Gunmetal Grey = 019 Pewter
- 906 Black Silver gold = 010HL Steel Grey
- 907 Black Gold = 205C Antique Gold Cord
- 908 Black Copper = 215C Antique Copper Cord
- 910 White Confetti = 095 Starburst
-
How to use Blending Filament
Applications:
Blackwork, crewel, crochet, cross stitch/counted thread, doll making (by hand and machine), fly fishing, hardanger, knitting (by hand), lace making, machine embroidery/bobbin work, machine embroidery/in the needle, miniatures, needlepoint/canvas work, punch embroidery, silk gauze/Polysil embroidery, smocking, stumpwork, weaving, and many more.
Hand Embroidery:
The thin quality of Blending Filament allows you to create elements of subtle light reflection. It is often combined with cotton, wool or another thread type, in the same needle, to create a random metallic sparkle. The addition of one or two strands does not add weight to your thread, so you can use the needle size that accommodates the stranded cotton. Vary the amount of highlight or shimmer you want to add to a design by using one or more strands; use a single strand for the most subtlety or two strands for added effect.
Overstitching & Texture:There's more to Blending Filament than just 'blending,' however. You can also use Blending Filament by itself to overstitch, bringing a reflective highlight or glow to a particular spot. Also, use a single strand of Blending Filament by itself in half-cross stitches for backgrounds on fabric; it creates a slight texture and subtle shimmer.
Tips on using Kreinik Blending Filament in hand work:
- Use short lengths of thread — about 45cm (18 inches) or less — to avoid excessive abrasion when pulling the thread through the ground fabric or canvas. The more a strand is pulled through fabric or canvas, the more 'wear' it causes on the thread. Using shorter lengths will maintain the quality of the thread, plus reduce tangling as shorter lengths are easier to control (less knotting!). If you are stitching on fabric, use a needle large enough to 'open' the hole in the fabric sufficiently and allow the thread(s) to go through more easily; this reduces friction and fraying.
- If combining Blending Filament with another thread type in a needle, you may wish to moisten the filament together with the other thread with a slightly damp, soft cosmetic sponge. This can help to control both thread types as they work together in your needle.
- Stitch slowly with Blending Filament to achieve more control and uniformity in stitching.
- Let your needle hang frequently to let the thread untwist and thus reduce knotting.
- If using Hi Lustre Blending Filament, lay the filament flat and smooth as you stitch to allow maximum light reflection. Think of it as a tiny ribbon; using a laying tool can help prevent twisting, or simply use your finger to lay the thread.
Machine Embroidery:
Blending Filament creates three-dimensional effects whether used in the needle or the bobbin of a sewing machine with specific embroidery patterns or free-motion techniques. It is ideal for art quilts and wearable art. Blending Filament also creates delicate reflective highlights in programmed patterns on embroidery machines. Kreinik offers an extensive color range to match fabric or mood.
Tips on using Kreinik Blending Filament with a sewing machine or serger:- When using Blending Filament in the needle, try a Metalfil or Metallica needle. You will need to loosen the top tension and adjust the bottom tension; practice until you get a combination that works with your machine, stitches, and fabric choice.
- When using Blending Filament in the bobbin for needle lace or other effects, experiment with different tension settings until you find a combination that achieves the look you want on your fabric. A 50m reel of Blending Filament fills a bobbin nicely.
- You can also combine Blending Filament with other threads or use it alone in a serger. Estimate 10 times the length to be sewn for thread yardage when using without mixing with other threads.
Care:
Kreinik Blending Filament is hand or machine washable and dry cleanable. Cool water is recommended. Do not use bleach. It can also be tumble-dried on low setting. When ironing a finished piece containing Blending Filament, do not iron directly on the thread; use a cloth, and do not use steam.


Shop Needlework > Metallic Threads > Blending Filament
-
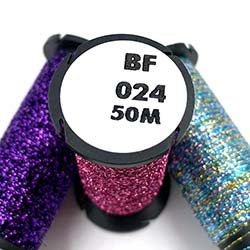
Blending Filament
This is the thinnest metallic (similar to tinsel on a Christmas tree) offering the most subtle effect. Use Filament by itself or combined with other threads and yarns for a random highlighting effect. Available in basic colors plus glow-in-the-dark (F), hi lustre (HL), vintage or antiqued (V), and holographic (L).
