
- Shop Fly Fishing
-
Shop Needlework
- Metallic Threads
- Silk Threads
- Kits & Sets
- Accessories
- Free Patterns
- How To
30 products found
Sort by:
Recommended
Shop Needlework > Accessories > Custom Corder
-
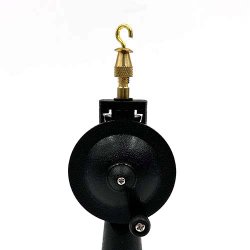
Kreinik Custom Corder
Make customized cording, piping, straps, and trim to decorate pillows, table runners, candles and more. Cord jewelry items, friendship bracelets, ropes to applique onto designs...the sky is the limit. Use any fibers, yarns, or strips of material. Combine your favorite colors, team colors, school colors, or colors to coordinate with a project.
-
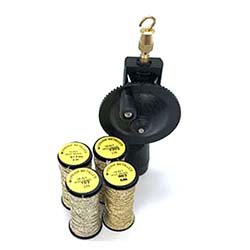
Custom Corder Gold Set
Get started making gorgeous trims, cords, and jewelry with the hand-held Kreinik Custom Corder and four gold metallic threads.
-
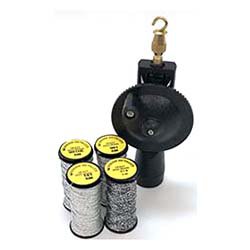
Custom Corder Silver Set
Get started making gorgeous trims, cords, and jewelry with the Kreinik Custom Corder and silver metallic threads.


Shop Needlework > Accessories > Treasure Tape
-
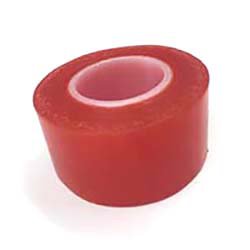
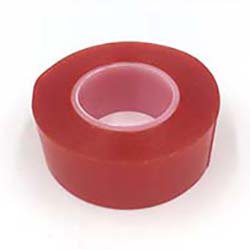
1" Treasure Tape roll
Package contains one roll of 1-inch-wide double-sided, heavy-duty, archive-quality (acid-free) tape. Use for crafting (embellish anything) and finishing (attach needlepoint and cross stitch to objects). The tape is clear; the red is just the protective liner.
-
3/4" Treasure Tape roll
Package contains one roll of 3/4-inch-wide double-sided, heavy-duty, archive-quality (acid-free) tape. Use for crafting (embellish anything) and finishing (attach needlepoint and cross stitch to objects). The tape is clear; the red is just the protective liner.
-
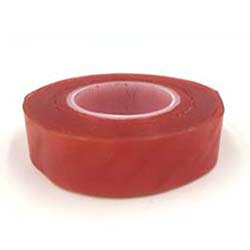
1/2" Treasure Tape roll
Package contains one roll of 1/2-inch-wide double-sided, heavy-duty, archive-quality (acid-free) tape. Use for crafting (embellish anything) and finishing (attach needlepoint and cross stitch to objects). The tape is clear; the red is just the protective liner.
-
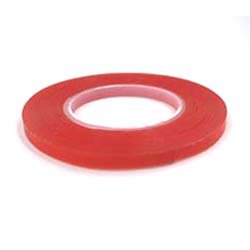
1/8" Treasure Tape roll
Package contains one roll of 1/8-inch-wide double-sided, heavy-duty, archive-quality (acid-free) tape. Use for crafting (embellish anything) and finishing (attach needlepoint and cross stitch to objects). The tape is clear; the red is just the protective liner.


Shop Needlework > Free Patterns > Cosplay & Costumes
-
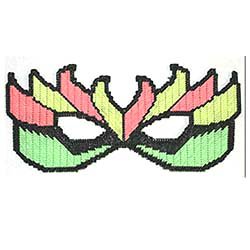
Martian Mask
NOTE: This item is not shipped. Click the link below to download the PDF.
Design by Carole Rogers
Stitch a Halloween mask using Kreinik glow-in-the-dark threads on plastic canvas.
Materials needed:
- Kreinik Medium (#16) Braid - 051F Tangerine, 053F Lime, 005 Black
- 14 ct plastic canvas
- 12" black chenille stem
- 1 1/2 yds elastic
- #22 tapestry needle
- thick tacky glue
Instructions:
Click here to download the instructions for this design.
You will need the Adobe Reader to view and print this file. -
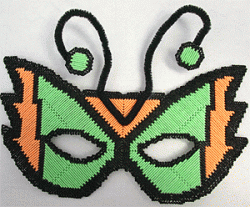
Neon Flames Mask
NOTE: This item is not shipped.
Stitch a plastic canvas mask using Kreinik glow-in-the-dark threads.
Design by Carole Rogers
Materials needed:
- Kreinik Medium (#16) Braid - 055F Watermelon, 054F Lemon-Lime, 053F Lime,005 Black
- 14 ct plastic canvas
- 1 1/2 yds elastic
- #22 tapestry needle
- thick tacky glue
Instructions:
Click here to download the instructions for this design. You will need the Adobe Reader to view and print this file.
-
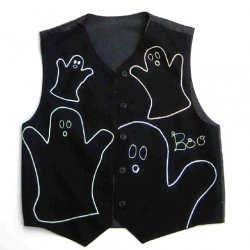
Glow-in-the-Dark Boo Vest
Decorate a purchased vest with Kreinik iron-on threads for a quick, no-sew costume.
NOTE: This item is not shipped.
Materials needed:
• purchased black vest (look for one at your local Goodwill, costume, or consignment shop)
• Kreinik Iron-on Ribbon in 6700 Cantaloupe, 6710 Coconut, 6720 Honeydew(they all glow in the dark)
• Kreinik Iron-on Medium #16 Braid in 6700 Cantaloupe, 6710 Coconut, 6720 Honeydew
• Mini iron or household iron
• Press Cloth
• fabric marking pen or pencil (one that washes off or disappears)
• ghost template*
* use a ghost pattern from a coloring book, a child’s drawing, or your own pattern. Photocopy it in a variety of sizes.
Instructions:
1. Turn your iron onto the highest heat setting and let it heat thoroughly.
2. Cut out your ghost pattern templates and lay in desired pattern on your vest. Trace each pattern with your fabric marking pen.
3. Outline each ghost pattern on your vest with Iron-on Ribbon: Place your ribbon at a starting point, cover with the Press Cloth, and press with your hot iron for several seconds until the thread adheres. Continue, working in sections.
4. Make the eyes and mouth with Iron-on Braid, always covering with the press cloth before ironing to keep the adhesive in the thread from sticking to your iron.
5. Write “Boo” freehand with your fabric marker. Trace over this word with Iron-on Braid.
6. For maximum wearability, tack down the iron-on thread with tiny stitches using a clear monofilament thread.© Copyright Kreinik. May be reproduced but not sold.
-
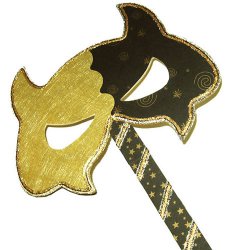
Gold Mask
NOTE: This item is not shipped.
Use this technique to make a fun Mardis Gras or Halloween mask. Pick colors that match your outfit or coordinate with your party theme.
Materials:
- Wooden Mask (purchased from a craft store like Michaels, Hobby Lobby or JoAnns)
- Gold Paper (from papercraft section of a craft store)
- Gold Star & Swirl Papers (from papercraft section of a craft store)
- Kreinik 1/8" Ribbon in 002V Vintage Gold
- Kreinik Tapestry #12 Braid in 5001 Brass Key
- 1/4" Treasure Tape
- Diamond Beadlets
- Glue stick, x-acto knife, pencil, scissors
Instructions:
1. Trace your mask onto the back of your papers, one half of the mask on each paper. Cut them out, trimming any excess. (You can also hold the mask in place and cut out your shapes with an x-acto knife, to get a closer fit.) Make a decorative edge on the overlapping paper (use your favorite paper-edgers or just cut in a wavy or scalloped line). Glue both pieces to your mask. Allow glue to dry.
2. Using your 1/4" tape, wrap around the edge of the mask, so that the tape is level with the bottom and overhangs on the top of the mask. Make small cuts in the tape along curves in the edges of the mask. Fold the overhang down onto the mask. Next, apply tape at an angle along your mask's handle.
3. Peel back the red liner along a portion of your tape. Begin edging the mask with your gold ribbon. Continue around the entire mask. Next, apply the ribbon along the other edge of the tape, all the way around. Finish by adding a stripe of color 5001 braid between the two lines of ribbon. To embellish your handle, remove the red liner and wrap your tape with threads.
4. When finished embellishing, place your mask in a shallow tray or ziplock bag and pour Diamond Beadlets over the exposed tape. Swirl with your fingers to cover fully and tap to remove excess beadlets.
-
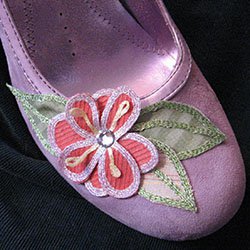
Decorated Dance or Stage Shoes
NOTE: This item is not shipped.
Iron-on threads and hot-fix sequins decorate any shoes with metallic thread. Use this technique for a Bohemian look or any costume that you need to make in a hurry.
Materials:
- 1 pair of plain shoes
- Fabric: 2 green prints for leaves, 1 color for flower
- Iron-on or glue-on flat-backed Crystals in Clear (from a craft store)
- Kreinik Iron-On #16 Braid 6200 light yellow
- Kreinik Iron-On 1/8" Ribbon in 6500 lavender and 6300 green
- Fusible Webbing or Treasure Tape
- Tools: Iron, teflon press cloth, scissors, fabric pencil
Instructions:
Note: if your iron isn't Teflon coated, you will want to either use a press cloth between the thread and your iron, or adhere one of our Adhesive Press Cloths to your iron (apply while cool). This will keep the adhesive in the thread from sticking to your iron.
1. Turn on your iron to it's highest setting and allow it to heat up. Cut out your fabric pieces: three leaf shapes and two simple daisy shapes (4 petals each).
2.Use your Iron-On Ribbon to edge each of your fabric pieces: lay the thread at a starting point, cover with the Teflon press cloth, and press with your hot iron for several seconds until the thread adheres. Use the 6300 Meadow Green 1/8" Ribbon around the edges of each leaf shape and add one stripe of thread down their centers. Use the 6500 Hydrangea 1/8" Ribbon around the edges of your flower shapes.
3. To create the yellow stamen detail on your flower, use a piece of scrap fabric. Iron down the very end of your 6200 Daffodil #16 Braid. Fold the thread end into a closed loop and iron in place. Gently pull off the fabric while still warm. Cut the end leaving a 1" tail. Make 4 of these.
4. Begin assembling your flower. Iron 4 stamen pieces onto your top flower shape, leaving the curled ends loose. Iron your crystal onto the center of the flower. (Place the crystal on your design and cover with your presscloth. Press with the iron to heat the crystals until they fuse with your fabric.)
5. Cut your fusible webbing or Treasure tape to the size of your leaves and flower pieces. Apply to the back of your fabric. Attach your two flower pieces together, so that the bottom petals show between the top petals. Decide how you want to arrange your leaves and flower, then iron them onto your shoe.
Repeat these instructions for your second shoe and get ready to step out in style!


