
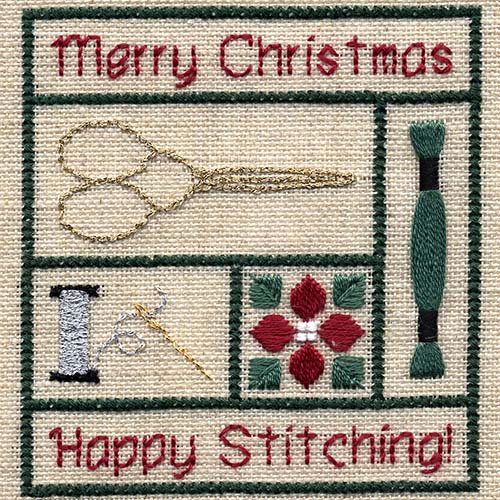


Happy Stitching Ornament
Note: This item is not shipped; the pattern is a PDF you download onto your computer or device
Designed by Betsy Foster
Skill Level: Advanced
Design size: 48w x 51h, or about 3 1/2 x 3 1/2 inches
when stitched over two on 28-count linen
Get started on making a keepsake Christmas ornament for yourself or a stitching friend with this charming design. It would make a fun guild or stitching group project for the holidays, too.
Materials needed:
- 28-count Lambswool Linen
- DMC embroidery floss in colors 500, 310, Blanc, 816, 501
- Kreinik #8 Braid 002 gold
- Kreinik 1/16" Ribbon 001 Silver
- Kreinik #4 Braid 001 Silver
- Kreinik Japan #5 002J Gold
- #24 Tapestry needle and scissors
Instructions:
This design is stitched over two threads on the 28-count linen. So each square on the chart equals two fabric threads.
- 1. Cross stitch the border using two strands of DMC 500. Make sure you count carefully and follow the main graph.
- 2. Backstitch the scissors with #8 Braid 002 Gold.
- 3. Backstitch the words "Happy Stitching" with 2 strands of DMC 816.
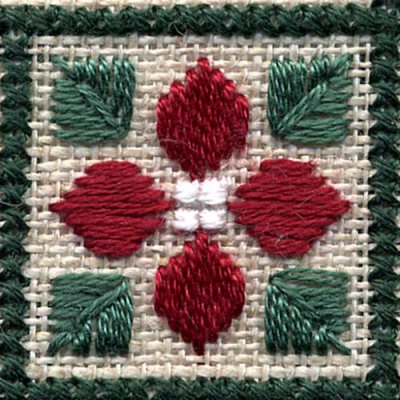
- 4. Create the flower center with DMC Blanc in Smyrna Crosses (1 strand). Stitch four small Smyrna Crosses where each star symbol is found on the chart.
- 5. Satin stitch the flower with two strands of DMC 816. Satin Stitch the leaves with 2 strands of DMC 501.
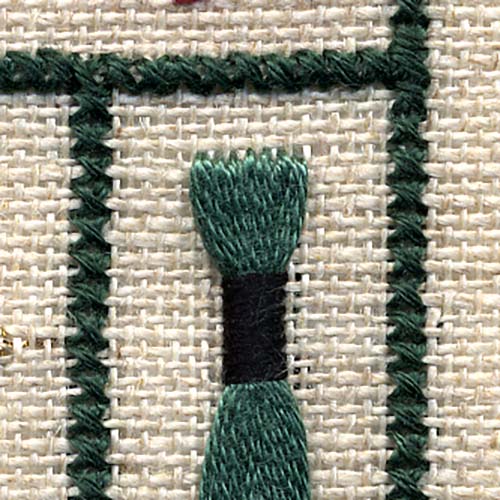
- 6. Here's how to create the skein: use six strands of DMC 501. Separate them and then put them together again. Follow the graph and make 7 long vertical Satin Stitches. Use 2 strands of DMC 310 to "wrap" the skein. the graph shows the fabric threads that the "wrap" will go around, couching the vertical threads. You will need to push the vertical threads to the side on the front and back as you stitch.
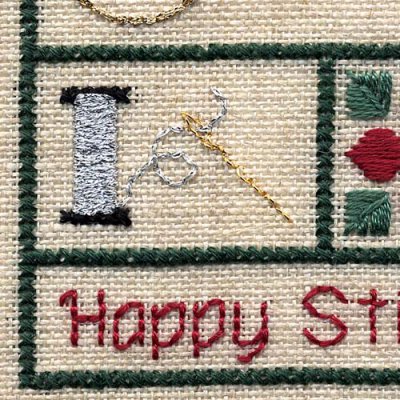
- 7. Cross stitch the spool outline with two strands of DMC 310. Then satin stitch, horizontally, the thread on the spool with 1/16" Ribbon 001, laying the ribbon flat as you stitch.
- 8. Then backstitch the needle with Japan Thread #5 in Gold, and backstitch the thread with #4 Braid 001.
To finish as an ornament:
- 1. Cut two pieces of cardboard the same size as your design.
- 2. Glue quilt batting to this cardboard, then wrap your stitched design around the front of your padded cardboard.
- 3. Using sewing thread, lace the edges of your fabric together, pulling taut so that the front of the design is straight and flat.
- 4. Cover the back with another piece of cardboard that you have covered with colorful fabric. (Colorful fabric should become the back of your ornament.)
- 5. Using the Kreinik Custom Corder, make decorative cording using leftover thread from the design. Glue or sew the cording around your ornament, leaving a loop at the top for an ornament hanger.
Printing Instructions:
Click here to download the FREE instructions for this design. You will need the Adobe Reader to view and print this file.


