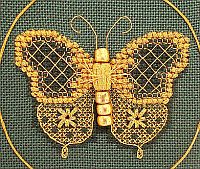
Golden Butterfly
Designed by: Janelle Giese
Design size: about 3" round
Stitch count: 42w x 42h
Materials needed:
-
28-count dark green fabric, about 9" x 9"
-
four glass pebble beads, or similar
-
Kreinik Japan #1 002J Japan Gold
-
Kreinik Japan #5 002J Japan Gold
- Kreinik 1/16" Ribbon 002J Japan Gold
-
DMC embroidery floss color 500 Very Dark Blue Green
Instructions:
Each square on the chart equals two fabric threads.
Step One
Backstitch wing outline using one strand of Japan #1 002J. Backstitches
spanning 2 x 4 fabric threads were worked in two 1 x 2 thread increments
to create uniform stitches. (This will be important when later working
Whipped Backstitch around lower wing areas.)
Step Two
With one strand DMC 500, work cross stitches of background and shadow areas.
Step Three
Form metallic cross stitches using one strand of each fiber as listed on
key. Work the lower wing portions first, and then the upper portions.
On the upper portions, ribbon cross stitches and perimeter 3/4 stitches,
will conceal the fine cord backstitches of the wing outline.
Step Four
Using one strand of Japan #5 002J, backstitch around inner motif of upper wing portions.
Step Five
Algerian Eye Stitch and Jacobean Couching are worked over the completed
cross stitches we have made as background areas in Step 2.
- With one strand of 1/16" Ribbon, work Algerian Eyelets (up at 1, down at center, up at 2, down at center, etc).
- Using one strand of Japan #5 for laid thread, and one strand of Japan
#1 for anchoring thread, work Jacobean Couching stitch as follows. For
this project, laid threads are long, straight stitches placed across the
top of completed cross stitches. Come up at 1, down at 2, up at 3, down
at 4, etc. Work all threads facing one angle, then cross back with all
threads of the opposite angle. Anchoring threads hold laid threads in
place. Referring to dots indicated on chart: bring Japan #1 up at point,
over intersection of laid threads, and back down at same point.
Continue until all marked intersections are secure.
Step Six
Couch Japan #5 to stitch antennae to fabric, using one strand of Japan
#5 for laid thread, and one strand of Japan #1 for anchoring thread.
Bring laid thread up at right and hold with left thumb while working.
Bring anchoring thread up at 1, down at 2, up at 3 etc. Repeat until all
laid thread is anchored. Secure ends to back.
Step Seven
Complete outline of lower wing portions using Whipped Backstitch. Bring
one strand of Japan #5 up at point where wing sections meet at outside
edge. Working in direction of arrow, wrap thread around backstitches
without entering fabric as illustrated, following outline around and
stopping at body.
Step Eight
To make body, cut about a 12" length of 1/16" Ribbon and thread onto a
small tapestry needle. Place two pebble beads end-to-end and draw ribbon
through center of bead pair, leaving about a 2" tail. Wrap beads with
ribbon by going out around and up through center, placing each wrap
side-by-side. Do not allow fiber to twist or overlap. Continue wrapping
until cylinder is covered. Allow ribbon tails to remain at each end; do
not trim.
- Complete body assembly by threading four plain beads onto ribbon
tails; placing one above the cylinder for the head, and three below for
the lower body.
Step Nine
To attach body to design fabric, draw ribbon tails into fabric at points
indicated on chart. Secure tails through back of stitching and cut off
excess.
- Continue securing to fabric by tacking between head/body, and the
three lower body joints using one strand of Japan #1 to come up through
fabric, loop over ribbon, and draw back down into fabric.
- The last step in attaching the body to the design fabric is an
over-the-top style embellishment. it is very simple to do and adds great
dimension. Straight stitches are worked using one strand of Japan #5 as
shown in diagram, and enter/exit the cylinder between the beads and top
layer of ribbon. Straight stitches of the model crossed under a span of
three ribbon widths.
Step Ten
Border is couched to design fabric using the same couching method as
described in Step Six. One strand of Japan #1 is used as the anchoring
thread. However, four strands of Japan #5 are used here as the laid
threads.
- Begin by bringing one strand of thread up at each point indicated at
lower center border on chart. Lay all threads together and anchor to
fabric, following circle. To end, draw one thread back down through each
of the same points where the thread begins. Complete anchoring, and
then end threads by wrapping them into back of stitching.
Finishing
Frame, or insert into a premade jar lid.
Printing Instructions:
Click here to download the FREE instructions for this design.
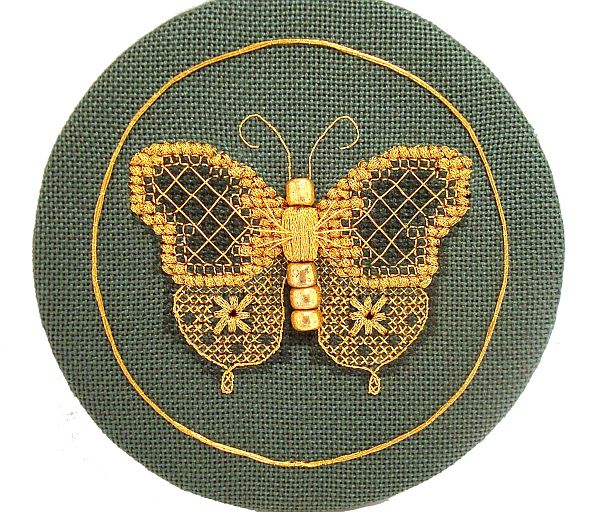
 You will need the FREE program Adobe Reader to view and print this file. If you have trouble downloading this file and would like us to send you a printed copy send a #10 SASE to: Golden Butterfly, P.O. Box 1258, Parkersburg, WV 26102.
© Copyright Kreinik. Consumer Info: 1-800-537-2166 or www.kreinik.com |