
- Shop Fly Fishing
-
Shop Needlework
- Metallic Threads
- Silk Threads
- Kits & Sets
- Accessories
- Free Patterns
- How To
6 products found
Sort by:
Recommended
Shop Needlework > Free Patterns > Cosplay & Costumes
-
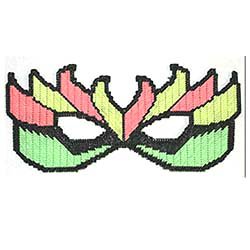
Neon Flames Mask
NOTE: This item is not shipped.
Stitch a plastic canvas mask using Kreinik glow-in-the-dark threads.
Design by Carole Rogers
Materials needed:
- Kreinik Medium (#16) Braid - 055F Watermelon, 054F Lemon-Lime, 053F Lime,005 Black
- 14 ct plastic canvas
- 1 1/2 yds elastic
- #22 tapestry needle
- thick tacky glue
Instructions:
Click here to download the instructions for this design. You will need the Adobe Reader to view and print this file.
-
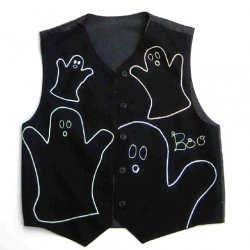
Glow-in-the-Dark Boo Vest
Decorate a purchased vest with Kreinik iron-on threads for a quick, no-sew costume.
NOTE: This item is not shipped.
Materials needed:
• purchased black vest (look for one at your local Goodwill, costume, or consignment shop)
• Kreinik Iron-on Ribbon in 6700 Cantaloupe, 6710 Coconut, 6720 Honeydew(they all glow in the dark)
• Kreinik Iron-on Medium #16 Braid in 6700 Cantaloupe, 6710 Coconut, 6720 Honeydew
• Mini iron or household iron
• Press Cloth
• fabric marking pen or pencil (one that washes off or disappears)
• ghost template*
* use a ghost pattern from a coloring book, a child’s drawing, or your own pattern. Photocopy it in a variety of sizes.
Instructions:
1. Turn your iron onto the highest heat setting and let it heat thoroughly.
2. Cut out your ghost pattern templates and lay in desired pattern on your vest. Trace each pattern with your fabric marking pen.
3. Outline each ghost pattern on your vest with Iron-on Ribbon: Place your ribbon at a starting point, cover with the Press Cloth, and press with your hot iron for several seconds until the thread adheres. Continue, working in sections.
4. Make the eyes and mouth with Iron-on Braid, always covering with the press cloth before ironing to keep the adhesive in the thread from sticking to your iron.
5. Write “Boo” freehand with your fabric marker. Trace over this word with Iron-on Braid.
6. For maximum wearability, tack down the iron-on thread with tiny stitches using a clear monofilament thread.© Copyright Kreinik. May be reproduced but not sold.
-
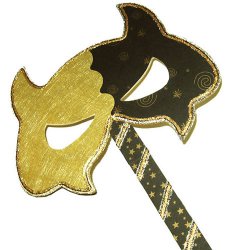
Gold Mask
NOTE: This item is not shipped.
Use this technique to make a fun Mardis Gras or Halloween mask. Pick colors that match your outfit or coordinate with your party theme.
Materials:
- Wooden Mask (purchased from a craft store like Michaels, Hobby Lobby or JoAnns)
- Gold Paper (from papercraft section of a craft store)
- Gold Star & Swirl Papers (from papercraft section of a craft store)
- Kreinik 1/8" Ribbon in 002V Vintage Gold
- Kreinik Tapestry #12 Braid in 5001 Brass Key
- 1/4" Treasure Tape
- Diamond Beadlets
- Glue stick, x-acto knife, pencil, scissors
Instructions:
1. Trace your mask onto the back of your papers, one half of the mask on each paper. Cut them out, trimming any excess. (You can also hold the mask in place and cut out your shapes with an x-acto knife, to get a closer fit.) Make a decorative edge on the overlapping paper (use your favorite paper-edgers or just cut in a wavy or scalloped line). Glue both pieces to your mask. Allow glue to dry.
2. Using your 1/4" tape, wrap around the edge of the mask, so that the tape is level with the bottom and overhangs on the top of the mask. Make small cuts in the tape along curves in the edges of the mask. Fold the overhang down onto the mask. Next, apply tape at an angle along your mask's handle.
3. Peel back the red liner along a portion of your tape. Begin edging the mask with your gold ribbon. Continue around the entire mask. Next, apply the ribbon along the other edge of the tape, all the way around. Finish by adding a stripe of color 5001 braid between the two lines of ribbon. To embellish your handle, remove the red liner and wrap your tape with threads.
4. When finished embellishing, place your mask in a shallow tray or ziplock bag and pour Diamond Beadlets over the exposed tape. Swirl with your fingers to cover fully and tap to remove excess beadlets.
-
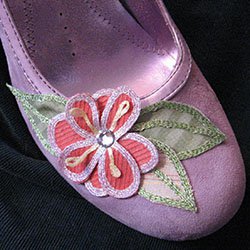
Decorated Dance or Stage Shoes
NOTE: This item is not shipped.
Iron-on threads and hot-fix sequins decorate any shoes with metallic thread. Use this technique for a Bohemian look or any costume that you need to make in a hurry.
Materials:
- 1 pair of plain shoes
- Fabric: 2 green prints for leaves, 1 color for flower
- Iron-on or glue-on flat-backed Crystals in Clear (from a craft store)
- Kreinik Iron-On #16 Braid 6200 light yellow
- Kreinik Iron-On 1/8" Ribbon in 6500 lavender and 6300 green
- Fusible Webbing or Treasure Tape
- Tools: Iron, teflon press cloth, scissors, fabric pencil
Instructions:
Note: if your iron isn't Teflon coated, you will want to either use a press cloth between the thread and your iron, or adhere one of our Adhesive Press Cloths to your iron (apply while cool). This will keep the adhesive in the thread from sticking to your iron.
1. Turn on your iron to it's highest setting and allow it to heat up. Cut out your fabric pieces: three leaf shapes and two simple daisy shapes (4 petals each).
2.Use your Iron-On Ribbon to edge each of your fabric pieces: lay the thread at a starting point, cover with the Teflon press cloth, and press with your hot iron for several seconds until the thread adheres. Use the 6300 Meadow Green 1/8" Ribbon around the edges of each leaf shape and add one stripe of thread down their centers. Use the 6500 Hydrangea 1/8" Ribbon around the edges of your flower shapes.
3. To create the yellow stamen detail on your flower, use a piece of scrap fabric. Iron down the very end of your 6200 Daffodil #16 Braid. Fold the thread end into a closed loop and iron in place. Gently pull off the fabric while still warm. Cut the end leaving a 1" tail. Make 4 of these.
4. Begin assembling your flower. Iron 4 stamen pieces onto your top flower shape, leaving the curled ends loose. Iron your crystal onto the center of the flower. (Place the crystal on your design and cover with your presscloth. Press with the iron to heat the crystals until they fuse with your fabric.)
5. Cut your fusible webbing or Treasure tape to the size of your leaves and flower pieces. Apply to the back of your fabric. Attach your two flower pieces together, so that the bottom petals show between the top petals. Decide how you want to arrange your leaves and flower, then iron them onto your shoe.
Repeat these instructions for your second shoe and get ready to step out in style!


Shop Needlework > Free Patterns > Iron-On Thread > Autumn and Halloween
-
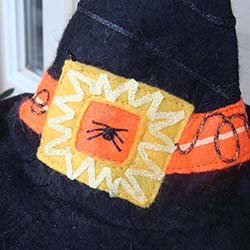
Faux Embroidered Felt Witch's Hat Pet Costume
Note: This item is not shipped.
Skill level: for all, Time: about an hourWe found this cute pet costume at the dollar store but knew it needed more bling and some visual interest. Any "witch" would want it that way! Fusible Iron-on Threads make the job fast.
Materials needed:
- felt witch's hat
- Kreinik Iron-on metallic threads in your choice of colors. We used 1/8" Ribbon and #16 Braid in 6700 Cantaloupe (glow-in-the-dark orange), 6090 Black, 6200 Daffodil Yellow, 6255 Autumn
- home iron or craft iron
- Kreinik Press Cloth
Note: if your iron is not Teflon-coated, you will want to use a press cloth between the thread and the iron, or apply a Kreinik Adhesive Press Cloth to your iron (several sizes are available). Apply the Adhesive Press Cloth while your iron is cool and unplugged.
Instructions:
- Turn your iron on to the highest heat setting and let it heat thoroughly.
- Lay your fusible Iron-on thread at a starting point, cover with a Teflon press cloth, then press for several seconds until the thread adheres. Continue working this way, working your monogram in sections. Note: the Teflon keeps the heat-activated adhesive in the thread from sticking to your iron. Some home irons are already Teflon-coated, but the mini craft irons will need a sheet of adhesive Teflon or a piece of Teflon (both available from Kreinik).

Shop Needlework > How To > Metallic Thread
-
Kreinik on costumes in the movies
Kreinik: embroidery threa
dto the starsIt may come on any normal, routine day at the Kreinik thread factory: a phone call from a costume company that will get everyone excited and Googling current movies in production. "We're going to be worn by celebrities, again!" We can't help being starstruck when Kreinik threads show up in a movie. From the early days of the company when Jerry and Estelle sold threads to famed costume designer Nudie Cohn, to the present day, Kreinik threads have been on stage and screen.
When a costume designer or costume company calls, they usually can't say what production they're working on due to production confidentiality (we still try to guess). They usually describe a period costume or a certain look they want to reproduce, and we come up with the Kreinik threads that match. The result is stunning embroidery or trim that helps bring a character, mood, and theme to life.
Metallic threads show up well on stage and screen due to their light-reflecting properties, plus they are modern, easy-to-use materials replacing expensive, heavy real metal trims and embellishments. The most popular Kreinik threads used on costumes tend to be our heavier Braids, our Ribbons, and our 3/8" Trim. A few hundred meters of Kreinik #8 and #12 Braids appear as the gold embroidery on costumes in Hocus Pocus 2, for instance. And Kreinik 3/8" Wired Trim created dimensional, detailed embroidery in Game Of Thrones (we really stand out on Queen Cersei's robe in one dramatic scene).
We were excited to work with the talented costume designer Michele Carragher throughout the seasons of Game of Thrones. We even had to rush threads to filming sites a few times. Here you can see some of the costumes: https://www.michelecarragherembroidery.com/game-of-thrones
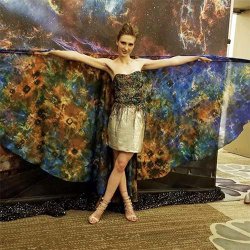
Michele's career reflects her love of and talent for detailed embroidery. Michele has used Kreinik threads on costumes in other productions. She shares these photos (below) of gowns in the movie "Queen of the Desert," released in 2015 starring Nicole Kidman. Michele worked on ball gowns and corsages for Nicole's character in the film. See more of Michele's stunning costume and clothing designs here: https://www.michelecarragherembroidery.com/

It's exciting to work with costume designers, and even more exciting to see the same threads you use for your needlepoint/cross-stitch/embroidery featured on an actor or actress. When you watch movies and episodes where there's embroidery on costumes, see if you can spot any Kreinik threads.
And if you are a costume designer or work for a production company—from local theatre to Broadway, from opera to movies, from cosplay events to Halloween costumes—you will find a Kreinik thread to make your embroidery and embellishment visions come to life.

