
Christmas
-
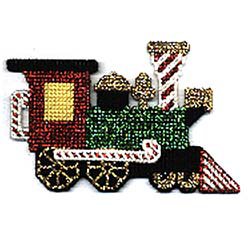
Candy Cane Railroad
NOTE: this is not a product that is shipped. Click the link below to download the PDF.
Candy Cane Railroad
- Designed Rosemarie Walter
This is a fun holiday project. Stitch it for someone who loves trains, toys, candy canes or Christmas "or all of the above" or make it as holiday decor for your own home. There are five 'cars' in this train. Attach clear fishing line to make into ornaments, or add magnets to make into a refrigerator decoration
Materials needed:
- Kreinik Medium (#16) Braid" in 031 Crimson, 002HL Gold Hi Lustre, 008HL Green Hi Lustre
- Cotton embroidery floss in white, black and yellow (see color key)
- 14-count plastic canvas, 1/4 sheet each white and clear
- #24 Tapestry needle
Instructions:
Click here to download the FREE instructions for this design.You will need the Adobe Reader to view and print this file.
-
Christmas Angel Pin or Magnet
NOTE: this is not a product that is shipped. Click the link below to download the PDF.
Christmas Angel Pin- Designed by Mary Cosgrove
Seasonal, sweet, simple! This is a quick-to-stitch project for group meetings, teacher gifts, or as a gift. This concludes our year-long series of needlework pins fromMary.
Materials needed:
- QuickCount® 10-count plastic canvas by Uniek or similar
- Kreinik Heavy (#32) Braid in 008 Green, 9400 Baby Blue
- Kreinik Very Fine (#4) Braid 221 Antique Gold
- Kreinik 1/8" Ribbon in 002V Vintage Gold, 009 Emerald, 092 Star Pink, 100HL White Hi Lustre
- DMC embroidery floss in 321 Christmas Red, 422 Hazel Nut Brown
- Glue, we used Fabri-Tac Permanent Adhesive by Beacon
- Whimsy Glass Beads by Wichelt Imports: 10 matte gold (#5142) or similar
- Scissors
- Plastic canvas needle (No. 18)
- Backing material such as fabric, perforated paper, card stock
- Pinback or magnet
Instructions:
Clickhere to download the FREE instructions for this design.
You will need the Adobe Reader to view and print this file. -
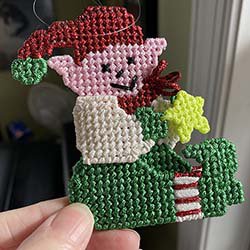
Country Elf Ornament
NOTE: this is not a product that is shipped. Click the link below to download the PDF.
Country Elf Ornament- Designed by Mary Cosgrove
This little guy will bring Christmas cheer to your tree or to the face of a giftr ecipient. Why not make several for nursing home patients or an ill friend. His little star glows in the dark and reminds us not only of the happiness of the season, but also it's peace.
Materials needed:
- Kreinik Heavy (#32) Braid in 003HL Red Hi Lustre, 008 Green, 005HL Black Hi Lustre
- Kreinik 1/8" Ribbon in 100HL White Hi Lustre, 092 Star Pink, and 054F Lemon Lime
- 10-mesh plastic canvas such as QuickCount® by Uniek, or similar. You will need to cut pieces for the following: one elf 32 x 32 holes, one right arm 13 x 9 holes, one right leg 22 x 10 holes, one star: 7 x 7 holes
- #18 plastic canvas needle
- scissors
- small piece of nylon thread
Instructions:
Clickhere to download the FREE instructions for this design.
You will need the Adobe Reader to view and print this file. -
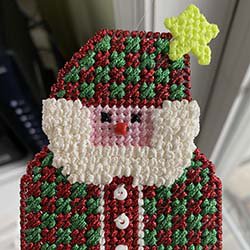
Country Santa Ornament
NOTE: this is not a product that is shipped. Click the link below to download the PDF.
Country Santa Ornament- Designed by Mary Cosgrove
With his patchwork coat and glowing star, this little guy will be a cheerful addition to your Christmas tree ornaments.
Materials needed:
- Kreinik Heavy(#32) Braid in 003HL Red Hi Lustre (6 yards), 008 Green (3 yards), 005HL Black Hi Lustre (18 inches)
- Kreinik 1/18" ribbon in 100HL White Hi Lustre (5 yards), 092 Star Pink (1.5 yards), 054F Lemon-Lime (1 yard)
- Kreinik Fine (#8) Braid 100HL White Hi Lustre (1 yard)
- 10-mesh plastic canvas such as Quick-Count by Uniek. You will need to cut pieces for the following: one Santa at 26 x 45 holes, one star at 7 x 7 holes
- 1/8" (E) beads: 10 white and one red
- Plastic Canvas needle (#18) and embroidery/beading needle
- scissors, small piece of nylon thread (for the ornament hanger)
Instructions:
Clickhere to download the FREE instructions for this design. You will need the Adobe Reader to view and print this file.
-
Country Snowman Ornament
NOTE: this is not a product that is shipped. Click the link below to download the PDF.
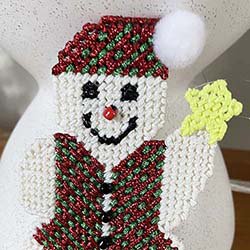
Country Snowman- Designed by Mary Cosgrove
With his patchwork coat and glowing star, this little guy will be a cheerful addition to your Christmas tree ornaments.
Materials needed:
- Kreinik Heavy (#32) Braid 003HL Red Hi Lustre, (2 yards) 008 Green (2 yards), 005HL Black Hi Lustre (18 inches)
- Kreinik 1/8" Ribbon 100HL White Hi Lustre (7 yards), 054F Lemon-Lime (1 yard)
- 10-mesh plastic canvas (such as QuickCount" by Uniek). You will need to cut pieces for the following: one snowman 27 x 44 holes and one star 7 x 7 holes
- 1/8" E beads: 1 red and 3 black
- white pom-pom (1/2-inch size)
- #18 plastic canvas needle
- scissors
- small piece of nylon thread
Instructions:
Click here to download the FREE instructions for this design. You will need the Adobe Reader to view and print this file.
-
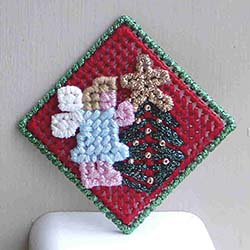
Festive Ornament Frame
NOTE: this is not a product that is shipped. Click the link below to download the PDF.
Festive Ornament Frame- Designed by Mary Cosgrove
Just got those school pictures back of your kids, now here's a nice little picture frame ornament for your loved ones this holiday. It uses Kreinik Heavy (#32) Braid plus sequins and spangles to capture the sparkle of the season.
Materials needed:
- two 5m spools of Kreinik Heavy (#32) Braid" in 091 Star Yellow
- 7-mesh plastic canvas (such as QuickCount® by Uniek). You will need to cut pieces for the following: one front = 27 x 29 holes, one back = 13 x 17 holes
- Sequins and spangles: four 3/4" green leaves, six 1/2" red flowers, two 1/4" green rounds
- plastic canvas needle #18
- scissors, small pieces of nylon thread for the ornament hanger, and craft glue (such as Jewel Glue by Delta)
Instructions:
Click here to download the FREE instructions for this design.You will need the Adobe Reader to view and print this file.
-
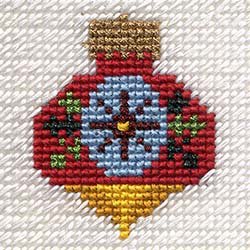
Ornament Coasters
NOTE: this is not a product that is shipped. Click the link below to download the PDF.
Ornament Coasters
- Designed by Kathryn Rubinstein
Materials needed:
- Kreinik Very Fine (#4) Braid 009 Emerald, 2 spools
- Kreinik Very Fine (#4) Braid 015 Chartreuse, 1 spool
- Kreinik Fine (#8) Braid 061 Ruby, 1 spool
- Kreinik Very Fine (#4) Braid 202HL Aztec Gold Hi Lustre, 2 spools
- Anchor Embroidery Floss in the following: Red #19 (2 skeins), Gold #307 (1), Yellow #298 (2), White #1 (6), Light Blue #160 (1), Light Green #257 (1)
- Darice 10-mesh plastic canvas
- Embroidery needle, scissors
- Optional: white Flexi-Foam (1 sheet), craft glue
Instructions:
Clickhere to download the FREE instructions for this design.You will need the Adobe Reader to view and print this file.
-
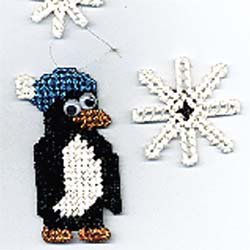
Playful Winter Penguin
NOTE: this is not a product that is shipped. Click the link below to download the PDF.
Playful Winter Penguin- Designed by Mary Cosgrove
This is a fun, quick-to-stitch design. The plastic canvas medium makes it strong so it can be glued to a picture frame, a memory book cover (What I Did On My ChristmasVacation...), or made into a refrigerator magnet. Download the pattern for a bonus snowflake design.
Materials needed:
- Kreinik 1/8" Ribbon in 100HL White Hi Lustre, 005HL Black Hi Lustre, and 006 Blue
- Kreinik Heavy (#32) Braid in 027 Orange
- 10-count plastic canvas in clear
- two 7mm wiggly eyes
- plastic canvas needle, scissors, craft glue
Instructions:
Click here to download the FREE instructions for this design.You will need the Adobe Reader to view and print this file.
-
Star Tree Topper
NOTE: this is not a product that is shipped. Click the link below to download the PDF.
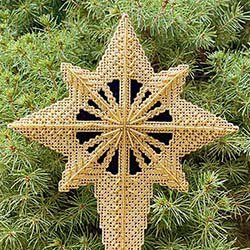
Star Tree Topper
- Designed by Rosemarie Walter
A stunningly gorgeous tree topper sparkling from Kreinik metallic threads.
Materials needed:
- 10 spools of Kreinik 1/8" Ribbon in 202HL Aztec Gold,
- Kreinik Japan #1 002J Gold for attaching beads
- 10-count plastic canvas
- 8" x 4" piece of blue velvet
- Gold bugle beads: large, medium and small, also gold seed beads
Instructions:
Click here to download the FREE instructions for this design.You will need the Adobe Reader to view and print this file.
-
Log Cabin
NOTE: this is not a product that is shipped. Click the link below to download the PDF.
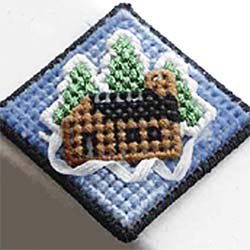
Log Cabin
Make a pin, magnet or ornament- Designed by Mary Cosgrove
Materials needed:
- Kreinik Heavy (#32) Braid in 008 Green
- Kreinik 1/8” Ribbon in 100 White and 005 Black
- DMC Embroidery floss in 809, 310 and 435
- Quick-Count® 10-ct plastic canvas by Uniek
- Fabri-Tac™ Permanent Adhesive by Beacon™
scissors - plastic canvas needle (No. 18)
- Backing material: fabric, perforated paper or card stock
- pinback or magnet
Instructions:
Click here to download the FREE instructions for this design. You will need the Adobe Reader to view and print this file.
-
Christmas Tea Ornament Set
NOTE: this is not a product that is shipped. Click the link below to download the PDF.
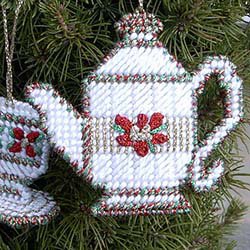
Christmas Tea Ornament Set
Designed by: Susan Leinberger
Skill Level: IntermediateMake these charming ornaments to decorate aChristmas tree this season. For little girls, moms, daughters and grandmothers, it brings to mind the fun of a Christmas Tea Party. (Scroll to bottom of page to see chart)
Materials needed:
- 1/4 sheet 10-count plastic canvas
- #3 Pearl cotton in white
- Kreinik Heavy #32 Braid in 238, 008HL, 002 (color 238 was discontinued, so you can substitute red 003, or 308 Coral, or 203 Flame)
- Kreinik Medium #16 Braid in 002
- Kreinik 1/8" Ribbon in 003
- #18 tapestry needle
Instructions:
1. Cut plastic canvas according to graphs, cutting out center hole on saucer top only, leaving saucer base intact.
2. Stitch pieces as follows: saucer top as graphed, saucer base with white Continental Stitches; one cup and one teapot as graphed, reverse one cup and one teapot and stitch with Continental Stitches andSlanted Gobelin stitches.
3. When background stitching is completed, work embroidery as indicated; do not work embroidery on saucer base.
4. Using Heavy #32 Braid in 238, whipstitch wrong sides of teapot pieces together along inside and outside edges.
5. Following graph, whipstitch wrong sides of cup pieces together along all edges except bottom edge.
6. Using white, whipstitch bottom edges of cup to inside edges on saucer top. using #32 Braid 238, whipstitch wrong sides of saucer top and base together.
7. for hangers. attach desired lengths of gold#16 Braid where indicated to cup and teapot with a Lark's Heat Knot. tie ends together in a knot to form a loop for hanging.
Saucer top and base: 16 holes x 11 holes Cut 1
Teapot: 31 holes x 28 holes Cut 2
Teacup: 16 holes x 14 holes Cut 2
Printing Instructions:
Click here to download the FREE instructions for this design. You will need the Adobe Reader to view and print this file.


