Free silk thread projects
You just don't realize how nice silk is until you work with it. It's a hands-on fiber that will spoil your hands (and your eyes). Experience the soft feel and the beautiful luster of silk thread with these heirloom-quality projects.
-
Embroidered Flower Motif
NOTE: This item is not shipped. Click the link below to download the PDF.
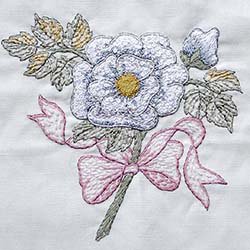
Embroidered Flower Motif
Designed by J.Marsha Michler
Marsha has written terrific how-to books on crazy quilting, including the popular “The Magic of Crazy Quilting.” Her latest book (“Motifs for Crazy Quliting”) showcases specific spot motifs to use in quilting projects. These designs are suitable for wall hangings, wearables, and anything fabric-related — think album covers, sachets, etc. They are embroidery patterns that can be used in many ways.
We asked Marsha to share a special motif with Kreinik web site visitors. She created this rose motif from Kreinik Silk Bella, Mori and Serica. The result is a beautiful, heirloom rose—we’re sure it would take the prize in any garden scene.
Materials needed:
- use 100% cotton muslin, 100% cottonbatiste, or silkl organza, depending on how you will use this design
- Kreinik Silk Mori in 4203 Light Sage, 4073 Light Dusty Green, 2013 Light Gold, 2014 Medium Gold, 1103 Light Mauve, 1031 Baby Pink
- Kreinik Silk Bella in 4206 Dark Sage, 1098 Wood Rose
- Kreinik Silk Serica in 4073 Light Dusty Green, 7086 Dark Straw, 8000 Soft White, 8084 Medium Gray, 8073 Light Charcoal
- Kreinik Tapestry (#12) Braid 001J Japan Silver
- Kreinik Japan #1 001J Japan Silver
- Embroidery needles to fit the threads
- tracing paper
Instructions:
Click here to download the FREE instructions for this design.You will need the Adobe Reader to view and print this file.
Our model includes the following stitches:
- Backstitch in Silk Mori for filling in the stems
- French Knots in Silk Serica for the rose
- Coral Stitch in Silk Serica for the leaves
- Seed Stitch in Silk Serica for the bow
-
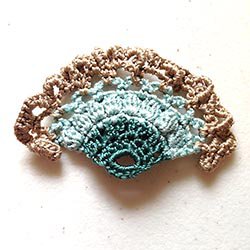
Silk Fan Brooch Pattern
Note: This item is not shipped
Designed by Kathleen Power Johnson
Silk Serica is a 3-ply, twisted filament silk with a magnificent, rich sheen. It is soft and luxurious to the touch, and it makes an excellent crochet thread for creating elegant accents and heirloom jewelry.
Use a non-greasy hand creme to keep the silk from snagging on rough spots.
Materials
- 1 reel of Silk Serica in these colors: 4166 Dark Victorian Green, 4043 Light Teal, 7014 Medium Lead Grey
- Size 9 (1.25mm) steel crochet hook
- 3” x 4” piece of coordinating non-woven backing material (felt, synthetic suede, or leather)
- 1 pin back
- sewing thread & needle
Instructions
See "Abbreviations & Definitions" at the end of the page.
- Using color 4166, ch 8, join in ring with sl st. Ch 1, work 12 sc over ring, join with sl st to ch 1.
- Row 1: Ch2, hdc8. Turn.
- Row 2: (RSR) Ch 4 (counts as 1 dc), ch 1, sk 1 st, V-st across row, ending dc in tc (4 Vsts). Turn.
- Row 3: Join color 4043: Ch1, sc in each dc and in each ch space (17 sts). Turn.
- Row 4: Ch3, work bobble in first st, ch2, sk 1 st, (bobble, ch2, sk 1) across row ending dc in tc. Turn.
- Row 5: (Ch5, sc in each ch2 space) across, end ch5, sc in tc. Turn.
- Row 6: Join color 7014. Ch 3, (sc in ch loop, ch5) across row (7 loops), ch3, dc in last loop. Turn.
- Row 7: Ch5, sc in 1st loop, (ch5, sc in sc, ch5, sc in loop) across row, ending ch3, dc in last loop. Fasten off.
- To Finish: Sew pin back onto wrong side just below ring. Cut backing material slightly smaller than the solid portion of the fan. Cut an opening in the middle slightly larger than pin finding. Position over pin back, trim if necessary and sew in place. Hint: To accentuate ruffle, pull downward on each ch5 loop of last row.
Abbreviations & Definitions
- ch chain
- St, sts Stitch, stitches
- sl st slip stitch
- sc single crochet
- hdc half double crochet
- dc double crochet
- tr triple crochet
- tc turning chain
- RSR right side row
- V-st (dc, ch 1, dc, ch1)
- Bobblework 4 dc into same st, retaining one loop from each, yo, pull through all loops) yo yarn over hook sk skip a stitch
-
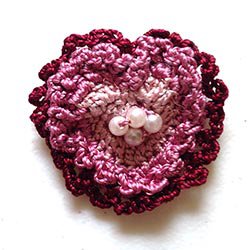
Silk Heart Brooch Pattern
Note: This item is not shipped
Designed by Kathleen Power Johnson
Silk Serica is a 3-ply, twisted filament silk with a magnificent, rich sheen. It is soft and luxurious to the touch, and it makes an excellent crochet thread for creating elegant accents and heirloom jewelry.
Use a non-greasy hand creme to keep the silk from snagging on rough spots.
Materials
- 1 reel of Silk Serica in these colors: 1092 Lightest Wood Violet, 1105 Medium Dark Mauve
- Size 9 (1.25mm) steel crochet hook
- Tapestry needle
- 3 to 5 small pearls
- dental floss threader or sewing thread and fine needle
Instructions
See "Abbreviations & Definitions" at the end of the page.
- With color 1092, make slip knot leaving a long tail. Pull a loop through slip knot, ch1, 5sc into loop.
- Rnd 1: With color 1092, ch3, dc11 covering sc loop (12 sts). Sl st to top of ch. Tighten opening by pulling tail.
- Rnd 2: Ch2 (=1hdc), hdc in next st, hdc2, (hdc2, dc), tr, (dc, hdc2), hdc2 in each of next 2 sts, (hdc, dc), (dc,tr,dc), work 1 slip st for center of heart, (dc, tr, dc), (dc, hdc). Sl st to top of ch 2.
- Rnd 3: Join color 1105. Ch 3 (= 1dc), dc into 1st and foll 6 sts. (Dc, tr, dc), dc in next 8 sts, dc2, (dc, tr, dc), (dc, hdc), sc in center, (hdc, dc), (dc, tr, dc), dc2, dc in next 2 sts, sl st to top of ch 3.
- Rnd 4 (ruffle): Ch 4, sk 1, post stitch (sc around back of dc post), (ch 4, sk 1 st, post st) 11 times. At the center point: ch 4, post st around center bar 2 rnds below, cont (ch 4, sk 1 st, post st) ending ch 4, sl st to base of ch 3. Fasten off.
- Rnd 5 (ruffle): Join color 1119, to top center st. Ch5, sc in sk st from previous rnd, (ch5, sk 1, sc) around heart, ending with sl st into 1st st. Fasten off.
- To Finish: Run in ends. Draw center together by running tail of original slip knot around opening and fastening. Bring this thread through to center on RS, thread 3-5 pearls onto tail, insert needle back through center of heart and fasten off.
- Hints: Post Stitch: Insert hook from front to back around stem of dc, pull up a loop and complete stitch as usual. To thread pearls: Using a nylon dental-floss threader, insert silk thread through loop, pull pearls onto threader stem, over loop and onto thread. Alternatively, use a fine sewing needle threaded with a short piece of sewing thread. Knot ends together to form loop. Insert silk thread through loop and pull pearls onto needle and over thread loop as just described.
Abbreviations & Definitions
- ch chain
- St, sts Stitch, stitches
- sl st slip stitch
- sc single crochet
- hdc half double crochet
- dc double crochet
- tr triple crochet
- tc turning chain
- RSR right side row
- V-st (dc, ch 1, dc, ch1)
- Bobblework 4 dc into same st, retaining one loop from each, yo, pull through all loops) yo yarn over hook sk skip a stitch
-
English Bouquet Embroidery Pattern
NOTE: this item is not shipped. Click the link below to download the PDF.
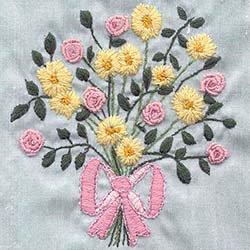
English Bouquet
- Designed by Sharon Coxhead
Sharon shares this design with us out of her love for embroidery on fabric. She found the Silk Mori to be a beautiful thread for designing this type of needlework. Use this as a stand-alone embroidery, or as an embroidery on a crazy quilt.
Materials needed:
- A piece of fabric of your choice approximately 9 inches by 9 inches. I used Dupion silk and put some waste fabric on the back, thus sewing through both pieces of fabric to stop any puckering on the stitching.
- Silk Mori for bullion roses: 0323, 0324, and 0325. For the rose stems and leaves, use Silk Mori 4037. For the daisy’s middles use 2027 and for the petals use 2024. For the daisy’s stems use 4034. For the bow use 0303 and 9032. (all Silk Mori colors)
- Kreinik Very Fine (#4) Braid 092 Star Pink for edging the bow and highlighting.
- A milliners/straw needle for bullion knots and French knots. A sharp embroidery needle with a suitable size of eye to allow 2 single strands together of Silk Mori to pass through for all other stitches.
Instructions:
- Click here to download the FREE instructions for this design.You will need the Adobe Reader to view and print this file.
-
Silkberry
NOTE: this is not a product that is shipped. Click the link below to download the PDF.
Silkberry
Designed by Mary Polityka Bush
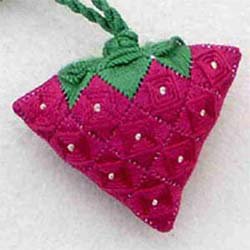
Skill Level: IntermediateThis adorable needlepoint design, a strawberry scissors charm, can be made so quickly, you'll want to make several for gifts. It's also a fun project for a monthly group meeting, guild chapter, women's group, craft club, or in-store class. The Silk Mori and Silk Serica makes it lusciously rich looking!
Materials needed:
- 5m skeins of Kreinik Silk Mori in colors 1057 and 4036
- 10m spools of Kreinik Silk Serica in colors 1057, 2024, and 4036
- Zweigart 18-ct white interlock canvas, 6" x 9"
- #24 Tapestry needle
- laying tool like a Bent Weaver's Needle or Tekobari
- stretcher bars, 1 pair each: 6" and 9"
- Fiberfill or cotton balls
- Tacky
- Glue
General Information:
Use 3-ply of Silk Mori (plied) and single strands of Silk Serica (unplied) throughout. For maximum sheen, use a laying tool when working with Silk Mori and maintain a consistent twist when stitching with Silk Serica. Work two motifs on canvas (for the strawberry front and back), leaving 1" between each strawberry.
Printing Instructions:
Click here to download the FREE instructions for this design. You will need the Adobe Reader to view and print this file.
-
Fir Tree Ornament
NOTE: this item is not shipped. Click the link below to download the PDF.
Fir Tree needlepoint ornament
Designed by Kathy Holicky
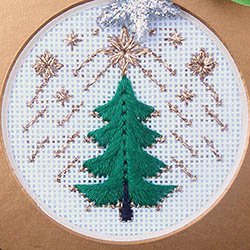
This needlepoint ornament design can be worked in either a white/gold or green colorway.
Materials needed:
- 18-ct mono canvas in white, 5” x 5”
- FOR WHITE VERSION: Kreinik Silk Mori white 8000
- FOR GREEN VERSION: Kreinik Silk Mori green 4036, dark brown 7166
- Kreinik Blending Filament #002V
- Purchased gold ornament frame (or have a framer cut one for you out of gold matboard)
- Kreinik Treasure Tape™
Instructions:
Download the 4-page PDF chart/instructions:
https://www.kreinik.com/PDF/fir_tree_ornament.pdf
1. Use 4-ply of Silk Mori, or 4 strands of Blending Filament following the diagrams. Use green silk for the tree, brown silk for the trunk, and gold Blending Filament for the remainder.
2. When stitching is complete, make a “sandwich” by layering the front of the gold ornament frame on top, followed by your stitched piece, and the gold ornament frame backer. Use Treasure Tape™ double-sided tape dots as the adhesive between layers. Add ribbons etc for ornament hanger as desired.
-
A Berry Holly-day ornament
NOTE: this item is not shipped. Click the link below to download the PDF.
A Berry Holly-Day Ornament
Designed by Kathy Holicky
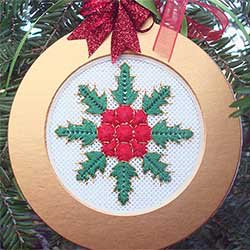
This ornament design can be worked in either a white/gold or red/green colorway.
Materials needed:
- 18-ct mono canvas in white, 5” x 5”
- FOR WHITE VERSION: Kreinik Silk Mori white 8000
- FOR RED/GREEN VERSION: Kreinik Silk Mori in red 1117, green 4036
- Kreinik Japan #5 Gold 002J
- For finishing: use a store-bought round ornament frame in the appropriate size, or ask your local framer to cut you a similar frame out of gold mat board
- Kreinik Treasure Tape™ double-sided tape
Instructions:
- Use 4-ply of Silk Mori, or Japan just as it is (single strand) following the diagrams.
- When stitching is complete, make a “sandwich” by layering the front of the gold ornament frame on top, followed by your stitched piece, and the gold ornament frame backer. Use Treasure Tape™ double-sided tape as the adhesive between layers. Add ribbons etc for ornament hanger as desired.
-
Fancy Fir Ornament
NOTE: this item is not shipped. Click the link below to download the PDF.
Fancy Fir Ornament
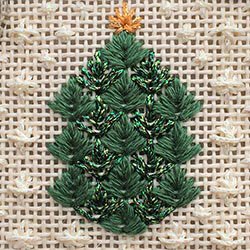
Needlepoint stitches + Kreinik metallic threads + purchased photo frame ornament = the easiest, prettiest little Christmas project. Perfect for hostess gifts or for your own tree.
Find ornament frames at craft stores during the holidays (Michaels, Hobby Lobby, etc)
Materials needed:
- 18-count mono canvas in eggshell
- purchased photo frame ornament (like from Target, Michaels, Walmart, Dollar Tree, etc)
- Kreinik Fine #8 Braid colors 5815, 5555, 5982
- Kreinik Silk Mori (2.5m skein) in color 4063
- #24 Tapestry needle
Instructions:
Download the PDF of the instructions here:
-
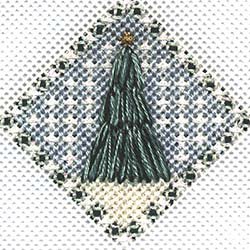
Tree In Snow Ornament or Pin
NOTE: this is not a product that is shipped. Click the link below to download the PDF.
Tree In Snow Ornament or Pin
- By Tink Bordill
Here's an elegant needlepoint accessory to pin on your jacket this season or turn into a Christmas ornament, and it stitches up quickly on a cold winter's night. Here, Tink Boord-Dill captures the look of snow with pearl braid, while Silk Mori and Silk Serica lend textural contrast. We love the tranquil sense you get from the blue, green and white colors
Materials needed
- Kreinik Silk Mori® in 4163 Light Victorian Green, 4166 Dark Victorian Green, 4167 Very Dark Victorian Green, 5053 Light Slate Blue
- Silk Serica® 4167 Very Dark Victorian Green
- Very Fine (#4) Braid" 032 Pearl and 002 Gold
- 18-count white mono canvas
Instructions:
Click here to download the FREE instructions for this design. You will need the Adobe Reader to view and print this file.
- By Tink Bordill
-
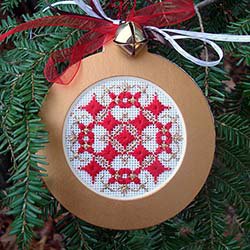
Merry Stitchmas Ornament
NOTE: this is not a product that is shipped. Click the link below to download the PDF.
Merry Stitchmas! ornament
Designed by Kathy Holicky
This ornament design can be worked in either a white/gold or red/green colorway.
Materials needed:
- 18-ct mono canvas in white, 5” x 5”
- FOR WHITE VERSION: Kreinik Silk Mori white 8000
- FOR RED/GREEN VERSION: Kreinik Silk Mori in red 1117
- Kreinik Blending Filament 002V Vintage Gold
- Gold ornament frame (find at craft stores during the holiday season, or have a framer cut a round frame for you)
- Kreinik Treasure Tape™
Instructions:
Download the PDF chart/instructions:
https://www.kreinik.com/PDF/merry_stitchmas.pdf
1. Use 4-ply of Silk Mori, or 4 strands of Blending Filament following the diagrams.
2. When stitching is complete, make a “sandwich” by layering the front of the gold ornament frame on top, followed by your stitched piece, and the gold ornament frame backer. Use Treasure Tape™ double-sided tape as the adhesive between layers. Add ribbons etc for ornament hanger as desired.
-
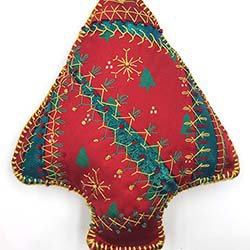
Crazy Quilt Tree Ornament Pattern
NOTE: this is not a product that is shipped. Click the link below to download the PDF.
Crazy Quilt Tree Ornament
- Designed by Linda Lindgren
Linda has created a fun, quick-to-make holiday ornament. Use fabrics from a family member to make a special gift (Linda likes to use men's old ties). The Kreinik silk threads are perfect crazy quilt embellishments; the colors are rich, and the look is timeless. For crazy quilting, silk is nice and easy
Materials needed:
- Kreinik Silk Bella in 4164 Medium Victorian Green, 2014 Medium Gold, and 1117 Very Dark Christmas Red (one spool each)
- Kreinik Silk Serica in 2014 Medium Gold (one spool)
- 9-inch square firm interfacing and red velveteen
selection of red silks, satins, and Christmas prints, plus 1-inch wide green metallic ribbon - also: scissors, needles, matching sewing thread, polyester fiber fill
Instructions:
- Click here to download the FREE instructions for this design.You will need the Adobe Reader to view and print this file.
-
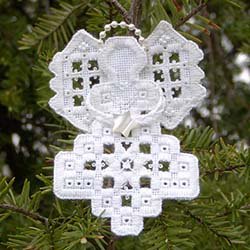
Hardanger Angel Ornament
Note: This product is not shipped; download the PDF at the link below
- Hardanger Angel Ornament
- Designed by Ruth Hanke of Hanky Panky Designs
Hardanger has been a popular form of needlework for, well, centuries. We asked designer Ruth Hanke to create a special Hardanger ornament for our web site visitors. Made with Kreinik silk threads, it will become an instant heirloom.
Materials needed:
- 6-inch square of 24-count white Congress Cloth
- two skeins of Silk Mori 8000 Soft White
- #24, #26 Tapestry needles
- large Mother of Pearl star *
- two 2mm joined beads (about three inches) *
- eight white glass seed beads *
- beading needle and white sewing thread
- tacky glue and Fray Check
Instructions:Clickhere to download the FREE instructions for this design.You will need the Adobe Reader to view and print this file.


