
- Shop Fly Fishing
-
Shop Needlework
- Metallic Threads
- Silk Threads
- Kits & Sets
- Accessories
- Free Patterns
- How To
17 products found
Sort by:
Recommended
Shop Needlework > Free Patterns > Crafts > Autumn & Halloween
-
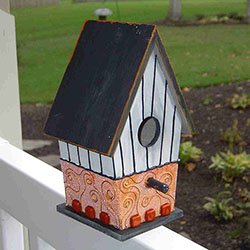
Beaded Halloween Birdhouse
Note: This item is not shippedDesigned by Amy Law
Materials needed:
- Wooden birdhouse
- Acrylic Craft Paint in black, white, & Pumpkin orange
- Orange cabochons
- Treasure It Diamond Beadlets
- 1-inch roll of Treasure Tape
- Orange Cabochons (or flat-backed button/embellishments) from a craft store
- 1/8" Iron On Ribbon in 6090
- Mini Iron or household iron
- Press Cloth or Kreinik Adhesive Press Cloth*
- Kreinik Facets in Black
- Kreinik #16 Braid 150V, 051F
- Kreinik #8 Braid 152V
Instructions:
* If your iron isn't non-stick or Teflon coated, we recommend that you get one of our Adhesive Press Cloths. It will keep the adhesive in the thread from sticking to your iron. They come in various sizes. Apply to a cool iron.
- Paint your house first. You can use a ruler to make a line around the middle of the house on all four sides, three inches from the base, as a guide. Paint the top half of your house white and the bottom half orange. Then paint the roof and base of your house black. Paint the perch and interior of the opening black as well. Once the paint has dried, detail the roof edges with orange. Apply some orange paint to your brush and lightly brushing across the edges of the roof.
- When your paint has dried completely, begin applying your tape. Peel back one corner of the red liner on one piece and center it over the back of your house, so that the bottom edge of the tape sits along the base of the house. Press down the exposed corner to hold the tape in place, then peel the rest of the liner away and smooth down the remaining tape. Trim any excess tape from the edges of the house. Repeat this process on the two sides of the house. For the front, cut a small hole in the tape for the perch. Apply the tape to your house as you did the others. Use your fingers to smooth out any air pockets. You are ready to embellish.
- It is easier if you begin with the iron-on design. Using the 005, iron your thread in stripes along the white part of your house. Begin in the center and work your way out. When you have finished with your stripes, you are ready to work on the tape.
- Peel the red liner back from your tape on one side. Push your orange cabochons into the tape along the base of the house, evenly spaced. With your thread, start at the base of the house and make large curlicues. (We started with one color first, and then followed those curls with the second color.)When you have finished embellishing that side, replace the red liner if possible and press to secure your threads firmly. Move to the next side and repeat the embellishment process.
- When you have finished all four sides of your birdhouse, remove the red liner from each side. Beginning in the back, outline the top edge of your tape with the Facets. Trim the end and press them firmly into the tape.
- Place your birdhouse in a shallow pan and pour Beadlets over the exposed tape. Swirl with your fingers to cover fully. Tap the house to remove excess beadlets.
-
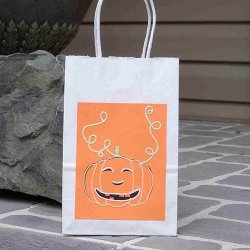
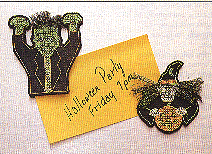
Halloween Party Gift Bag
Note: this item is not shipped
Designed by: Amy Law
Skill Level: beginnerMaterials needed:
- small white paper gift bag with handles (5 1/2” wide x 8 1/2” tall)
- orange cardstock 4 1/4” x 5 1/2”
- large jack o’lantern rubber stamp and black stamp pad (or print a black and white drawing of a jack o’lantern onto your orange cardstock)
- Kreinik press cloth*
- Kreinik Iron-on #16 Braid 6700, 6710, 6720
- mini iron or household iron
- 1-inch Treasure Tape
*If your iron isn't non-stick or Teflon coated, we recommend that you get one of our Adhesive Press Cloths. It will keep the adhesive in the thread from sticking to your iron. They come in various sizes. Apply to a cool iron.
Instructions:
- Turn your iron onto the highest heat setting and let it heat thoroughly.
- If needed, stamp the jack o’lantern image onto your cardstock.
- Iron over the outline of the pumpkin using the orange iron-on braid: lay the thread at a starting point, cover with the press cloth, and press for several second or until the thread adheres. Continue this way, working the design in sections.
- Use the 6710 iron-on braid to outline the eyes, nose, and mouth of the jack o’lantern.
- Use the green iron-on braid to outline the pumpkin stem, and to create leafy tendrils next to the stem. Use our photograph as a guide.Adhere the decorated orange cardstock to the center front of your white bag using Treasure Tape.
-

Metallic Mohawk Skull
Note: this item is not shippedA metallic thread mohawk is what all the best-dressed skeletons will be wearing this Halloween.
Materials needed:- styrofoam skull from the dollar store
- Kreinik Bag O' Bits
- a few nails (optional)
- Kreinik Treasure Tape 1/2" Roll
Instructions:
Lay a strip of Treasure Tape from the top of the head to the back of the head. Remove the red liner to expose the sticky area. Begin to lay bits of metallic threads on the tape, pressing as you go. If needed to fill out the mohawk, add layers of tape underneath rows of thread where you can add even more thread. Trim the thread so ends are even in length. Add nails on skull if desired.


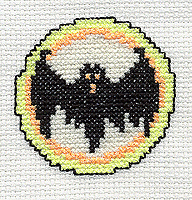
Shop Needlework > Free Patterns > Cross Stitch > Halloween Cross Stitch
-
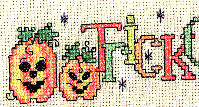
Trick or Treat Bag
Note: This item is not shipped; the pattern is a PDF you download onto your computer or device
Design by Pam Kellogg
Stitch count: 126 wide x 27 highThis quick-and-easy pattern fits perfectly on a Charles Craft tote bag. Let your little one use it for trick-or-treating, or use it yourself for toting around projects, groceries, orall that stuff we seem to have to carry around with us. Everyone will love thewhimsy and cheer of the three little pumpkins in the design and theglow-in-the-dark Kreinik Braid.
Materials needed:
- Kreinik Fine (#8) Braid or Very Fine #4 Braid (slightly thinner) in 002 Gold, 008 Green, 015 Chartreuse, 023 Lilac, 026 Amethyst
- DMC embroidery floss in 310, 349, 434, 676, 721, 729, 740, 754, 938
- at least a 10" x 10" piece of 14-count Aida cloth in creme color
Instructions:
Click here to download the FREE instructions for this design. You will need the Adobe Reader to view and print this file.
-
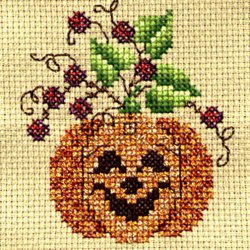
Checkers The Pumpkin
Note: This item is not shipped; the pattern is a PDF you download onto your computer or device
Designed by Pam Kellogg
Design size: 40w x 45hYou've never seen a pumpkin as cute as this one. He's nice and easy to stitch and will bring a smile to everyone who sees him all stitched up. We love the Vintage red, gold, amber and sienna mixed with sage greens—it's beginning to feel like autumn.
Materials needed:
- Kreinik Very Fine (#4) Braid in 002V, 003V, 026V, 150V, 152V, 153V, 154V
- cotton embroidery floss as listed in color key
- 14-count Aida in Summer Khaki color
Instructions:
Clickhere to download the instructions for this design.
You will need the Adobe Reader to view and print this file. -
Jack O' Lantern Kid
Note: This item is not shipped; the pattern is a PDF you download onto your computer or device
Designed by Puckerbrush
Stitch Count 71 x 66Where indicated, add one strand of Kreinik Blending Filament to two strands of floss. Where two floss colors are indicated use one strand of each color.
Materials needed:
- Kreinik Blending Filament: 052F, 005, 080HL, 027, 009HL, 021
- Kreinik Fine (#8) Braid: 9100
- DMC Floss: 310, 355, 647, 720, 722, 731, 758, 909, 918, 922, 939, 948, 758
- 14 ct. Aida
Instructions:
Click here to download the instructions for this design. You will need the Adobe Reader to view and print this file.
-
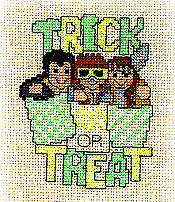
Trick or Treat Trio
Note: This item is not shipped; the pattern is a PDF you download onto your computer or device
Designed by Ursula Michael
Remember the excitement building as you decided on and then prepared your Halloween costume, as you anxiously waited through dinner to get dressed, and then as you hurried into the crisp autumn air to meet your best friends to go trick-or-treating. (Or did you go with your siblings?) You looked simply scary (or simply darling, according to all the neighbors), and had so much fun getting candy and meandering through the seasonal decorations at every door.
Well, this little design by Ursula Michael is a grown-up treat for a stitcher. Made with glow-in-the-dark threads, it can be appliquéed on a tote bag (for trick-or-treating), or made into a door hanger (mount on wooden board with curled wire as the hanger).Let it remind you of all the fun and camaraderie of childhood at Halloween.
Materials needed:
- Kreinik Very Fine (#4) Braid in 053F, 054F, 9192, 326
- cotton embroidery floss (DMC: 948, 353, 3799, 921, 434, 437, 414) or (Anchor: 1011, 6, 236, 1003, 310, 362, 235)
- 16-count fabric (we stitched our model on Charles Craft’s ‘Natural’ Aida color)
- #24 Tapestry needle
Instructions:
- Click here to download the FREE instructions for this design.You will need the Adobe Reader to view and print this file.
-
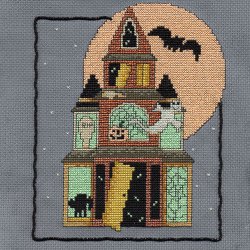
Haunted Kreinik House
Note: This item is not shipped; the pattern is a PDF you download onto your computer or device
Designed by Mike Vickery
Design Size: 82w x 102hCross stitch this design centered on your fabric. Use two strands of DMC floss or one strand of Braid according to color key. Use one strand of floss for backstitching. The border is worked by laying Kreinik Facets on the surface of your fabric, then couching, or tacking down, with Kreinik Cord.
Materials needed:
- the threads in the Kreinik Metallic Gift Collection: Halloween
- DMC embroidery floss in 310, 435, 437, 725, 739, 783, 822, 3022, 3787, 3799
- 14-ct Aida in Dark Grey color
Instructions:
Clickhere to download the instructions for this design. You will need the Adobe Reader to view and print this file.
-
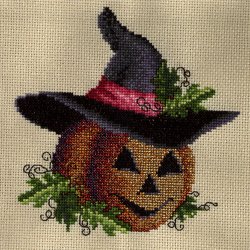
Happy Jack
Note: This item is not shipped; the pattern is a PDF you download onto your computer or device
Designed by Pam Kellogg
Make this beautiful pumpkin cross stitch the center of your Halloween decorations this fall. It is a classic representation of an endearing motif that has come to mean Halloween, autumn, and home. You will love the antique look produced by Kreinik’s Vintage Threads and the earthy colors designer Pam Kellogg has chosen for Jack’s hat and foliage. Enjoy every stitch, but wait until you see your finished project. Wow.
Materials needed:
- Kreinik Very Fine (#4) Braid in 002V, 003V, 026V, 150V, 152V, 153V, 154V (V stands for Vintage Threads)
- cotton embroidery floss in colors listed in Color Key
- #24 Tapestry needle
- 16-count light tan Aida cloth (or stitch over two on your favorite 32-count linen)
Instructions:
Click here to download the instructions for this design. You will need the Adobe Reader to view and print this file.
-
Halloween Pins
Note: This item is not shipped; the pattern is a PDF you download onto your computer or device
Designed by Ursula Michael
- Materials needed:
- Kreinik Blending Filament - 054F, 051F, 052F, 006, 015, 091, 003, 045
- DMC Floss - 310, 946, 317, 353, 909, 995
- 14-ct White Aida
- Fabric Stiffener and Draping Liquid
- 1" Pin Back
Instructions:
Click here to download the instructions for this design. You will need the Adobe Reader to view and print this file.
-
Spooktacular Magnets
Note: This item is not shipped; the pattern is a PDF you download onto your computer or device
- Design by Dianne Davis
Materials needed:
- Kreinik Fine (#8) Braid in each color: 051F Tangerine, 052F Grapefruit, 053F Lime, 054F Lemon-Lime, Backstitch with 005HL Black
- Kreinik 1/16" Ribbon in color 019 Pewter
- 4" x 5" black aida cloth for each creature
- 4" x 5" black felt for each creature
- #24 Tapestry Needle
- Sharp scissors
- Magnets
Instructions:
- Click here to download the FREE instructions for this design. You will need the Adobe Reader to view and print this file.
-
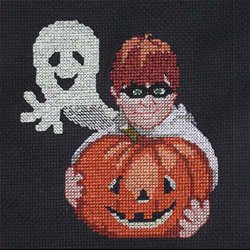
Halloween Friends
Note: This item is not shipped; the pattern is a PDF you download onto your computer or device
Designed by Ursula Michael
- On All Hallow Eve in late October, friends delight in bringing playful spirits alive with glow-in-the-dark threads. Start thinking of your Halloween decor or gifts by stitching these quick projects.Stitch these over two threads on 28-count linen, or over one on 16-count blackAida.Stitch using one strand of Kreinik's Very Fine (#4) Braid or two plies of cotton floss according to the color key.All backstitching isdone with one ply of black embroidery floss.
Materials needed for Pumpkin Trio:
Stitchcount: 26w x 45h
Size: 2" x 3-1/4" (over two on 28-ct.)- Kreinik Very Fine (#4) Braid in 051F Tangerine
- Stitch over two threads on 28-count linen, or over one on 16-count black Aida
- DMC or Anchor Floss: 469 or 267, 310 or 403
Materials needed for Happy Ghost:
Stitch count: 30w x 49h
Size: 2-1/4" x 3-1/2" (over two on 28-ct.)- Kreinik Very Fine (#4) Braid in 052F Grapefruit, and 053F Lime
- Stitch over two threads on 28-count linen, or over one on 16-count black Aida
- DMC or Anchor Floss: 469 or 267, 947 or 330, 3341 or 328, 310 or 403
Instructions:
Click here to download the instructions for this design. You will need the Adobe Reader to view and print this file.


