

Micro Ice Chenille
Use this fun metallic chenille to add a fuzzy effect to any design. Couch it onto the surface of your project, or use in specialty stitches that are longer rather than tight and compact. Perfect for adding a mini garland to Christmas designs.
-
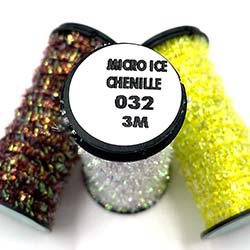
Micro-Ice Chenille
Kreinik’s Micro Ice Chenille is a light-reflecting, fuzzy metallic thread you couch onto fabric or canvas. This is a unique texture that adds interest, whimsy, realism and something fun to a design.
-
How To Use Kreinik Micro Ice Chenille
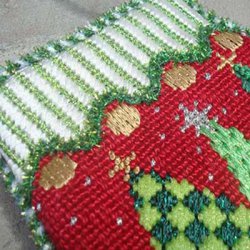
Quick! Name five things that are fuzzy (bonus points for fuzzy metallic things). How about: garland on Christmas trees, legs on spiders, flower centers, bushy eyebrows, other, ahem, hairy things, peaches, caterpillars, lots of bugs actually, baby chicks, moldy cheese, your brain after a long weekend. How many could you list? Nature and life itself are full of texture. It makes things visually interesting and tactile.
You can recreate the fuzzy factor of true life objects with Kreinik's Micro Ice Chenille in your favorite hobby: needlepoint, cross stitch, embroidery, fly fishing, crochet, knitting, weaving. It adds whimsy, dimension, texture, and just plain visual interest to a design.What is Micro Ice Chenille and where can you use it?
- it's a fuzzy metallic
- couch in needlepoint, cross stitch, quilting, crazy quilting for surface embroidery (couch it with a Kreinik Cord or Very Fine #4 Braid, rather than stitch in and out)
- can also use it in long stitches in needlepoint if the canvas is not densely stitched (Micro Ice Chenille just doesn't like going in and out of fabric very much)
- combine it with any other fiber for cording and trims on stockings, ornaments, etc
- crochet little accessories and appliques (wreaths, flowers)
- use it in duplicate stitch in knitting (like a spider!)
To use in weaving:
- Can be used in weft, not for warp (too much stress)
- Weight/Yardage: Kreinik metallic yarns are not measured in terms of weight like wool or cotton yarns are, so measure by yard or meter. Purchase 50-meter cones; or cones of any amount by special order.
- Sett = 5 epi
- Care: Kreinik metallics don't felt, and are inelastic compared to some other types of yarns, so for best results, we recommend testing the threads with the weaving yarns you plan to use before beginning your project.
- Tips from weaver Deb Essen of DJE Handwovens: 1. Pull the thread off the cone horizontally, not from the top, to avoid adding twist to the fiber. 2. Combine with other yarns (rather than use a metallic exclusively) as an accent yarn for best results ("It makes a great, fun fabric"). 3. Test how the textures work together before making your main project: make test swatches if using stretchy yarns with the inelastic metallics, for instance, then use a warm-water wash for the wet-finishing. 4. You may want to experiment with looser sett to vary drapability. 5. Play! Have fun! "I love how the colors pop in sunlight or lamplight and shimmer as the piece is moved."
Content:
Cotton core, polyester metallic
-
Couching
Where to use it:
In cross stitch, needlepoint, surface embroidery and counted thread designs where you want to attach a real metal thread, or a larger item like a thick thread or cording, and in traditional Japanese embroidery.
What to couch:- Kreinik 1/8" Ribbon & 1/16" Ribbon
- Kreinik Heavy #32 Braid, Canvas #24 Braid & Medium #16 Braid
- Kreinik Japan #5 & Japan #7
- Kreinik Japan colors in #16 Braid, 1/16" Ribbon, and 1/8" Ribbon
- Kreinik Torsade
- Kreinik real metal threads
- Kreinik Facets & Petite Facets
Use these finer threads to couch the thicker ones:
- Kreinik Cord
- Kreinik Japan #1
- Kreinik Silk Bella
- Kreinik Silk Couching Thread
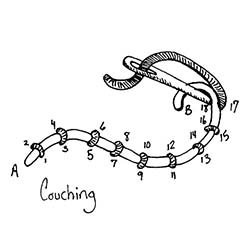
How to do it:
Follow the diagram for needle and stitch placement. Plunge the end of your thicker thread into the fabric at A, securing the ends on the back of your fabric with a few stitches, or temporarily taping the end. To couch, come up at 1, down at 2, up at 3, down at 4, etc. When finished, plunge the end into the fabric at B, and secure end on the back of your fabric with a few stitches.

Alternative:
Designer and teacher Anna-Marie Winter taught us that you can also couch a thicker thread by inserting your tacking stitches down the center of the larger thread, rather than side-to-side as in the traditional instructions above. This enables you do make curves and corners more easily.
WATCH how to couch in needlepoint:


