

How to use metallic threads
Learn the ins and outs of using metallic threads.
-

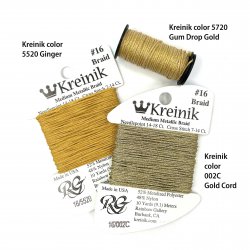
Discontinued Kreinik metallic colors
We hate to discontinue any thread color, but sometimes it is required due to manufacturing problems (for example, if we can't get the raw material to transform it into your favorite Kreinik threads). You will find the list of discontinued colors below. If you have these in your stash, we recommend putting a mark on the label to indicate a discontinued color.
Important tips for stitchers who buy thread stashes on Ebay, at estate sales, and Goodwill/Salvation Army stores:
- The thread dye lot most likely has changed. Mark those threads so you know and won't get caught running out mid project.
- Some of those threads may be discontinued. Google search or contact the manufacturer to double check before you use them in a project (and end up needing more).
Discontinued Kreinik colors and substitution suggestions:
NM means no close match
- 003C Red Cord = 003 Red
- 005C Black Cord = 005 Black
- 007C Pink Cord = 007 Pink
- 008C Green Cord = 008 Green
- 011C Nickel Cord = 010HL Steel Grey
- 012C Purple Cord = 012 Purple
- 022L = 052HL Bronze
- 026L = 026 Amethyst
- 027L Orangeruptis = 027 Orange
- 029L = 029 Turquoise
- 031L Berry Red = 153V Vintage Burgundy
- 032C Pearl Cord = 032 Pearl
- 034 Confetti = NM
- 041 Confetti Pink = 044 Confetti Blue
- 041C Confetti Pink Cord = 044 Confetti Blue
- 042 Confetti Fuchsia = NM
- 042L Optic Opal = NM
- 043 Confetti Green = NM
- 051C Sapphire Cord = 051HL Sapphire Hi Lustre
- 056F Blueberry = NM
- 057F Grape = NM
- 070 Mardi Gras = 5011 Elfin Green
- 080 Garnet in Miro Ice Chenille = Red is a bolder version
- 080C Garnet Cord = 080HL Garnet Hi Lustre
- 086C Fern = 4201 Sugar Cane
- 087C Meadow Grass = 089 Aspen
- 088C Lily Pond Cord = 4201 Sugar Cane
- 104C Colonial Gold Cord = 102C Vatican Gold Cord
- 195 Sunburst = 095 Starburst
- 202C Indigo Cord = 018 Navy
- 225C Slate Cord = 4204 Storm Cloud
- 2094HL Heather Hi Lustre = NM
- 235 Red Ember = 307 Deep Coral
- 271 Plum = 3223 Ametrine
- 664 Magenta Blue = NM
- 3240 Opal = 095 Starburst
- 3508 Rhumba Green = 829 Mint Julep
- 3509 Cha Cha Verde = 008HL Green Hi Lustre
- 3540 Bolero Black = 005 Black
- 393 Silver Night = 622 Wedgewood Blue
- 4001 Green Tea = 4201 Sugar Cane
- 4002 Spiced Chai = 4202 Dusky Meadow
- 4003 Ginseng Gold = 4203 Cattail
- 4004 Earl Grey = 4204 Storm Cloud
- 4005 Sugar Cube = 102 Vatican Gold
- 4006 Rosehip = 007 Pink
- 4639 Light Aqua = 3214 Blue Zircon
- 5002 Pixiedust = NM
- 5004 Love Potion = 024L Fiery Fuchsia
- 5007 Brocade = 5006 Ore
- 5008 Leprechaun = 009 Emerald
- 5500 PInk Lemonade - 5700 Cotton Candy
- 5525 Lemon = 5725 Lollipop Lemon
- 5530 Rosemary Green = 4201 Sugar Cane
- 9132 Lemongrass = 5725 Lollipop Lemon
- 9300 Orchid = NM (closest pastel is slightly darker 093 Star Mauve)
- Easter Grass in 1/8" Ribbon size (Easter Grass still available in 1/16" and 1/32")
- Marine Blue in Micro Ice Chenille = NM
- Petite/Facets 012 = Petite/Facets 026
- Petite/Facets 029L = NM
-
How to calculate thread amount
For cross stitch or needlepoint
The following offers guidance for determining how much thread you may need to stitch your project. Knowing exactly how much thread you will need for a project is not an exact science. There are many factors that vary from project to project and stitcher to stitcher.
This info comes from stitchers who provided us with the information based on their projects. Stitching techniques and tension may vary from person to person, so you may want to stitch an inch or stitch a test area and calculate how much thread was required. Then use that measurement to guesstimate on your project area. We suggest adding an additional 10% to 20% to include a margin of error (variances in stitch techniques, whether you have to rip out, how much thread is used to start and stop, etc)
Keep in mind that specialty stitches take extra thread, so the comments below are only for Tent Stitch or the Cross Stitch.
- NEEDLEPOINT: The formula for yardage calculation for TENT STITCH is The square inches to be worked x 1.5 = thread yardage needed. That is based on using 1.5 yards to complete a 1” square. So, calculate the square inches of the area you are stitching and multiply it times 1.5 to get the amount of thread in yards that you need.
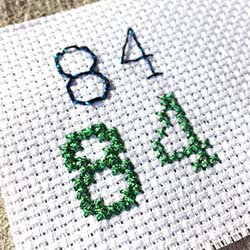
- CROSS STITCH: On 18 count Aida, it took 95 inches of Very Fine #4 Braid to stitch a 1-inch square.
- CROSS STITCH: On 18-count Aida, it took 98 inches of Fine #8 Braid to stitch a 1-inch square
- CROSS STITCH: On 14 count Aida, it took 75 inches of Very Fine #4 Braid to stitch a 1-inch square
- CROSS STITCH: On 14-count Aida, it took 78 inches of Fine #8 Braid to stitch a 1-inch square
-
Kreinik thread content
Below you will find the material content for Kreinik threads:
- Braid/Ribbon/Filament Hi Lustre colors: 62% polyester, 38% nylon
- Braid/Ribbon/Filament Holographic colors: 100% polyester
- Braid/Ribbon/Filament Vintage colors: 64% polyester, 36% nylon
- Braid/Ribbon/Filament Fluorescent colors: 80% polyester, 20% nylon
- Braid/Ribbon/Filament Basic colors: 65% polyester, 35% nylon
- Ombre colors: 65% polyester/35% nylon
- Micro Ice Chenille colors: cotton core, polyester metallic
- Cord, black core colors: 28% polyester, 72% rayon
- Cord, solid core colors: 37% polyester, 635 rayon
- Silk Mori: 100% spun silk
- Silk Serica: 100% filament silk
- Silk Bella: 100% filament silk
-
Thread bleeding advice
Test a metallic, silk, cotton, or rayon thread for bleeding
It's a potential disaster that every stitcher fears: a thread color bleeding. While most colors are safe, there are others with reputations: reds, oranges, greens for instance. What can you do if you've washed your needlework and discovered a bleed? Read on for tips from stitchers. We have not tested these, so you may want to try them on scrap stitching first*.
Suggestions:
- "Prewash any thread that could possibly bleed. Let dry before using in stitching."
- "Soak the piece in ice cold water until the color starts to come out. Then, rub ice cubes over the area and put it back into fresh ice water and soak again. Repeat these steps using clean water until the area is clear." See Carina's Craft Blog here for her test of this cold-water technique.
- "Rinse and repeat. Rinse the piece in very cold water, and allow it so sit for a few minutes. If the color doesn't start to come out by itself, then run an ice cube over the affected fabric until the color comes off."
- "If you see any signs of bleeding while you are washing your stitchery, stop washing, and start rinsing under running cold water right away. Rinse for several minutes and then let it soak in cold water." Click here for more information from Needlework Retailer on cleaning needlework.
*It's a good idea to have a test swatch on which you make a few stitches and wash to make sure a thread doesn't bleed. OR, cut a length of the thread and soak it in water.
-
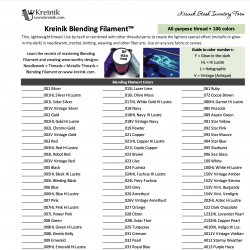
Kreinik Metallic & Silk Stash Inventory Lists
Here are official inventory sheets for Kreinik silk and metallic threads. Download a copy from this link and print the pages you need:
-
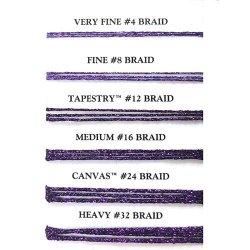
Kreinik Metallic Thread Widths
Jewelry makers and other fiber artists often choose thread by their width. Whether you’re working with wire, beads, needles, or general crafts, now you can choose the right Kreinik thread width for your project.
mm means millimeter
KREINIK THREAD NAME + WIDTH
#32 Braid, basic colors 1.5mm
#32 Braid, fluorescent colors 1.4mm
#32 Braid, hi lustre colors 1.6mm
#32 Braid, cord colors 1.5mm#16 Braid, basic colors .78mm
#16 Braid, fluorescent colors .87mm
#16 Braid, hi lustre colors 1.2mm
#16 Braid, cord colors .81mm
#16 Braid, Japan colors 1.6mm#12 Braid, basic colors .61mm
#12 Braid, fluorescent colors .63mm
#12 Braid, hi lustre colors .65mm
#12 Braid, cord colors .60mm
#12 Braid, Japan colors .54mm#8 Braid, basic colors .50mm
#8 Braid, fluorescent colors .57mm
#8 Braid, hi lustre colors .55mm
#8 Braid, cord colors .58mm
#8 Braid, Japan colors .43mm#4 Braid, basic colors .35mm
#4 Braid, fluorescent colors .54mm
#4 Braid, hi lustre colors .32mm
#4 Braid, cord colors .30mm
#4 Braid, Japan colors .39mmFacets 1.61mm
Petite Facets .98mmJapan #1 .15mm
Japan #5 .39mm
Japan #7 .51mm -
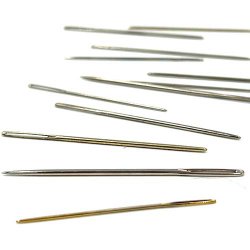
Thread fraying? Check your needle!
If you have a thread that's fraying or misbehaving, the first step is to check your needle. Needle selection matters more than you realize, and can make a stitching project easier or more difficult. Here are three quick tips for needle selection, especially when using metallic threads:
- Use a needle with an eye large enough to accommodate the thread weight. This will reduce thread fraying and enable smoother stitching.
- Also avoid needles with rust or damage as they can damage a thread.
Once you have a good needle, it's time to thread it...
Here are two top tips for threading Kreinik metallics:
Suggested threading technique for Blending Filament, Japan #1 and Cord (the thinnest metallics): Cut about an 20-inch length of thread and fold about 2 inches from one end to create a loop. Insert the loop through the eye of the needle and pull the loop over the point of the needle to "lock" in place. This will keep the thin thread from slipping off as you stitch. (BELOW)

Suggested threading technique for Braids, Ribbons and other Kreinik metallics: Cut a small strip of paper and fold in half. Place the fold through the eye of the needle and open the two ends to insert the thread in between. Gently pull the paper through so the thread is brought along. (BELOW)

-
Needle Selection for Cross Stitch and Needlepoint
Choosing the proper needle is a crucial fist step when you sit down to cross stitch or needlepoint, as a needle that is too small will damage a thread and frustrate your stitching process.
The table below gives specific suggestions for choosing needle sizes to use with Kreinik metallic threads. We focus on sizes of Tapestry needles; this needle has a blunt point and is used in needlepoint and cross stitch.
Kreinik Thread Size + Suggested Needle Sizes
- 1/8" Ribbon: Tapestry No. 18, 20, or 22
- 1/16" Ribbon: Tapestry No 22 or 24
- Heavy #32 Braid: Tapestry No. 18 or 20
- Medium #16 Braid: Tapestry No. 22 or 20
- Tapestry #12 Braid: Tapestry No. 22 or 24
- Fine #8 Braid: Tapestry No. 22 or 24
- Very Fine #4 Braid: Tapestry No. 24 or 26
- Blending filament: Tapestry No. 22, 24, 26, or 28
- Cord: Tapestry No. 24, 26, or 28
- Cable: Tapestry No. 24, 26, or 28
- Japan #1: Tapestry No. 24, 26 or 28
- Ombre: Tapestry No. 22 or 24
Your needle should be large enough to properly fit the thread width, but not so large that it distorts your fabric or canvas. To avoid distorting your canvas In needlepoint, you generally use a size 22 needle on 13 or 14-mesh canvas; a size 24 on 18-mesh canvas; and a size 26 on 24-mesh canvas. In cross stitching, you generally use a size 24 on 14- or 16-count Aida; a size 26 on 18-count Aida; a size 24 on 28-count linen; and a size 26 on a 32-count linen.
-
Needle Selection for Hand Embroidery
Allison Aller answers a common question: “Which needle should I use for hand embroidery on cotton fabric?”
Needle selection is a major contributor to your happiness factor, whether you are hand or machine stitching. Using an incorrect needle will cause a thread to fray, knot, and otherwise misbehave. Many of the problems people have with thread can be solved by needle selection. The problem isn't necessarily the thread, but rather a too-thin needle, a needle with a bad eye, a needle with a too-small eye, or something similar. So "which needle should I use" is a great question.
Needle Sizes to use with Kreinik Metallic Threads
Allie says: As a rule, I use needles with eyes that are larger and shafts a bit thicker than might be needed for regular threads. Because these are metallics, I don’t want any tension to stretch the thread or too small an eye to cause them to fray as I am stitching with them. This also makes for easy threading — you don’t want a fight when you are threading up.- Kreinik Cord—is very fine, but still I use a #8 Embroidery needle. I don’t want any tension to stretch the thread or cause it to fray, so I use a slightly bigger needle than I normally would for this weight of thread.
- Kreinik Very Fine #4 Braid: #22 Chenille. Again, the eye is larger than needed but the shaft of the needle makes a large enough hole that there is no resistance to the thread. This size needle is easy to thread as well—you don’t want to fight that.
- Kreinik Fine #8 Braid: #20 Chenille is good for this size.
- Kreinik Tapestry #12 Braid: 18 Chenille
- Kreinik Medium #16 Braid: #18 Chenille
- Kreinik 1/16” ribbon: I like a #18 Chenille or Darner.
- Kreinik 1/8” ribbon: #14 Chenille or Darner
Your goal is to have a clean (not rusty), fully operational (no burrs in the eye) needle with an eye large enough to accommodate the thread, but not too large that it creates too big of a hole in your fabric. Experiment on your own pairing Crewel needles, Tapestry needles, Chenille needles, and Darner needles with Kreinik threads and your chosen fabrics to find the perfect fit.
Allison is an award-winning quilt designer, teacher, and writer. She specializes in crazy quilts, and has extensive knowledge of embroidery. For more information on Allison, visit http://alliesinstitches.blogspot.com/ or check quilt stores and Amazon.com for her books. She's @alliealler on Instagram.
-
Metallic Thread Selection Guide
Which Kreinik metallic thread works best in Cross Stitch? Which Kreinik metallic thread can you use in a sewing machine? These selection questions and more answered below:
CARD MAKING, SCRAPBOOKING:
- Stitching on paper: Cord, Very Fine #4 Braid, Fine #8 Braid
- Ribbons: 1/16" Ribbon, 1/8" Ribbon
COSPLAY, COSTUMING, FASHION:
- See "Hand Embroidery" or "Machine Embroidery" lists (below)
CROCHET:
- Carry-along: Blending Filament, Ombre, Reflective Yarn
- Jewelry: Tapestry #12 Braid, Medium #16 Braid, Canvas #24 Braid
- Bead crochet: Fine #8 Braid, Tapestry #12 Braid
CROSS STITCH:
- Blending Filament (use by itself or combined with other thread like cotton embroidery floss)
- Cord (backstitching, couching)
- Very Fine #4 (on 16- and 18-count Aida or over two threads on 28-, 32-count linens)
- Fine #8 (on 14-count Aida, or over two threads on 28-count)
- Tapestry #12 Braid (12-count fabrics)
- Medium #16 Braid (11-count fabrics)
- 1/16" Ribbon (10- to 11-count fabrics)
- 1/8" Ribbon (6- to 8-count fabrics)
- Cross stitching on unusual materials, like pegboard, screens, etc? Go up to one of our larger Braids, such as Medium #16 Braid, Canvas #24 Braid, or Heavy #32 Braid); the larger the Braid number, the heavier the thread.
HAND EMBROIDERY:
- Stitch in and out of the fabric: Cord (for very fine details), Very Fine #4 Braid, Fine #8 Braid
- Couch for surface embellishment: Medium #16 Braid, Canvas #24 Braid, Heavy #32 Braid, 3/8" Trim, Facets, Petite Facets, Micro Ice Chenille, Wired Braid, 3/8" Trim
- Ribbon embroidery stitches: 1/16" Ribbon, 1/8" Ribbon, 1/4" Ribbon, Easter Grass
- Dimensional, shaped stitches: 3/8" Trim with wire, Wired Braid
KNITTING:
- Carry-along: Blending Filament, Ombre
- Bead Knitting: Fine #8 Braid, Tapestry #12 Braid
MACHINE EMBROIDERY and QUILTING:
- In the needle: Cord, Japan #1
- In the bobbin: Ombre, #4 and #8 Braids, Cord
- Couched: Facets, Petite Facets, Micro Ice Chenille, Ribbons, Braids (all sizes), Wired Braid, 3/8” Trim, Cable, Japan #5, 7
NEEDLEPOINT:
- Blending Filament (if blending with other fibers) (also can be used on 40-count silk gauze)
- Cord (backstitching, couching)
- Cable (3-ply twist for specialty stitches on any canvas)
- Very Fine #4 Braid (blending on any canvas)
- Fine #8 Braid (18-, 24-count)
- Tapestery #12 Braid (18-, 14-count)
- Medium #16 Braid (14-, 13-count)
- Canvas#24 Braid (13-, 12-count)
- Heavy #32 Braid (12-, 10-count)
- Ombre (18-count canvas, or specialty stitches)
- Couched: Petite Facets, Facets, Micro Ice Chenille, 3/8” Trim, Wired Braid, Japan Threads
- Ribbons: 1/16” (24-, 18-count canvas); 1/8” (14-, 13-count); 1/4” (12-, 10-count), Easter Grass (any canvas)
PUNCHNEEDLE:
- Blending Filament (#1 needle)
- Very Fine #4 Braid (#1 and #3 needles)
- Fine #8 Braid (#3 needle)
PLASTIC CANVAS:
- Medium #16 Braid (14 count)
- Canvas #24 Braid (10-count)
- Heavy #32 Braid (7 count)
- 1/8" Ribbon (7-10 count)
MIXED MEDIA, CRAFTS, STRING ART, OTHER FIBER ARTS:
- All fibers
SAMPLERS:
- Cord (backstitching, couching)
- Very Fine #4 Braid (over two threads on 28-, 32-, 36-count linens)
- Fine #8 Braid (over two threads on 28-count linens)
- Cable (long stitches and specialty stitches)
- 1/16" Ribbon (woven stitches)
SASHIKO:
- Very Fine #4 Braid
- Fine #8 Braid
- Tapestry #12 Braid
- 1/16" Ribbon
SWEDISH WEAVING:
- Very Fine #4 Braid
- Fine #8 Braid
- 1/16" Ribbon
- 1/8" Ribbon
TEMARI:
- Fine #8 Braid
- Tapestry #12 Braid
- Japan thread
- 1/16" Ribbon
WEAVING:
- Warp: Ombre, Ribbons (basic colors), Braids (basic colors)
- Weft: Micro Ice Chenille, Ombre, Ribbons and Braids (any color)
-
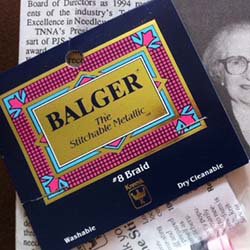
What to do if you need Balger
"I need the Balger, which thread is it?"
Balger was the name we used for our metallic thread line back in the 1970s/1980s. Today we have about 20 different threads in that line, but back then the number was much smaller. If your design uses that old term "Balger," we know it's probably Blending Filament, Cord, or #8 Braid. In order to figure out which of these three threads your project may be calling for, we need to look at how the thread is being used in the design.
If you have an older project — particularly a cross stitch project — check your chart or pattern for these potentially identifying factors:
- Is the Balger color meant to be combined with cotton floss? If so, it is probably Blending Filament.
- Is the Balger color meant to be used by itself, for a bolder look? It is probably Fine #8 Braid.
- Does the Balger color have a "C" in the color number? It is our thin Cord.
Keep in mind that some colors have been discontinued over the years, and dye lots of changed. -

Never use rubber bands to store thread
This is a public service announcement to needleworkers everywhere. Share with your stitching friends. Help us spread the word that rubber bands are not good when it comes to textiles!
Keep rubber bands away from your threads. Never, ever, ever ever ever wrap them around threads that have a silver content, such as Kreinik Japan Threads, or the "J" colors of Kreinik Braids and Ribbons (001J, 002J, etc). It may sound strange to some, but we have seen this over the years: people secure their threads by wrapping them with rubber bands. Not good. The sulphur or sulphur compounds in rubber bands will cause your thread to tarnish.


