

Dollhouse Miniatures
Have fun creating miniature versions of games and pictures for dollhouses.
-
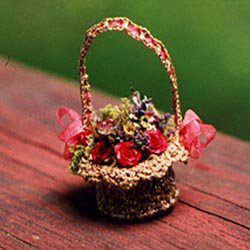
Miniature Crocheted Basket
Note: this item is not shipped
Designed by Linda Driscoll
Materials needed:- two spools Kreinik Fine (#8) Braid 017HL White Gold Hi Lustre
- Boye steel crochet hook size #11
- Aleene's stiffening and draping liquid to paint brush on finished piece
Instructions:
To begin, ch 3, join to form ring.
Round 1: Ch 3 (counts as first dc), work 12 dc in ring, slip st in top of ch 3 (13 dc)
Round 2: Ch 3, dc in same st, dc in next dc *2dc in next dc, * around (26 dc)
Round 3: Ch 3, dc in same st, dc in next dc, *2dc in next dc, 1dc in next dc* around (40dc)
Round 4: Ch 1, sc in same st, skip 1 dc, dc ch 1 in next dc 3 times, skip 1 dc, sc in next stitch, (3dc shell made), work 9 more shells around in same way (10 shells made)
Round 5: Slp st to middle dc in 1st shell. *Ch 3, skip 1dc, sc in space, ch 3, skip next dc, skip next sc, skip next dc, dc in next space, * around * slip st. to first picot loop made (22 picot loops)
Round 6: Ch 1, sc in same picot loop; in next loop, make 3dc shell, sc in next loop - repeat around, 10 3dc shells
Round 7: Repeat round 5
Round 8: Ch 4, * 3 trbl in next loop, * Ch 1, trbl in next loop, ch 1, 3 trbl in next loop * around.
Round 9: Sc in top of ch 4, skip 1 ch, 1 dc, 3 dc shell in next trbl, skip 1 dc, skip 1 ch, and sc in next trbl around.
Round 10: Repeat round 5
Round 11: Repeat round 6
Round 12: Repeat round 5
To work handle: Ch 60, counting to the right, skip 9 loops. In 10th loop, sc, ch 3, skip 1 loop to the right and sc in next loop. Ch 1, going back across on chain, skip 1 ch and dc in next ch. Skip 1 ch, dc in next chain across, ending with ch 1 and sc to top of loop
Round 13: 5 dc in next loop, working around basket to the left, and sc in next loop. Work 5 dc shells around basket in this fashion. When working near handle, hold back handle and work 5 dc shells into picots of previous rd.
Round 14: Work ch 3 picot around in spaces between dc in shells. End off and hide thread with a needle or crochet hook.
Stiffen basket and handle by painting inside of basket and underside of handle with Aleene's stiffening and draping liquid.
Abbreviations:
- ch = chain
- dc = double crochet
- sc = single crochet
- slip st = slip stitch
- trbl = treble crochet
-
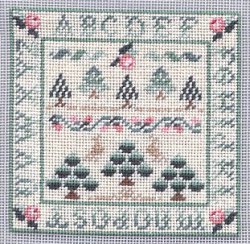
Miniature Silk Gauze Christmas Sampler
NOTE: this item is not shipped. Click the link below to download the PDF.
Miniature Christmas Sampler — a PETIT POINT silk gauze project- Designed by Carol Emmer
Stitch Count: 76w x 76h
What a peaceful way to prepare for the holidays-spending time stitching this classic design with silk threads on silk gauze. Take a moment for yourself as you run errands, plan meals, and do all of those things that can overwhelm us this time of year. Spend time stitching something, unhurried, and thinking of the meaning of the season for you and your family.
Materials needed:
- 4"x 4" piece of 40-ct Kreinik silk gauze
- Kreinik Silk Mori®, one 2.5m skein of each: 3017 Very Dark Coral, 3015 Medium Coral, 3013 Light Coral, 3011 Very Light Coral, 7124 Cream, 4166 Dark Victorian Green, 4164 Medium Victorian Green, 4163 Light Victorian Green, 7135 Medium Dark Mocha, 7134 Medium Bark, 7133 Light Bark,4167 Very Dark Victorian Green
Instructions:
Click here to download the FREE instructions for this design.You will need the Adobe Reader to view and print this file.
- Designed by Carol Emmer
-
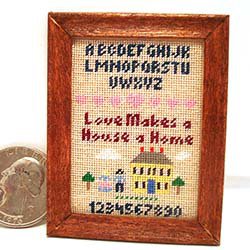
Love Makes a Home silk gauze sampler
NOTE: This item is not shipped. Click the link below to download the PDF.
Love Makes a House a Home PETIT POINT project
by Terrie Lyn Nutter
- An antique sampler exhibit at the Baltimore Museum of Art once displayed a needlework piece stitched by a young American girl in the late 1800s. It was stitched on a piece of gauze that had previously been wrapped around the wounds of a Civil War soldier hurt in a battle near her family's home. Imagine the stitches of silk thread embroidered on the transparent, thin, almost gossamer gauze. The stitches seemed to hang in the air.
This translucent, dimensional effect is one of the beauties of silk gauze embroidery, used throughout the centuries and growing in popularity today for petit point needlework and miniatures.
What is silk gauze?
Silk gauze is a 100% pure filament silk canvas. The silk threads are fine but very strong. Silk gauze is woven in a leno structure, which increases the stability of the canvas. Leno weave actually interlocks the weft threads making it almost impossible for them to shift. It comes in various sizes, including 18-count, 32-count and 40-count.
When do you stitch on silk gauze?
Stitch on silk gauze anytime you want a small, delicate piece of needlework. Miniaturists and doll house enthusiasts enjoy silk gauze needlepoint pieces because you can achieve realistic looking items. For example, doll house rugs, pillows, pictures, and bell pulls can be stitched to scale: 40-count silk gauze is perfect for 1-inch to 1-foot scale.
Silk gauze work is also now gaining popularity among cross stitchers and needlepointers looking for something different (aren’t we all attracted by miniature things?).
How do you stitch on silk gauze?
The first step in stitching on silk gauze is choosing a project. Almost any charted cross stitch design can be used for silk gauze needlepoint. Here you can stitch Love Makes a House a Home for a project. Designs without quarter stitches, blended colors, backstitches, or elaborate color changes make the most successful silk gauze needlepoint projects. You stitch over one thread on silk gauze.
Continental (tent) stitch is the appropriate stitch for silk gauze because it makes for smooth, even silk gauze needlework. Also, it is easier to stitch tent through such petite holes. The use of tent stitch, for example, will have a maximum of two threads in a hole whereas cross stitch could have as many as four stitches per hole. Generally, you stitch with silk threads on silk gauze.
Stitching tips
Sharp scissors, good lighting, and magnifiers can make stitching on silk gauze a breeze.Starting at the top of a chart makes it easier to keep your place on the chart while stitching. A magnet board will also help, or simply cross out stitches on the chart that have been completed as you go along.
Choosing the appropriate needle for silk gauze is also important, as using a needle that is too large can distort the canvas. For 18-count silk gauze, for example, you would use a #26 Tapestry needle with 3 strands of Silk Mori. ON 32-mesh, use a #28 Tapestry with two strands of Silk Mori. On the very fine 40-count, used in this design, Terrie Lynn Nutter recommends a #10 Crewel needle with one strand of Silk Mori.
When stitching on silk gauze, a neat back is especially important if some of the background is left unstitched. When starting a thread, try to use an ‘away waste knot’ to begin. You may sometimes be able to end a thread using this same technique, resulting in less bulk on the back of your work. When ending threads by ‘running’ under stitches, use caution so that the tension of the stitches is not changed.
A dark piece of cloth behind your work makes the holes of the silk gauze ‘pop’ and you can see the threads that need to be covered.
Materials needed:
- Kreinik Silk Mori in 8050, 7012, 7133, 1033, 1032, 2024, 4036, 5095, 8000, 7126, 5093, 5057, 1119, 3017, 8075
- Kreinik 40-count silk gauze, framed, at least 3" x 5" size
- #10 crewel needle
Instructions:
Download the graph and color key for this design by clicking on the PDF below. Stitch this design on the gauze using one strand of Silk Mori according to the color key in continental (tent) stitch. Follow the stitching tips above. Silk gauze work is not necessarily fast stitchery, but it is rewarding. And many will admire your creation. Enjoy.
Click here to download the FREE instructions for this design.You will need the Adobe Reader to view and print this file.
-
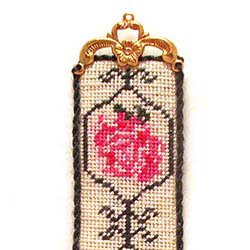
Mini Bell Pull Silk Gauze
NOTE: This item is not shipped. Click the link below to download the PDF.
Mini Floral BellPull
Make a Bookmark or Dollhouse Bellpull
Designed by Terrie Lyn Nutter
Design size: about 3 1/2” long by 5/8” wideMaterials needed:
- Kreinik 40-count silk gauze, at least a 5” x 7” piece
- Size #28 tapestry needle or small crewel needle
- One 2.5m skein of Kreinik Silk Mori® in colors 1032, 1054, 1057, 1055, 2024, 2026, 2027, 2063, 3011, 3013, 3015, 3021, 4037, 4167, 7124
For finishing:
- Kreinik Custom Corder
- brass charm (we used By Jupiter #60143)
- tassel maker, or tassel making instructions
- medium-weight fusible interfacing
- hand sewing needle or fabric glue
Instructions:
Tent stitch this design on your silk gauze using one strand of Silk Mori and following the color key on the main graph/instruction page.
Printing Instructions:
Click here to download the FREE instructions for this design. You will need the Adobe Reader to view and print this file. -
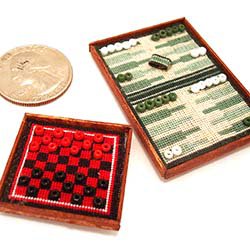
Mini Silk Gauze Board Games
Note: This item is not shippedSilk Gauze Game Boards
Ideal for dollhouses
Petit Point Designed By Terrie Lyn NutterThese are easy patterns to follow, but require some construction for finishing. You'll love the result, though: miniature, doll-house sized backgammon and checkers game boards.
Materials for checkers:- Kreinik Silk Mori¨ (2.5m) in each: 1116, 8050, 8000
- 4" x 4" piece of 40-count silk gauze from Kreinik
- 12 black seed beads, 12 red seed beads
Instructions:
Use one strand of Silk Mori over one thread on the 40-count silk gauze, following the color key. Attach beads with glue as you would in a real game of checkers (all red on one side, all black on the other, every other color block).
To finish: Trim the design to 1/4", turn edges under and secure. You will need to make a frame for the project out of thin pieces of wood, toothpicks, cardboard, or similar. Use your imagination or tools you have at home. Paint the frame or stain a wood color, then glue stitched piece into the frame.Materials for Backgammon:
- Kreinik Silk Mori¨ (2.5m) in each: 4166, 4163, 4167, 7126
- 3.5" x 5" piece of 40-ct silk gauze
- 14 white seed beads, 14 green seed beads
Instructions:
Use one strand of Silk Mori over one thread on the 40-ct silk gauze, following the color key. Glue five green beads at point A, two white beads at point B, five white beads at C, two green beads at point D. Stitch the small chart on an extra part of the silk gauze (it is the cup holding the imaginary dice). Trim to within 1/8' and turn edges to back. Fold the ends of this piece to the back, and glue to top of game board.
Downloading Instructions:
Click here to download the FREE instructions for this design. You will need the Adobe Reader to view and print this file. -

Floral Bouquet silk gauze pillow
NOTE: This item is not shipped. Click the link below to download the PDF.
Floral Bouquet on Silk Gauze
Designed by Terrie Lyn Nutter
This is a sweet little design —and we mean LITTLE! Worked over one on 40-count silk gauze, the design is about the size of a quarter. It can be finished as a dollhouse pillow, a framed project, or inset into an antique brooch.
Materials needed:
- Kreinik Silk Mori® (one 2.5m skein of each) as listed in color key
- one 4” x 4” piece of framed 40-count silk gauze from Kreinik
- one #10 crewel needle
Instructions:
Click here to download the FREE instructions for this design. You will need the Adobe Reader to view and print this file.
-
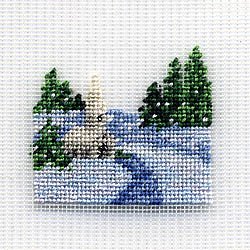
Winter Peace Silk Gauze
Note: This item is not shipped
Designed by: Laura Kramer Doyle • Skill Level: Intermediate • Design size: about 1” x 1”
Here’s a beautiful petit point design for the season – that’s miniature needlepoint, perfect for doll houses, model railroad displays, and other diminutive delights. It is stitched over one on 40-count silk gauze with silk thread—strong fibers that lend a luminous touch.
Materials needed:- Kreinik 40-count silk gauze, 4” x 4 framed piece
- Kreinik Silk Mori™ (one 2.5m skein of each): 5091 Ice Blue, 5073 Lt CountryBlue, 5093 Lt Royal Blue, 5013 Lt Navy, 8000 Soft White, 4034 Md Kelly Green,4037 Vy Dk Kelly Green, 4067 Vy Dk Holly, 7124 Cream, 4073 Lt Dusty Green,8053 Lt Ash Grey, 8055 Md Dk Ash Grey
- Kreinik Blending Filament™ in 011HL
- #28 tapestry or crewel needle
Use one strand of Silk Mori following the color key. Tent stitch (or half cross) centered on the 40-count silk gauze (a needlepoint canvas).Printing Instructions:Click here to download the FREE instructions for this design. You will need the Adobe Reader to view and print this file.
-
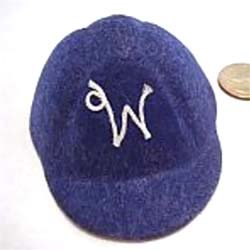
Doll-Sized Monogrammed Baseball Cap
Doll-Sized Baseball Cap
Skill level: beginner
Time: half hourIf you work with dollhouses or make clothes for dolls, Kreinik's iron-on (fusible) threads are an easy way to add a diminutive embroidered look. The fusible threads are fast and can be attached to any surface.
Materials needed:- doll-sized baseball cap (from craft store)
- Kreinik iron-on Braid in your choice of colors
- mini craft iron or household iron
- Kreinik press cloth (we recommend the adhesive press cloth, which can be attached to the foot of a mini craft iron)
Instructions: - Turn your iron on to the highest heat setting and let it heat thoroughly.
- Sketch out on a piece of paper or print your lettering from your computer to use as a placement guide.
- At your starting point on the baseball cap, lay the end of your iron-on Braid. Cover with a Teflon press cloth (or use a teflon-coated iron) and press for several seconds until the thread adheres. Continue working your design this way, placing and pressing your thread as you go.
-
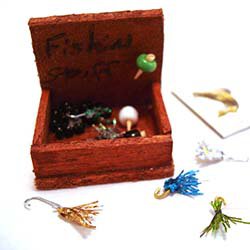
Miniature Fishing Tackle Box
Miniature Fishing Tackle Box
Skill level: beginner
Time: under an hourCreating a doll-house-sized cabin scene? or just looking for some fishing supplies for Ken and Barbie? Making miniature fishing lures is so easy.
Materials needed:- small wire, paper clips etc straightened out
- wire cutters
- pliers or a grip to hold the wire
- Kreinik 1/8" ribbon in "bug" colors like 032, 008, 085 etc
- Kreinik Blending Filament in colors to match your ribbon
- sharp sewing needle
Instructions:
- Hold a length of wire. With your pliers, curl the end of a wire to replicate a hook.
- Wrap the ribbon around the wire just beneath the hook, with the end of the ribbon pointing away from the hook. Take your matching Blending Filament and begin to wrap around the ribbon, securing it to the hook. When secured, thread the end of the filament through your needle, then insert the needle in the ribbon to knot the filament and "tie off" the end.
- Trim your ribbon and fluff the end using the needle to separate the strands a little bit.
- Cut your wire close to the ribbon (don't cut any ribbon).
- Repeat to make as many lures as desired.
-
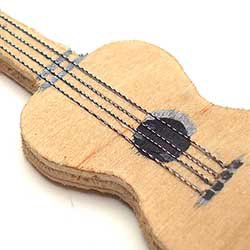
Miniature Wooden Guitar
Miniature Wooden Guitar
Skill level: beginner
Time: about an hourString a miniature wooden guitar with a fiber that is strong but thin - like Kreinik Cord. It's fine size makes it a miniaturists best friend. Cord is available in a variety of colors including 'guitar string gray.'Materials needed:- miniature wooden guitar
- Kreinik Cord in 105C Antique Silver Cord
- sewing needle
- drill with small bit or something similar to poke minute holes in the wood
- clear-drying glue
Instructions:- Poke small holes in the arm of the guitar and at the base where the strings will be threaded through to the back.
- Thread your needle with the Cord, knotting one end. Bring your needle up through one of your holes from the back (the knot will keep the Cord from coming through). Lay a dab of glue along the spot where the Cord will lay. Lay your Cord and insert your needle through the directly opposite hole, laying the cord as if it were guitar string. Repeat for the number of strings in your guitar. Let it dry thoroughly.
- Secure all Cord ends on the back of your guitar arm by gluing the ends to the back. Let dry.
-
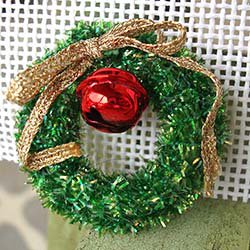
Miniature Crocheted Wreath
NOTE: this is not a product that is shipped.
Decorate your dollhouse for the holidays — it's easy to make these fun wreaths for the doors and windows. They also make quick gifts: pins to wear or ornaments.
Materials needed:- white plastic rings
- Kreinik Micro Ice Chenille in 009 green or 015 chartreuse, or Kreinik Medium #16 Braid in 008 Green or 015 Chartreuse
- crochet hook (choose a small hook size)
- Kreinik 1/8" Ribbon in 002 Gold
- #22 tapestry needle
Instructions:
- Single crochet around the ring using the green metallic thread. When you get to the last single crochet, connect to the starting single crochet with a slip stitch or chain stitch. Knot off.
- Thread your tapestry needle with a 6-inch piece of 1/8" Ribbon. Come up from the back of your wreath at a top point. Thread the other end of the ribbon in your needle and come up from the back (so now you have both thread ends of the 1/8" Ribbon in the front). Tie the ribbon into a bow. Add a jingle bell if desired.
- As desired attach a pinback, magnet, or double-sided Treasure Tape dot (if attaching to a dollhouse).
-
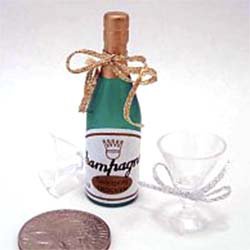
Decorative Miniature Champagne Bottle
NOTE: this is not a product that is shipped.
Miniature Champagne BottleBarbie's wedding or a doll-house celebration scene wouldn't be complete without a bottle of faux champagne and champagne glasses. Dress them up properly, and to scale, with Kreinik 1/16" Ribbon. it is the perfect size for micro-ribbon embellishments on miniatures.
Materials needed:- dollhouse or miniature sized champagne glasses and bottle
- Kreinik 1/16" ribbon in any color, SUCH AS: 002 Gold, 002L Chromo Gold, 202HL Aztec Gold, or 001 Silver, 001L Solar Silver, or 001HL Hi Lustre Silver
Instructions:
- Cut your length of ribbon and tie around the champagne bottle.
- Repeat with champagne glasses.
- If desired, add a touch of glue or Fraycheck™ to the end of the ribbon to keep the fibers from separating.


