
Fabric Projects
Fun ideas for embellishing quilt projects and using your fabric scraps
-
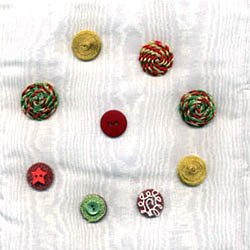
Button Block
Button Block
Designed by: Jim Cargo
Skill Level: Beginner Time: Fast!Quick Idea: Make button pillows in Christmas colors for seasonal gifts
Here's a fast, low-sew project that's fun, easy, and looks expensive. Simply embellish buttons using metallic threads and cords; the secret's in the double-sided tape. Kids will love making cords and embellishing the buttons too.
Materials needed:
- Kreinik double-sided Treasure Tape, 1-inch roll
- Kreinik Custom Corder if you want to make cording
- Kreinik Medium #16 Braid in your choice of colors (we used red, green and gold)
- Kreinik metallic 1/16" ribbon in your choice of colors (we used 015 Chartreuse and 002J Japan Gold)
- buttons in various sizes
- sewing thread and needle
- fabric block, quilt, or pillow
- optional: small buttons, sequins or flat-backed cabochons
Instructions:
1. Make cording using Kreinik metallic threads and the Kreinik Custom Corder, following instructions that come with the corder. You don't need to make cords that are very long; just long enough to cover your buttons.
2. Lay pieces of Treasure Tape on your buttons. You may need to trim any tape that overlaps your buttons.
3. Working one button at a time, remove the red liner to expose the top sticky area, and begin decorating with your threads and cords. Some ideas: - lay cords made with the Corder in a circular shape - lay 1/16" Ribbon or #16 Braid in single colors on the button, then use scraps of Treasure Tape to lay a smaller button or cabochon on top in the center.
4. When button decorating is complete, sew your buttons onto your fabric block and finish edges if needed by adding binding or hemming.
Alternate finishing ideas: - sew buttons onto a pillow for a contemporary home decor design. - sew buttons in a shape (like a tree shape, using all green thread colors) or initial.
-
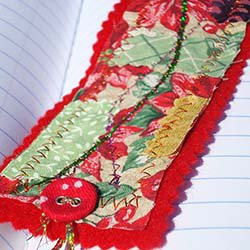
Crazy Colorful Fabric Bookmark
NOTE: this is not a product that is shipped.
Crazy Colorful Fabric Bookmark
featuring Kreinik holographic threads
Materials needed:
• scraps of Christmas fabric (or scraps of any fabric - this is a fun way to recycle textiles)
• Kreinik holographic thread colors in a variety of thread weights (we used threads from the Make Mine 3-D Holographic thread set)
• sewing needle or sewing machine (optional)
• red felt for backing
• button
• mini wooden spools, buttons or other as desired for a “tassel”
• pinking shears (scissors)
• sewing machine (optional)
• clear monofilament thread, glue (optional)
Instructions:
1. Cut a 3” x 7” piece of red felt.
2. You will be making a textile sandwich, with red felt in the back, layers of fabric scraps on the felt, then decorative threads on the fabric scraps, all sewing together using the threads. So begin by laying a scrap of fabric or scraps of fabric on the felt in random spots, then stitch them to the felt with the Kreinik holographic threads either by hand or sewing machine. Suggestions to get you started:
• use Kreinik Blending Filament in the needle of your sewing machine (use any bobbin thread, stitch slowly) in a zig zag stitch.
• couch Kreinik #16 Braid and/or 1/16” and 1/8” Ribbon with a clear monofilament or contrasting Blending Filament color, use a straight stitch, side by side, or decorative stitch to couch down the heavier metallics.
Have fun and play with threads. Don’t be perfect - be random, mistakes are ok, knots are even ok. This is free-form textile art.
3. When you have finished playing with the threads and top embellishments, trim the fabric pieces so that they are roughly even on the outside edges. Then trim your felt using pinking shears.
4. Attach a button at one end of the bookmark.
5. If using little wooden spools, wrap holographic thread around them just to cover the spool (glue the thread end to secure). String the spools onto some extra holographic threads, make a super large knot in one end to keep the thread from coming back out (or use a button like we did in the photo), then attach/tie the fibers to the button on your bookmark.
Printing Instructions:
Click here to download the FREE instructions for this design. You will need the Adobe Reader to view and print this file.

