
Variety
-
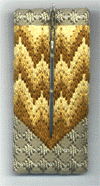
Silken Stitches
NOTE: this is not a product that is shipped. Click the link below to download the PDF.
Silken Stitches
- Designed by Mary Polityka Bush
Wear your art out with this elegant little project from designer and teacher Mary Polityka Bush that features Kreinik silk thread.Be prepared for the compliments, and perhaps you can introduce canvaswork to some new stitchers.
Materials needed:
- Kreinik Silk Mori®:2013 Light Gold, 2014 Medium Gold, 2016 Dark Gold, 4074 Medium Dusty Green
- Kreinik Silk Serica®:4074 Medium Dusty Green
- 6” x 8” White 24-ct Congress Cloth
- 14-ct plastic canvas, 1/18” x 2 3/4”
- #14 and #24 Tapestry Needles
- 1-inch sew-on pinback
Instructions:
Click here to download the FREE instructions for this design.You will need the Adobe Reader to view and print this file.
- Designed by Mary Polityka Bush
-
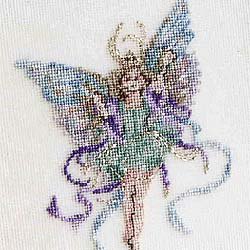
Silk Gauze Fairy
NOTE: This item is not shipped. Click the link below to download the PDF.
Silk Gauze Fairy
Designed by Donna Vermillion Giampa
Design size: 77w x 94hMaterials needed:
- one 2.5m skein of Kreinik Silk Mori® in each: 3013, 3021, 7135, 7012, 7014, 7124, 6083, 6106, 6104, 4166, 4164, 4163, 4162, 5093, 5053, 5091, 6124, 6123
- Kreinik Blending Filament in 002HL
- 32-count silk gauze from Kreinik (at least 4” x 4” piece)
- #28 Tapestry needle or #10 crewel needle
Instructions:
Click here to download the FREE instructions for this design.You will need the Adobe Reader to view and print this file.
-
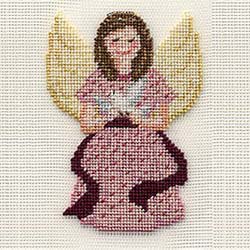
Victorian Angel silk gauze
NOTE: This item is not shipped. Click the link below to download the PDF.
Victorian Angel- Silk Gauze Design By Cherie Marie Leck
This is a sweet design that can be made as a gift for a sick friend or loved one, a new baby, a Christmas ornament for a Victorian-style tree, or as your own personal reminder of heaven-sent blessings. Stitching the angel on silk gauze gives it a sense of “floating on air.”
Materials needed
- Kreinik Silk Mori in the colors listed in the color key
- Kreinik Blending Filament 002HL
- 4” x 4” piece of 40-ct Kreinik Framed Silk Gauze
- #10 Crewel needle or #28 Tapestry needle
Instructions:
Click here to download the FREE instructions for this design.You will need the Adobe Reader to view and print this file.
-
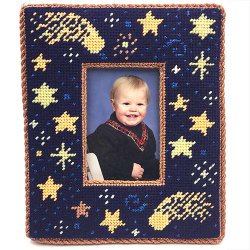
Little Stars Free Needlepoint Frame Pattern
NOTE: this is not a product that is shipped. Click the link below to download the PDF.
Little Stars Frame
Designed by Catherine Reurs
Design Size: 69w x 84hMaterials needed:
- Kreinik Medium (#16) Braid™ in these colors: 027, 051HL, 9100, 051F, 052F
- Anchor Cotton Embroidery Floss color 127 (several skeins)
- #22 Tapestry Needle
- White 14-ct Zweigart Interlock Canvas, approx 11" x 11"
- Stretcher bars with tacks
Stitching & Finishing Instructions:
Cover the raw edges of your canvas with tape to protect the thread from catching on the rough edges, then mount the canvas on stretcher bars. Use tent stitch throughout this design. Use 6 strands of cotton floss to fill the background (use 7 strands for fuller coverage). Then stitch the remaining areas using 1 stand of Medium (#16) Braid according to the color key.
Finishing:
This project should be mounted and finished as a picture frame. You may wish to have this project professionally finished; check your local needlecraft shop for a resource. Note the orange cording that serves as a border; this was made with Kreinik metallic thread and the Kreinik Custom Corder.
Stitching Tips
1. Use short lengths of thread—about 18 inches—to avoid excessive abrasion on the thread from repeated passes through the fabric. Shorter lengths will also give you more control over the thread, which reduces tangling.
2. Try ‘stroking’ the thread before threading the needle—using heat and moisture from your own hand after rubbing your hands together, or using a slightly damp sponge—to relax the thread and thus reduce twisting and knotting.
3. Use an even amount of tension as you stitch to avoid distorting the canvas. Lay the strands of cotton floss neatly for ideal coverage.
4. Let the needle hang frequently as you stitch so the thread can untwist.The way we twist the needle as we stitch, combined with the twist of the thread—or threads—often leads to frustrating knots. It is good to get into the habit of letting your needle dangle after every one or two stitches to return the thread to its natural twist.
5. For a quick-and-easy, take-anywhere threading technique, cut a small strip of paper and fold in half. Place the fold through the eye of the needle and open the two ends to insert the thread in between. Gently pull the paper through so the thread is brought with it.
Instructions:
Click here to download the FREE instructions for this design. You will need the FREE program Adobe Reader to view and print this file.
-
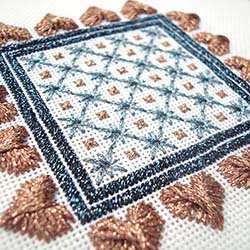
Florentine Romance
NOTE: this is not a product that is shipped
Florentine Romance
Designed by Mary Polityka Bush
Design size: about 3 1/2" x 3 1/2"
This small project shows off metallic threads, dimensional Rhodes stitch, and fun eyelets. You can stitch it in your own desired colorway or replicate our model.
Materials needed:
- Kreinik Tapestry #12 Braid 018 Navy (5 yards), 021 Copper (1 reel), 025 Grey (5 yards)
- 7" x 7" Zweigart white Congress Cloth (#9406/194/50)or Soft Congress Cloth (#3990/100/50)
- #24 Tapestry needle, masking tape, two pairs of 7" stretcher bars, tacks or staples
Instructions:
Refer to graph below. Note: only lower right 1/4 of pattern is graphed; work remaining 3/4 as mirror images
1. Tape Congress Cloth edges; mount on stretcher bars.
2. Thread needle with #025 Gray. Place away knot at right side of canvas. Work center row of Algerian Eyelets from lower right to upper left, beginning 1 1/4" from center of canvas. Work remaining rows in same manner.
3. Thread needle with #018 Navy. Beginning with waste knot, work 2 bands of slanted Gobelin, changing direction of slant at midpoint of each side.
4. Thread needle with #021 Copper. Beginning by burying tail in back of slanted Gobelin stitches, fill areas between eyelets with 2x2 cross stitches worked in long diagonal rows.
5. Thread needle with a 22" length of #021 Copper. Beginning by working two tent stitches over thread tail in center of area to be worked, work 1 Rhodes heart outside corner edge of Gobelin bands. work remaining Rhodes hearts in same manner, using 22" for each.
6. To finish: remove from bars. Mat and frame; back with fabric and stuff or fill with potpourri to make ornament or sachet; or mount in box with 3 1/2" opening.


