
Christmas and Winter
-
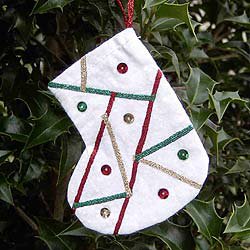
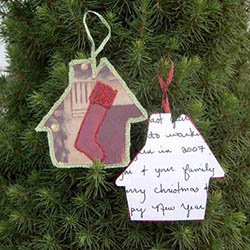
Iron-On Stocking
NOTE: this item is not shipped.
Iron-On Stocking
Designed by: Nancy Billetdeaux
Skill Level: IntermediateThis is a fun way to make a quick fabric ornament that looks like it was crazy quilted. You can take it a step further and make it a ‘signature’ ornaments– having family or friends sign their names in the sections of the design.The iron-on threads give you a quick decorative thread embellishment.
Materials needed:
• Iron-on 1/8” Ribbon in 6130 Red, 6225 Gold, 6350 Green
• 3” x 4” Kreinik Press Cloth if using a regular iron, or Kreinik adhesive press cloth if using a Clover Mini Iron
• Mini iron or household iron
• 4 1/2” X 4 1/2” white print fabric
• sequins (small) 6 red, 4 green, 4 gold
• sewing machine
• white all-purpose thread
• fabric glue
Instructions:
If using the adhesive press cloth on a mini iron, tear off the backing and apply to the mini iron while cool and unplugged.Turn your iron onto the highest heat setting and let it heat thoroughly.
1. Trace and cut out the stocking template. Place template onto doubled white print fabric and cut out.
2. Referring to template for placement, iron the 1/8’ Ribbon; lay the thread at a starting point, cover with the Teflon press cloth, and press for several seconds until the thread adheres. Continue in this way, working the design n sections. Refer to the photo for color location.
3. Pin stocking right sides together and sew around stocking, leaving top open, using a 1/4” seam allowance. Turn under 3/8” to inside of stocking and stitch around top of stocking 1/4” from edge.
4. Cut a piece of 1/8” red Iron-on Ribbon 8 1/2” long, and fold in half.Iron the raw ends to inside of stocking (always use your Teflon press cloth).
5. Glue sequins to stocking using fabric glue; refer to photo for color and placement. -
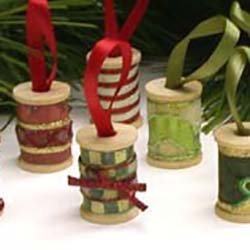
Wooden Spool Ornaments
Note: this item is not shipped
Quilters and sewers will love these handmade ornaments. With vintage charm, they can be easily-and quickly-made up in batches for a sewing club, nursing home, or even to sell at a holiday bazaar.
Materials needed:
- Bag of large wooden spools (available in wood aisle of craft store)
- Fabric scraps trimmed to width of spool
- Red and green satin ribbon (we used 1/4" wide ribbon)
- glue
For beaded ornaments:
- Treasure Tape 1" roll (if using spools with 1" wide design area)
- Treasure Tape 1/8" roll
- Diamond Beadlets
- Kreinik #12 Braid in 015, 003, 002
- Kreinik 1/16" Ribbon in 008, 002, 032
- shallow pan or tray
For iron-on ornaments:
- Kreinik Iron-on 1/8" Ribbon in Pearl and in Red
- Kreinik Iron-on #16 Braid in Pearl
- Kreinik Teflon Press Cloth
- Mini iron
Instructions for Iron-on ornaments:
1. Turn your iron onto the highest heat setting and let it heat thoroughly.
2. Using double-sided Treasure Tape or your favorite glue, attach fabric scraps to the spool.
3. Begin thread decorating by laying one end of your Iron-on Braid or Ribbon on the fabric-covered spool. Cover with the Teflon Press cloth and press with your hot iron for several seconds until the thread adheres. Continue this way, working your design in sections. We used the braid and ribbon to write the word "Joy" but you can create your own design too.
4. Attach the satin ribbon as a hanger either by knotting the ends and slipping it through the spool's hole, or by gluing the ends inside the spool's hole.
Instructions for beaded ornaments:
1. Using double-sided Treasure Tape or your favorite glue, attach fabric scraps to the spool.
2. Lay strips of the thin Treasure Tape roll on the spool. Remove the red liner to expose the top sticky area.
3. Begin thread decorating by laying the Kreinik ribbon in your desired pattern. Fill in with the Kreinik braid as desired.
4. When thread decorating is complete, lay your spool in a shallow pan and cover remaining sticky areas with Diamond Beadlets.
5. Attach the satin ribbon as a hanger either by knotting the ends and slipping it through the spool's hole, or by gluing the ends inside the spool's hole.
-

Easiest Christmas Ornaments
Note: This item is not shipped.
Need a Christmas party craft idea? These handmade ornaments fit neatly into an envelope for mailing, they recycle old Christmas cards, they're fast, easy, and inexpensive, and simple cookie cutters help to make the designing a no-brainer. You can also personalize them by writing a message or date on the back. This Christmas, everyone will be hooked on making the easiest Christmas ornaments ever.
Materials needed:
- cookie cutters in desired shapes (we used a tree and a star shape)
- old Christmas cards
- mini iron or household iron
- Kreinik 1/8" Iron-on Ribbon in your choice of colors (we like 6130 Red, 6225 Gold, 6300 Meadow, 6010 Pearl, or 6020 Silver)
- Kreinik #16 Iron-on Braid in your choice of colors
- Kreinik teflon press cloth
- ironing surface
- pen or pencil for tracing
- scissors
Note: if your iron is not Teflon-coated, you will want to use a press cloth between the thread and the iron, or apply a Kreinik Adhesive Press Cloth to your iron (several sizes are available). Apply the Adhesive Press Cloth while your iron is cool and unplugged.
Instructions:
1. Turn your iron on to the highest heat setting and let it heat thoroughly.
2. Meanwhile, trace the outline of the cookie cutter shape onto your Christmas cards, then cut out.
3. To begin decorating, lay your iron-on ribbon at the edge of your card design. Cover the thread with the Teflon Press Cloth, then press for several seconds until the thread adheres. Continue this way, laying the thread around the border. You may want to start and end at the top of your design so that you can leave extra thread for the loop.
4. If desired, decorate other parts of the card with the thinner iron-on braids. Always use the Teflon Press Cloth to keep the adhesive in the thread from sticking to your iron.
-
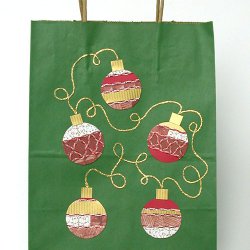
Ornament Gift Bag
Note: This item is not shipped.
Designed by: Amy Law, Skill Level: For all
Combine your creative talent with paper scraps to make festive gift bags this season. People will be amazed at the boutique-quality packaging. The magical embellishment is the iron-on thread, which makes decorating fast and easy.
Materials used in our model:
- Medium Size paper gift bag
- Red cardstock
- Red, gold, and white paper scraps
- Kreinik Iron-On Threads: 6230 Burnished Gold #16 Braid, 6136 Peppermint 1/8" Ribbon
- mini craft iron or household iron
- Kreinik Teflon Press Cloth or Adhesive Press Cloth
- Treasure Tape
Note: if your iron is not Teflon-coated, you will want to use a press cloth between the thread and the iron, or apply a Kreinik Adhesive Press Cloth to your iron (several sizes are available). Apply the Adhesive Press Cloth while your iron is cool and unplugged.
Instructions:
1. First turn on your iron to it's highest setting and allow it to heat up. Cut five 3-4" circles from your red cardstock (you can trace the bottom of a jar as a guide.) These will be your ornament bases. Cut 5 small squares of gold paper for your ornament tops.
2. Using your paper scraps, make stripes or patchwork designs on each of your ornaments. Leave some of your red cardstock showing if desired. Glue your designs in place and trim the scraps to the edge of each circle base.
3. Using your iron, embellish your ornaments with Peppermint ribbon. Lay the thread at a starting point, cover with the Teflon press cloth, then press for several seconds until the thread adheres. Continue working this way until your design is complete. Outline your stripes or create criss-cross and swirl patterns.
4. When finished, use the Treasure Tape to place your ornaments and ornament tops on the bag.
5. Finish your design with your Burnished Gold braid. "String" the ornaments together by ironing your braid between them.
-

Fast Festive Christmas Stocking
Note: This item is not shipped.
This quick project is an example of a perfect match: a quilt stencil + iron-on metallic thread. Simply use the stencil, like this tree pattern, as a guide for placing the thread. Add dollar-store mini ornaments for more variety, and you have a charming, whimsical stocking to hang this season. Add personal buttons or mementos if desired to make it even more special.
Materials needed:
- plain red stocking from a discount store
- quilt stencil of a tree shape
- Kreinik Iron-on 1/8" Ribbon in 6300 Meadow
- Kreinik Iron-on Medium #16 Braid in 6356 Rain Forest, 6130 Red, and 6020 Silver
- Mini Craft Iron or home iron
- Kreinik Adhesive Press Cloth (small size to fit a mini iron, or large for a home iron)
- Mini ornaments (like from Michaels, Joanns, or other craft store)
- red sewing thread
- fabric pen
Instructions:
- If your iron isn't coated with a non-stick surface, you will want to put the Adhesive Press Cloth on the plate. This keeps the heat-activated adhesive in the thread from sticking to your iron. When your iron is cool, simply peel the backer off the Adhesive Press Cloth and lay it flat on the plate of the iron.
- Turn your iron on to high heat and let it heat thoroughly.
- Using your quilt stencil and fabric pen, mark the lines of the tree in the desired place on your stocking.
- Iron the Medium #16 Braid 6356 Rain Forest green for the tree trunk. To iron the thread: lay the iron-on 1/8" Ribbon at a starting point on your stenciled lines, and press with the hot iron for several seconds until the thread adheres. Continue working your design this way, following the lines of your stencil pattern, until the design section is complete. Iron the 1/8" Ribbon 6300 Meadow green on the tree in the same way, following the lines on your stenciled pattern.
- Sew on mini ornaments with red thread as desired. Option: cut 5" pieces of the 6020 Silver Medium #16 Braid and tie in a bow around some of the ornaments (like we did with the candy canes). Then iron the Braid onto the tree, pressing around the ornaments so that the silver thread adheres and anchors the ornaments onto the stocking.
- Personalize the project by adding a person's name along the white band using the Medium #16 Braid iron-on thread in 6130 Red. Either "write" freehand, or use a computer font as a guide.
-
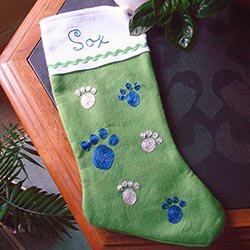
Pet Stocking
Note: This item is not shipped.
This felt stocking was $1 at Target. Simply add paw print embellishments with Kreinik Iron-on Thread, personalize it with the pet's name, and you have a whimsical but inexpensive Christmas stocking.
Materials needed:
- inexpensive purchased stocking (look at discount stores, craft stores, dollar stores)
- Kreinik Iron-on 1/8" Ribbon in 6450 Blue and 6020 Silver
- Kreinik Iron-on Medium #16 Braid in 6450 Blue
- Mini Craft Iron or home iron
- Kreinik Adhesive Press Cloth (small size to fit a mini iron, or large for a home iron)
Note: if your iron is not Teflon-coated, you will want to use a press cloth between the thread and the iron, or apply a Kreinik Adhesive Press Cloth to your iron (several sizes are available). Apply the Adhesive Press Cloth while your iron is cool and unplugged.
Instructions:
- If your iron isn't coated with a non-stick surface, you will want to put the Adhesive Press Cloth on the plate. This keeps the heat-activated adhesive in the thread from sticking to your iron. When your iron is cool, simply peel the backer off the Adhesive Press Cloth and lay it flat on the plate of the iron.
- Turn your iron on to high heat and let it heat thoroughly.
- Iron paw prints onto the stocking following the diagram as a guide. Lay the thread at a starting point, press with the hot iron for several seconds until the thread adheres, then keep pressing the thread in sections. For best results, lay the Iron-on 1/8" Ribbon flat as you work, creating a "spiral" or circle for the pads of the paw print.
- Continue adding paw prints to your stocking using the silver or blue Iron-on Ribbon.
- To add your pet's name, use the Medium #16 Braid in 6450 blue. Design your own lettering style, or use a font on your computer as a guide.
-
Recycled Card Ornaments
NOTE: this item is not shipped.
Recycled Card Ornaments
Skill Level: For all
Need a Christmas party craft idea? These handmade ornament fit neatly into an envelope for mailing, they recycle old Christmas cards, they're fast, easy, and inexpensive, and simple cookie cutters help to make the designing a no-brainer. You can also personalize them by writing a message or date on the back. This is an easy project for older kids and teens, too. (Just make sure an adult is present as they're using a hot iron.)
Materials needed:
- cookie cutters in desired shapes
- old Christmas cards
- mini iron or household iron
- Kreinik 1/8" Iron-on Ribbon in your choice of colors (we like 6130 Red, 6225 Gold, 6300 Meadow, 6350 Green, 6010 Pearl, or 6020 Silver)
- Kreinik #16 Iron-on Braid in your choice of colors
- Kreinik press cloth (adhesive press cloth if using the Clover Mini Iron)
- ironing surface
- pen or pencil for tracing
- scissors
instructions:
1. Turn your iron on to the highest heat setting and let it heat thoroughly.
2. Meanwhile, trace the outline of the cookie cutter shape onto your Christmas cards, then cut out.
3. To begin decorating, lay your iron-on ribbon at the edge of your card design. Cover the thread with the Teflon Press Cloth, then press for several seconds until the thread adheres. Continue this way, laying the thread around the border. You may want to start and end at the top of your design so that you can leave extra thread for the loop.
4. If desired, decorate other parts of the card with the thinner iron-on braids. Always use the Teflon Press Cloth to keep the adhesive in the thread from sticking to your iron.
-

Felt Angel Ornaments
NOTE: this item is not shipped.
You can do this same technique on any felt shape. Look for these ready-made felt shapes in craft stores.
In one West Virginia county, the local Hospice organization creates holiday trees with angel themes each year. Residents are encouraged to write a loved one's name on the angel and place it on the tree for remembrance. This simple Felt Angel design came out of such a project. Whether you make them for charity or for decorations on your own tree, they're fast, easy, and simply beautiful. They would also make lovely package decorations on your holiday gifts this year.
Materials needed:
- craft felt (or craft felt already cut into angel shapes)
- cookie cutter in an angel shape (if you can't find cut-out angels) and pen for tracing cutter shape onto felt
- scissors
- household iron or mini iron
- Kreinik Press Cloth (the adhesive version if you're using a Clover Mini Iron)
- Kreinik Iron-on #16 Braid in 6225 Gold, or your choice of colors
- Kreinik Iron-on 1/8" ribbon in 6225 Gold, or your choice of colors
Note: if your iron is not Teflon-coated, you will want to use a press cloth between the thread and the iron, or apply a Kreinik Adhesive Press Cloth to your iron (several sizes are available). Apply the Adhesive Press Cloth while your iron is cool and unplugged.
Instructions:
1. Turn your iron onto the highest heat setting and let it heat thoroughly.
2. Trace your desired shape onto the felt, then cut out.
3. Begin decorating the angel as desired with iron-on thread: lay the thread at a starting point, cover with the Teflon Press Cloth, and press for several seconds until the thread adheres. Continue this way, working your design in sections.
DESIGN IDEAS:
- write someone's name with the iron-on braid
- add a halo with a piece of iron-on ribbon, ironing just the ends of the thread on the back of your angel's head
- add buttons or charms by stringing the iron-on Braid through the holes in the button/charms, then iron down the thread to secure
- tie a bow with the iron-on thread then iron it onto your felt
- add an ornament hanger to the back by ironing the ends of the iron-on ribbon
-
Faux Gingerbread Ornament
NOTE: this item is not shipped.
Faux Gingerbread Ornament
Make a faux gingerbread ornament with a wooden shape, brown paint, and Kreinik iron-on metallic threadd. So easy and so fun to make!
Materials needed:
- Kreinik Iron-on 1/8" Ribbon in 6354 Green and Iron-on #16 Braid in 6010 Peal
- Household iron or mini craft iron
- Adhesive press cloth if using a mini-iron, or larger press cloth for home irons
- wooden shape from a craft store
- brown pain
- mini snowflake decal, or button with a flat back
- craft glue
Instructions:
PREP:
1. Paint your wooden shape brown. Allow to dry thoroughly.
2. To make sure your craft iron has a non-stick surface, attach the adhesive press cloth to the plate of the iron. This will keep the adhesive in the thread from stocking to your iron. If you choose not to use an adhesive press cloth, use a normal press cloth between the thread and your iron.
BEGIN:
1. Turn on. your iron to the highest heat setting and let it heat thoroughly.
2. Lay one of the iron-on colors at a starting point and press with the hot iron. Hold for a few seconds until the thread adheres. Continue working the design this way as desired. We decorated in twirly patterns using the green first, then the pearl on top, to replicate the look of icing.
4. Attach the snowflake with glue in the center.
5. Use yarn or extra Kreinik thread to make a loop as the ornament hanger; glue or staple to the back of your design.


