

Embroidery
Creative projects featuring embroidery, punchneedle, and free-form stitchery, brought to gorgeous life with Kreinik threads.
-
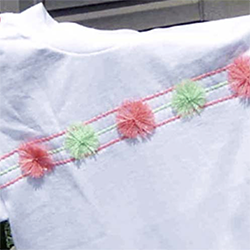
No-Sew T-Shirt With A Glow
NOTE: This item is not shipped.
Designed By eXpresSew
No one wants to fade away when the sun goes down. Keep your “glow” when the lights go out by decorating this plain t-shirt with fluorescent flowers.
Get everything together:
- Plain t-shirt in white or other solid color
- Glow-in-the-Dark thread by Kreinik, 1/8” ribbon or #32 Braid weight – 2 colors that look good together. You’ll need 1 spool of each color.
- Sewing thread that matches the t-shirt
- Disappearing pencil that can be seen on your t-shirt and erased later
- Ruler
- Sewing machine
- Embroidery hand sewing needle with large eye
- Small piece of paste board or tag board (like from a cereal box) – about 2” wide and 3” long
- Iron with steam setting
- Ironing board
Instructions:
Place the t-shirt flat on a table with the front facing up. Draw a line straight across the chest from sleeve to sleeve. Draw 2 more lines each _” apart. (Diag. 1).
Set up your sewing machine with the matching thread. Starting at one sleeve seam, lay one color thread over the top line and zigzag it to the shirt. (Diag. 2). Try NOT to stretch the shirt as you sew.Leave a thread tail at both ends of the line about 3” long.(By the way, zigzagging over a thick thread is called “couching”.) Zigzag or couch over the middle line with the second color thread. Couch the last line with the first color thread.
Push the embroidery needle through the shirt where the line meets the sleeve seam. Thread the tail through the large eye in the needle and pull the tail end through to the inside of the shirt. (Diag. 3). Repeat for the tails at each line end. Turn the shirt wrong side out. Stitch the tails back and forth securely to the seam allowance at each sleeve. Trim the tails off.
Print the pattern guide and use it to cut a template from the tag board for making the flowers.
For flowers, cut one piece of Glow-in-the-Dark thread about 6” long and keep it handy to tie the middle of the flower. Next wrap the thread around the template 8 full times and cut it off. (Diag. 4). Slide the tie piece through the space in the template and tie around the thread very tightly. (Diag. 5). Tie again and knot. Slide the flower off the template and cut the top and bottom loops. Trim the ends evenly. Make three flowers with the first color and two flowers with the second color.
Place the flowers on the ironing board and set the iron to the lowest setting for steam. Fan the threads out and press lightly with the iron until your flowers have a nice rounded shape.
Handstitch the flowers onto the middle line, alternating colors from left to right.


-
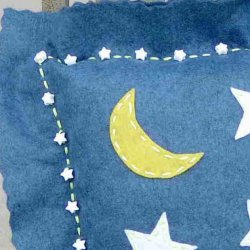
Celestial Pillow
NOTE: this is not a product that is shipped. Click the link below to download the PDF.
Celestial Pillow by Brenda Spitzer
- Design Size: 16" x 16"
This pillow would make a trendy bed accessory for a child or teenager. It's simple to put together (kids and teenscan help). The Kreinik threads glow in the dark.
Materials needed:
- one spool of each: Kreinik Medium #16 Braid 052F, 054F
- one spool of Kreinik 1/8" Ribbon in 054F
- Dark Blue felt, 16" x 32" piece (sold by the yard at fabric stores)
- Yellow felt, 9" x 12" piece
- White felt, 9" x 12" piece
- 32 White Star Pony Beads (or an iridescent royal blue color)
- #18 Chenille needle
- Scissors - a straight edge pair and pinking shears
- White marking pencil
- #2 pencil
- Ruler
- Safety pins
- Fabric glue
Clickhere to download the FREE instructions for this design. You will needthe Adobe Reader to view and print this file. If you have trouble downloadingthis file and would like us to send you a printed copy send a #10 SASE to:Celestial Pillow, P.O. Box 1258, Parkersburg, WV 26102. -
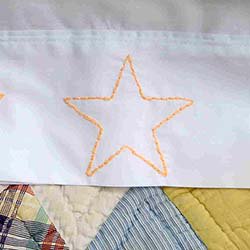
Lo-Sew Twinkle Pillowcase Free Pattern
NOTE: this is not a product that is shipped. Click the link below to download the PDF.
Lo-Sew TWINKLE PILLOWCASE
ByeXpresSew®
If you dislike that moment when the lights go out, you need a few stars to sparkle in the dark!Easy embroidery stitches outline a simple shape to turn your ordinary pillowcase into something you can wish on AND sleep on.
Materials needed:
- Kreinik 1/16" Ribbon in any glow-in-the-dark color (051F is used in the picture)
- Plain pillowcase to fit your pillow
- Disappearing pencil that can be seen on your pillowcase and erased later.
- Embroidery needle, size 3 or 4. This is a thick needle with a big eye – helpful in pulling a thick thread through regular fabric
Instructions:Clickhere to download the FREE instructions for this design.You will needthe Adobe Reader to view and print this file.
-

Embroidered Flower Motif
NOTE: This item is not shipped. Click the link below to download the PDF.
Embroidered Flower Motif
Designed by J.Marsha Michler
Marsha has written terrific how-to books on crazy quilting, including the popular “The Magic of Crazy Quilting.” Her latest book (“Motifs for Crazy Quliting”) showcases specific spot motifs to use in quilting projects. These designs are suitable for wall hangings, wearables, and anything fabric-related — think album covers, sachets, etc. They are embroidery patterns that can be used in many ways.
We asked Marsha to share a special motif with Kreinik web site visitors. She created this rose motif from Kreinik Silk Bella, Mori and Serica. The result is a beautiful, heirloom rose—we’re sure it would take the prize in any garden scene.
Materials needed:
- use 100% cotton muslin, 100% cottonbatiste, or silkl organza, depending on how you will use this design
- Kreinik Silk Mori in 4203 Light Sage, 4073 Light Dusty Green, 2013 Light Gold, 2014 Medium Gold, 1103 Light Mauve, 1031 Baby Pink
- Kreinik Silk Bella in 4206 Dark Sage, 1098 Wood Rose
- Kreinik Silk Serica in 4073 Light Dusty Green, 7086 Dark Straw, 8000 Soft White, 8084 Medium Gray, 8073 Light Charcoal
- Kreinik Tapestry (#12) Braid 001J Japan Silver
- Kreinik Japan #1 001J Japan Silver
- Embroidery needles to fit the threads
- tracing paper
Instructions:
Click here to download the FREE instructions for this design.You will need the Adobe Reader to view and print this file.
Our model includes the following stitches:
- Backstitch in Silk Mori for filling in the stems
- French Knots in Silk Serica for the rose
- Coral Stitch in Silk Serica for the leaves
- Seed Stitch in Silk Serica for the bow
-

English Bouquet Embroidery Pattern
NOTE: this item is not shipped. Click the link below to download the PDF.
English Bouquet
- Designed by Sharon Coxhead
Sharon shares this design with us out of her love for embroidery on fabric. She found the Silk Mori to be a beautiful thread for designing this type of needlework. Use this as a stand-alone embroidery, or as an embroidery on a crazy quilt.
Materials needed:
- A piece of fabric of your choice approximately 9 inches by 9 inches. I used Dupion silk and put some waste fabric on the back, thus sewing through both pieces of fabric to stop any puckering on the stitching.
- Silk Mori for bullion roses: 0323, 0324, and 0325. For the rose stems and leaves, use Silk Mori 4037. For the daisy’s middles use 2027 and for the petals use 2024. For the daisy’s stems use 4034. For the bow use 0303 and 9032. (all Silk Mori colors)
- Kreinik Very Fine (#4) Braid 092 Star Pink for edging the bow and highlighting.
- A milliners/straw needle for bullion knots and French knots. A sharp embroidery needle with a suitable size of eye to allow 2 single strands together of Silk Mori to pass through for all other stitches.
Instructions:
- Click here to download the FREE instructions for this design.You will need the Adobe Reader to view and print this file.
-
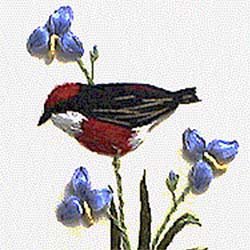
Crimson Chat Stumpwork
NOTE: this is not a product that is shipped. Click the link below to download the PDF.
Crimson Chat Stumpwork
- Designed by Jean Fletcher
Design size: 4" x 5"
Australian embroiderer Jean Fletcher created this stumpwork piece using Kreinik Silk Mori. The silk captures the subtle luminescence of a real bird's feathers. Here Jean walks us through stumpwork techniques as an introduction to this wonderful, dimensional art form. For additional information on stumpwork, ask your local needlework shop staff, or explore one of the many books on stumpwork. Jean was inspired by the flora and fauna of Australia, seen in her two books "Stumpwork the Australian Way" and "Our Stumpwork World," and she annually taught here in the United States. Jean recently passed away, but we are thankful to be able to share this charming piece of her work with you.
Materials needed:
- Kreinik Silk Mori in 1114, 2024, 4033, 4206, 5203, 5204, 7014, 8077, 8000
- Kreinik Very Fine (#4) Braid in 005
- Background fabric: 12" x 12" (Jean used a satinised cotton curtain fabric, but any firm, smooth, closely-woven fabric should be suitable)
- Calico or quilter's muslin, 12" x 12"
- Calico or quilter's muslin 6" x 6"
- Light gray or light brown craft felt, 4" x 4"
- 3" x 14" lengths of 30-gauge white cake decorator's wire or other fine paper-covered wire
- 1 black seed bead (for the bird's eye)
- Fine crewel needle
- Large chenille needle
- 7-10" embroidery hoop
- 4" embroidery hoop
- small, sharp embroidery scissors
- old scissors or wire cutters
Instructions:
Click here to downloadthe graphs and instructions for this pattern. -
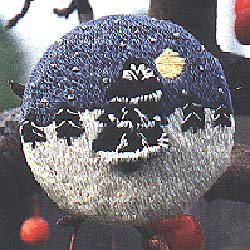
Starry Night Stumpwork Ornament
NOTE: this is not a product that is shipped. Click the link below to download the PDF.
Starry Night Stumpwork Pin
Designed by Kathleen Grigg of The Sewing Bird
Design size: about 2 inches by 2 inchesIf you've never tried stumpwork, this is a good project to begin. It's probably more 'free-form' than you're used to, but that's okay, just let your needle be your guide and enjoy the freedom of creativity. The true beauty of this piece, however, is the simple feeling of serenity that the snowfall scene evokes. It's a peaceful winter moment captured in threads. The subtle iridescence of the metallic braid creates the soft snow against the rich colors of silk threads for the tree and evening sky. Enjoy the project, and happy holidays.
Materials needed:
- Kreinik Silk Mori in 8086 Dark Gray, 2013 Light Gold, 4067 Very Dark Holly, 7136 Dark Mocha
- Kreinik Fine (#8) Braid 100 White
- piece of muslin fabric
- Dritz cover button kit and large pin back (button size should be about 2 " x 2") if making into a pin; you can also finish it in a purchased ornament frame (from a craft store like Michaels) with 2" x 2" opening
- #28 Tapestry needle or a crewel needle (which has a sharper point)
- embroidery hoop or frame to hold the fabric taut while you stitch
Instructions:
Click here to downloadthe graphs and instructions for this pattern. -
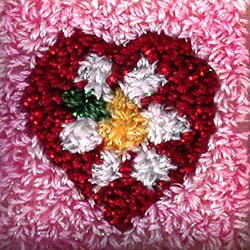
He Loves Me, He Loves Me Knot Punchneedle
NOTE: This item is not shipped. Click the link below to download the PDF.
He Loves Me, He Loves Me Knot
Designed by: Susan Davis of AuntSusie's House
Skill Level: IntermediatePunchneedle is like making hundreds of tiny knots, coloring in lines on fabric with thread. The thinner Kreinik metallic threads like Blending Filament are easy to use with punchneedles, and they add a touch of sparkle to make your design more exciting. This month we feature a quick little project that would make a sweet Valentine's gift or wedding present.
Materials needed:
- 3-strand punch needle
- piece of weavers cloth,
- 9" x 9"
- 4-inch Susan Bates Hoopla Hoop
- Kreinik Blending Filament in 032, 015HL, 003V, 092
- DMC embroidery floss in White, 367 Green, 743 Yellow, 815 Red
- Weeks Dye Works 1138 Sophie's Pink
- For finishing as a locket, we used Satin Ribbon: 1/8" x 24" and Antique Silver Locket (By Jupiter! Inc.®)
- For finishing in a box, we used Locket Box: small (2 5/8" x 2 5/8" x 2") by Provo Craft: Home Accents
- Small scrap of perfect mount matte board
- Fray check
- Pencil
Instructions:
Click here to download the FREE instructions for this design. You will need the Adobe Reader to view and print this file.
-
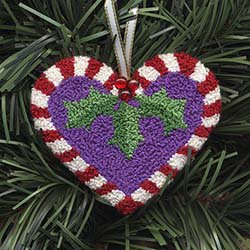
Candy Cane Heart Punchneedle
NOTE: this is not a product that is shipped. Click the link below to download the PDF.
Design By: Linda Connors of Calico Crossroads®
Finished size: 3 1/4" x 3" high
Materials needed:- Kreinik Silk Mori® in 1117 Very Dark Christmas Red, 8000 White, 6107 Very Dark Lavender, 4034 Medium Kelly Green, 4036 Dark Kelly Green — one 2.5m skein of each color, except for a 5m skein of 6107
- one 9" square of natural Weaver's Cloth
- 4" embroidery hoop
- 3-strand punchneedle
- one 8" x 4" piece of template plastic
- one 8" x 4" piece of batting
- one 4" x 4" piece of color-coordinated cotton backing fabric
- one package Mill Hill Glass Treasures #12110 (6mm red/gold balls, 3)
- 6" length of Kreinik 1/8" ribbon in pearl or gold for hanger
- white glue
- pencil or Sharpie pen
- light box or window
- Fray Check™ or similar product
- needle and strong sewing thread in red or white
Printing Instructions:
Click here to download the FREE instructions for this design. You will need the Adobe Reader to view and print this file.
-
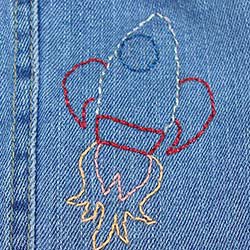
Embroidered kid's denim jacket
NOTE: this is not a product that is shipped.
Out of this world kid's denim jacketWe picked up a kid's denim jacket in great condition for $3 at Goodwill, then upcycled it into a colorful, embroidered fashion statement using patterns from Sublime Stitching. The funny message "Take Me To My Leader" makes it ideal for a kid to wear on a school field trip! Here's how to create a similar jacket for a child in your life.
Materials:- youth denim jacket
- alien and rocket ship embroidery templates from Sublime Stitching (we used patterns in the book "Sublime Stitching: Hundreds of Hip Embroidery Patterns and How-To" by Jenny Hart for Chronicle Books)
- embroidery needles - size 3/9 (we used Mary Arden brand)
- Kreinik metallic threads, size Fine #8 Braid and Tapestry #12 Braid in glow-in-the-dark colors plus metallic colors (we used 001 Silver, 003 Red, 033 Royal Blue, 421 Azalea, etc). Kids LOVE metallic and glow-in-the-dark!
- needle threader
Instructions:
1. If you are using the Sublime Stitchery embroidery patterns from the book mentioned above, they are iron-on templates. If not using these, feel free to draw free-hand similar rocket ships, aliens and stars on your jacket using a fabric pencil or disappearing ink pen.
2. Begin embroidering, following the outlines, using the desired colors of Kreinik Braid. A simple backstitch or running stitch is all that you need, but feel free to embellish with other specialty stitches or stitches you've made up on your own. The point is to have fun - so go for it!
TIPS:
• Don't even waste another second trying to thread a needle - just use a needle threader! • Use the thicker Tapestry #12 Braid in areas that you want to stand out a little more, then use the thinner Fine #8 Braid in smaller areas.
• Use a sharp embroidery needle that has a large enough eye to accommodate the braid.
• Don't try to use super long lengths of thread - it will just tangle. Stick with about 18" lengths, and let your needle dangle every few stitches if needed to relax the thread.
• If your Braid is curling from being wrapped around the spool, simply use a slightly damp cosmetic sponge to relax the thread before stitching. Sublime Stitching has so many wonderful embroidery patterns - and metallic or glow-in-the-dark threads are perfect for making many of the embroidery details come to life in brighter color, more texture, more visual interest. Have fun!!! -
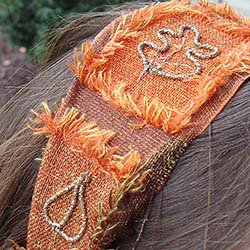
Embroidered Autumn Headband
NOTE: this is not a product that is shipped.
Autumn Headband
Dress up a plain fabric headband with embroidered details. You can make an inexpensive item look fresh and fashionable in less than an hour. Great idea for gifts!
Materials needed:- purchased fabric-covered headband
- embellishment threads — we used Kreinik Facets in gold, Kreinik Cord 002C Gold, Very Fine #4 Braid 017HL White Gold
- embroidery or sharp needle
- Fray Check™, tape or touch of glue
Instructions:
- We couched Kreinik Facets in the shape of a leaf. First, tape the ends of the Facets or touch with a spot of glue to keep the ends from raveling.
- Then lay your Facets at a starting point and couch (or tack down) with Kreinik Cord 002C Gold (a matching color). Place the Facets in the shape of a leaf and couch down as you work the shape.
- Add details like leaf veins with the thinner Very Fine #4 Braid thread, using a straight stitch in your desired pattern.
- Add beads or other thread embellishments if desired.
-

Pumpkin Pocket Placemat
NOTE: this is not a product that is shipped.
Pumpkin Pocket PlacematSilverware pockets are a fun addition to plain placemats. We found this black mesh placemat at the dollar store and knew it would be perfect for a felt pumpkin pocket.
Materials needed:- black mesh placemat from the dollar store, or any placemat
- scraps of orange felt, brown felt, and green felt
- Kreinik Fine #8 Braid in 015 Chartreuse, 012 Purple, 032 Pearl
- sharp embroidery needle with large eye
- needle threader
- orange sewing thread or Treasure Tape 1/4" roll
Instructions:
- We drew a free-hand pumpkin to use as a template. If you don't want to draw, look for pumpkin templates online or from a child's coloring book. Following your pattern or freehand, cut out a pumpkin, stem, and leaf from your felt.
- Using the Kreinik Braid and a blanket stitch, outline each piece: pumpkin first, then the stem (attach as you stitch), then the leaf. We used green to outline the pumpkin, purple to outline the stem, and pearl to outline the leaf.
- Attach the pumpkin applique to your placemat with small hidden stitches using plain orange sewing thread. Leave an opening at the top so you can insert your silverware into the pocket. Alternative: if you want your applique to be temporary, use Kreinik Treasure Tape 1/4" roll to attach the pumpkin pocket.


