Flowers
-
Pansies
- Note: This item is not shipped
Designed by Nazanin S. Fard • Intermediate level
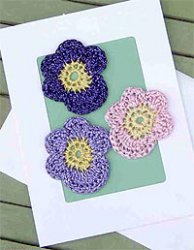
This is a greeting card decorated with crocheted pansies. You can put your crocheted pansies on anything—clothing, a. hat, picture frame, jewelry, etc. Each pansy is about 2 1/4 inches long.
Stitch gauge: 7 dc = 1 inch with size E crochet hook
Materials needed:
- Kreinik 1/8" Ribbon in Purple 012, Star yellow 091, Amethyst 026, Star Pink 092
- Crochet hook size E
- Strathmore photo frame card 5" x 6 7/8"
- Green construction paper 5" x 3 1/2"
- Tacky glue
- Pair of scissors
Instructions:
Note: when the instruction calls for CC (contrasting color), use one of the purple, amethyst or star pink colors. Make each pansy in a different color for added interest.
Pansy instructions (make 3);
With Star Yellow 091, ch 4. Make a ring with a sl st into the first ch.
Rnd 1: Ch 1, 10 sc into the ring. End with sl st into the first ch.
Rnd 2: Ch 1, 2 sc in each of next sts, until there are 2 sts left, (sc, hdc) in next st, (hdc, sc) into next st. End with a sl st into the first ch.
Rnd 3: With (CC), Ch 1, [(sc, hdc, dc) in next st, (dc, hdc, sc) in next st, sl st into next st] 4 times, (sc, hdc, dc) in next st, [2 dc in next st] 3 times, (dc, hdc, sc) in next st, sl st into next st.
Rnd 4: Ch 1, [sc in each of next 6 sts, sl st into the next st] 4 times, sc in each of next 12 sts. End with a sl st into the first st. Fasten off.
Finishing: Cut a piece of construction paper in 5” x 3 1/2” size. Slowly push it through the opening into place. Glue down each pansy in place as shown in photo, or use your imagination.
-
Crocheted Calendula (Marigold) Pattern
- Note: This item is not shipped
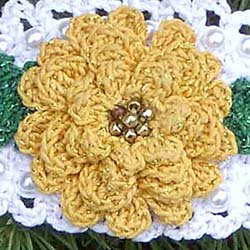
October's Flower: Calendula (Marigold)- Design by Maggie Petsch
Materials Needed:- Crochet cotton size 20: Small amounts each dark yellow (A) and dark green (B)
- Crochet cotton size 10: Small amount white (C)
- Kreinik Blending filament (50m per spool): 1 spool each #028 citron (BFA), #008 green (BFB) and #093 star mauve (BFC)
- Sizes 7 and 9 steel crochet hooks or sizes needed to obtain gauge
- Tapestry needle
- 3-inch long barrette
- 29 (1/8)-inch in diameter pearls
- 7 gold seed beads
- Sewing needle and sewing thread
- Starch
Instructions:
Click here to download the FREE instructions for this design or see written instructions below.
GAUGE:
Flower = 1-1/2 inches in diameter with smaller hook and A
Check gauge to save time.
PATTERN NOTE: Join rnds with a sl st unless otherwise stated.
PATTERN STITCH:
Beaded ch (bch): Slide bead up against hook; wrapping thread from front to back, ch 1 tightly to secure.
FLOWER:
Rnd 1 (RS): With smaller hook and one strand A and one strand BFA held tog, ch 2, 7 sc in second ch from hook, join in first sc. (7 sc)
Rnd 2: Ch 1, sc in same st as joining, ch 1, [sc in next sc, ch 1] rep around, join in first sc. (7 ch-1 sps)
Rnd 3: Sl st in first sp, [ch 2, 2 dc, ch 2, sl st] in same sp, [sl st, ch 2, 2 dc, ch 2, sl st] in each rem sp around. Do not join. (7 petals)
Rnd 4: Working behind petals of last rnd, sc in next unworked sc of Rnd 2, ch 2, [sc in next unworked sc of Rnd 2, ch 2] rep around, join in beg sc. (7 ch-2 sps)
Rnd 5: Sl st in first sp, [ch 3, 2 tr, ch 3] in same sp, [sl st, ch 3, 2 tr, ch 3, sl st] in each rem sp around. Do not join. (7 petals)
Rnd 6: Working behind petals of last rnd, sc in next unworked sc of Rnd 4, ch 3, [sc in next unworked sc of Rnd 4, ch 3] rep around, join in beg sc. (7 ch-3 sps)
Rnd 7: Sl st in first sp, [ch 3, 3 tr, ch 3] in same sp, [sl st, ch 3, 3 tr, ch 3, sl st] in each rem sp around. Do not join. (7 petals)
Rnd 8: Working behind petals of last rnd, sc in next unworked sc of Rnd 6, ch 4, [sc in next unworked sc of Rnd 6, ch 4] rep around, join in beg sc. (7 ch-4 sps)
Rnd 9: Sl st in first sp, [ch 3, 2 tr, ch 3, sl st] twice in same sp, [{sl st, ch 3, 2 tr, ch 3} twice, sl st] in each rem sp around, join in first sl st. Fasten off. (14 petals)
With sewing needle and sewing thread, sew 7 gold seed beads into center of Flower.
BACK PIECE
Rnd 1 (RS): With larger hook and one strand C and one strand BFC held tog, ch 25, 2 sc in second ch from hook, *sc in next ch, hdc in each of next 2 chs, dc in each of next 2 chs, tr in each of next 12 chs, dc in each of next 2 chs, hdc in each of next 2 chs, sc in next ch*, 3 sc in last ch; working in rem lps across opposite side of foundation ch, rep from * to *, sc in same ch as first sc, join in first sc.(50 sts)
Rnd 2: Ch 1, 2 sc in same st as joining, sc in each of next 24 sts, 3 sc in next st, sc in each rem st around, ending with sc in same st as first sc, join in first sc. Fasten off. (54 sc)
String 29 pearls onto one strand C only.
Rnd 3: With RS facing, attach one strand C only with a sl st in last sc of last rnd, ch 1, (sc, bch, sc) in same st, [bch, sk next sc, sc in next sc] 13 times, [bch, sc in next sc] twice, [bch, sk next sc, sc in next sc] 12 times, bch, join in first sc.
Rnd 4: With one strand C and one strand BFC held tog, ch 1, sc in same st as joining, ch 4, [sc in next sc, ch 4] rep around, join in first sc. Fasten off.
LEAF (make 2)
Rnd 1: With smaller hook and one strand B and one strand BFB held tog, ch 8, [sc, p, 2 sc, p] in second ch from hook, *dc in each of next 2 chs, p, tr in next ch, dc in next ch, p, dc in next ch*, (sc, p, 2 sc, p) in last ch; working in rem lps across opposite side of foundation ch, rep from * to *, join in beg sc. Fasten off.
FINISHING (as a barrette):
With sewing needle and green sewing thread, using photo as a guide, sew leaves to Back Piece. With sewing needle and yellow sewing thread, sew flower to center of Back Piece over inner ends of leaves.
With paper towel or small sponge, apply starch to Flower, Leaves, and Back Piece. Let dry thoroughly.
With sewing needle and white sewing thread, sew Back Piece to top of barrette.
- Note: This item is not shipped
-
Chrysanthemum
- Note: This item is not shipped
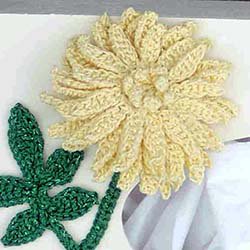
November's Flower Chrysanthemum, design by Maggie PetschMaterials:
- Crochet cotton size 10: Small amounts each yellow (A) and dark green (B)
- Kreinik Blending filament (50 m per spool): 1 spool each #091 yellow (BFA) and 008 green (BFB)
- Size 7 steel crochet hook or size needed to obtain gauge
- Small amount polyester fiberfill or cotton ball
- Starch
- Wooden Tissue Box and craft glue (if desired to finish as a tissue box)
Instructions:
Click here to download the FREE instructions for this design or see pattern below.
GAUGE: 9 sc = 1 inch
PATTERN NOTE: Join rnds with a sl st unless otherwise stated.
FLOWER
Base
Rnd 1 (RS): With one strand A and one strand BFA held tog, ch 2, 7 sc in second ch from hook, join in back lp only of first sc . (7 sc)
Rnd 2: Ch 1; working in back lps only, 2 sc in same st as joining, 2 sc in each rem sc around, join in first sc. (14 sc)
Rnd 3: Ch 1; working in back lps only, sc in same st as joining, 2 sc in next sc, [sc in next sc, 2 sc in next sc] rep around, join in first sc. (21 sc)
Rnds 4 & 5: Ch 1; working in back lps only, sc in same st as joining, sc in each rem sc around, join in first sc. (21 sc)
Rnd 6: Ch 1, sc in same st as joining, sc dec, [sc in next sc, sc dec] rep around, join in first sc. Fasten off, leaving length for finishing. (14 sts)
Petals
Rnd 1: Join one strand A and one strand BFA held tog with a sl st in any rem lp of rnd 1 on Base, *ch 4, sc in second ch from hook, sc in each of next 2 chs**, sl st in next rem lp, rep from * around, ending last rep at **, join in st at base of first ch-4. (7 petals)
Rnd 2: Sl st in rem lp of rnd 2 of Base directly behind joining st, *ch 7, sc in second ch from hook, hdc in next ch, dc in each of next 3 chs, sc in next ch**, sl st in next rem lp of rnd 2 on Base, rep from * around, ending last rep at **, join in st at base of first ch-7. (14 petals)
Rnd 3: Sl st in rem lp of rnd 3 of Base directly behind joining st, *ch 8, sc in second ch from hook, hdc in next ch, dc in each of next 4 chs, sc in next ch**, sl st in next rem lp of rnd 3 on Base, rep from * around, ending last rep at **, join in st at base of first ch-8. (21 petals)
Rnd 4: Sl st in rem lp of rnd 4 of Base directly behind joining st, *ch 9, sc in second ch from hook, hdc in next ch, dc in each of next 5 chs, sc in next ch**, sl st in next rem lp of rnd 4 on Base, rep from * around, ending last rep at **, join in st at base of first ch-9. (21 petals) Fasten off.
Pin out Flower, straightening each petal. Apply starch with paper towel or small sponge. Let dry thoroughly.
With tapestry needle, weave length left for finishing through tops of sts of last rnd of Base. Stuff Base with small amount of polyester fiberfill or cotton from cotton ball. Pull length left for finishing tightly to close opening. Fasten off.
CALYX
Rnd 1 (RS): With one strand B and one strand BFB held tog, ch 2, 7 sc in second ch from hook, join with sl st in first sc. (7 sc)
Rnd 2: Ch 1, 2 sc in same st s joining, 2 sc in each rem sc around, join with sl st in first sc. (14 sc)
Rnd 3: Ch 1, sc in same st as joining, 2 sc in next sc, [sc in next sc, 2 sc in next sc] rep around, join with sl st in first sc. (21 sc)
Rnds 4-6: Ch 1, sc in same st as joining, sc in each rem sc around, join with sl st in first sc. At end of rnd 6, fasten off, leaving 18-inch length for finishing. (21 sc)
FLOWER STEM
Join one strand B and one strand BFB held tog with a sl st at bottom of Calyx, ch 41, sc in second ch from hook, sc in each rem ch across, sl st at bottom center of Calyx. Fasten off.
Stuff Calyx with polyester fiberfill or small amount of cotton. With length left for finishing, sew tops of sts of last rnd of Calyx to bottom of Flower Base.
LEAF (make 2)
Rnd 1 (RS): With one strand B and one strand BFB held tog, *ch 7, sc in second ch from hook, dc in next ch, tr in each of next 2 chs, dc in next ch, sc in next ch*, ch 10, sc in second ch from hook, dc in next ch, tr in each of next 2 chs, dc in next ch, sc in each of next 2 chs, ch 11, sc in second ch from hook, dc in each of next 2 chs, tr in each of next 2 chs, dc in each of next 2 chs, sc in each of next 3 chs, sc in rem lp at base of next ch-10, ch 8, sc in each of next 2 chs on ch-10, sc in rem lp at base of first ch-7, rep from * to *, sl st in base of Leaf, ch 8 for Leaf Stem, sl st in second ch from hook and in each of next 6 chs, sl st at base of Leaf.
Rnd 2: Working in rem lps at base of first ch-7 of last rnd, sl st in each of next 6 sts, sl st over end of next st, ch 1, sl st in each of next 6 sts, sl st in rem lp of each of next 2 chs; working in rem lps at base of next ch-10, (sl st, ch 1) over end st, sl st in each of next 7 sts; working in rem lps of ch-11, sl st in each of next 10 sts, (sl st, ch 1) over end st, sl st in each of next 11 sts; working in rem lps at base of next ch-8, sl st in each of next 7 sts, (sl st, ch 1) over end st, sl st in each of next 9 sts; working in rem lps at base of next ch-7, sl st in each of next 6 sts, (sl st, ch 1) over end st, sl st in each of next 6 sts, sl st at base of leaf, sl st in each st across Leaf Stem to bottom of Leaf Stem. Fasten off, leaving short length for finishing.
FINISHING (as shown)
Apply starch to Stem and Leaf. Pin out to dry, curving Flower Stem slightly. Let dry thoroughly.
With tapestry needle and length left for finishing, tack end of Leaf Stem on either Leaf to left edge of Flower Stem, approximately 2-1/4 inches from bottom of Flower Stem. Tack rem Leaf to right edge of Flower Stem approximately 1-1/2 inches from bottom.
With Craft glue, using photo as a guide, glue Flower, Stem and Leaves to left side of tissue box.
- Note: This item is not shipped
-
Crocheted Orchid Pattern
- Note: This item is not shipped
December Flower: Orchid- Design Size: 3-1/4 inches wide x 3-1/4 inches long
- Skill Level: Intermediate
Designed by Maggie Petsch- Materials needed:
- Crochet cotton size 10: Small amounts each white (MC) and purple (CC)
- Kreinik Blending filament (55 yd per spool): 1 spool each #093 star mauve (BFM) and #012 purple (BFC)
- Size 7 steel crochet hook or size needed to obtain gauge
- #22 Tapestry needle
- Large glass jar with narrow neck
- 1 yd. (5/8)-wide lilac ribbon
- Craft glue
- Starch
Instructions:
GAUGE: 7 dc = 3/4 inch
PATTERN NOTE: Join rnds with a sl st unless otherwise stated.
Center
Rnd 1 (RS): With one strand MC and one strand BFM held tog, ch 2, 7 sc in second ch from hook, join in first sc. Do not fasten off. (7 sc)
Top Petal
Row 1: Ch 3 (counts as first dc throughout), 6 dc in same sc as joining, turn. (7 dc)
Rows 2 & 3: Ch 3, dc in each rem dc across, turn.
Row 4: Ch 2, dc in next dc (beg dec made), dc in each of next 3 dc, dc dec over next 2 sts, turn. (5 sts)
Row 5: Beg dec, dc in next dc, dc dec, turn. (3 sts)
Row 6: Ch 2; holding back on hook last lp of each st, dc in each of next 2 sts, yo, draw through all 3 lps on hook. Fasten off. (1 st)
With tapestry needle and length of MC, sew ends of Rows1 & 2 tog at the back of Petal.
First Side Petal
Rnd 1 (RS): With one strand MC and one strand BFM held tog, ch 10, 2 sc in second ch from hook, hdc in next ch, dc in next ch, 2 tr in next ch, tr in next ch, dc in each of next 2 chs, hdc in next ch, 3 sc in last ch; working in rem lps across opposite side of foundation ch, hdc in next ch, dc in each of next 2 chs, tr in next ch, 2 tr in next ch, dc in next ch, hdc in next ch, sc in same ch as first sc, join in first sc. (22 sts)
Rnd 2: Ch 1, 2 sc in same st as joining, sc in each st across to center sc of next 3 sc group, 3 sc in center sc, sc in each rem st around, join in first sc. (26 sc)
Rnd 3: [Ch 3, sk next sc, sl st in next sc] rep around, end with ch 3, sl st in st at base of beg ch-3, sl st in first unworked sc on either side of Top Petal on Rnd 1 of Center. Fasten off.
Second Side Petal
Rnds 1 & 2: Rep rnds 1 & 2 of First Side Petal
Rnd 3: Rep rnd 3 of First Side Petal, ending with sl st in first unworked sc on opposite side of Top Petal on Rnd 1 of Center as First Side Petal
First Bottom Petal
Row 1 (RS): With RS facing, attach one strand MC and one strand BFM held tog with a sl st in first unworked sc next to either Side Petal, ch 3, 2 dc in same st, turn. (3 dc)
Row 2: Ch 3, dc in each rem dc across, turn.
Row 3: Ch 3, dc in first dc, dc in next dc, 2 dc in last dc, turn. (5 dc)
Row 4: Ch 3, dc in first dc, dc in each of next 3 dc, 2 dc in last dc, turn. (7 dc)
Row 5: Beg dec, dc in each of next 3 dc, dc dec, turn. (5 sts)
Row 6: Beg dc, dc in next dc, dc dec, turn. (3 sts)
Row 7: Ch 2; holding back on hook last lp of each st, dc in each of next 2 sts, yo, draw through all 3 lps on hook. Fasten off. (1 st)
Second Bottom Petal
Row 1 (RS): With RS facing, attach one strand MC and one strand BFM held tog with a sl st in first unworked sc next to rem Side Petal, ch 3, 2 dc in same st, turn. (3 dc)
Rows 2-7: Rep rows 2-7 of First Bottom Petal.
Center Petal
Rnd 1: With one strand MC and one strand BFM held tog, leaving a length for finishing, ch 1 (center ch), ch 3 more (counts as first dc), 9 dc in center ch, join in top of first ch-3. (10 dc)
Rnd 2: Ch 3, 2 dc in next dc, [dc in next dc, 2 dc in next dc] rep around, join in top of first ch-3. (15 dc)
Rnd 3: Ch 3, dc in each rem dc around, join in top of first ch-3.
Rnd 4: Sc in next dc, dc in next dc, [2 dc in next dc, dc in next dc] 5 times, sc in next dc, sl st in next dc. Fasten off, turn.
Rnd 5: Join one strand CC and one strand BFC held tog with a sl st in last sc made, sc in next st, hdc in next st, [2 dc in next st, dc in each of next 2 dc] 4 times, hdc in next st, sc in next st, sl st in next st, turn.
Rnd 6: Ch 1, sl st in first sc, sc in each of next 2 sts, hdc in next st, [dc in each of next 2 sts, 2 dc in next st] 4 times, hdc in next st, sc in each of next 2 sts, sl st in next st; working over end sts of rows, sl st in each st across to first sl st, join in first sl st. Fasten off, turn.
Rnd 7: Join one strand MC and one strand BFM held tog with a sl st in same st as joining, [ch 3, sk next st, sl st in next st] rep around, ending with ch 3, join in st at base of first ch-3. Fasten off.
With length left for finishing, tack Center Petal to center of Center.
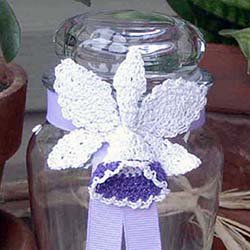
FINISHING as shown in our photo: Apply starch to orchid. Pin out to shape. Let dry thoroughly. Tie ribbon around neck of glass jar. Trim ends to desired length. With craft glue, glue orchid to ribbon over knot. Fill jar with potpourri, seashells, or any small treasures.
- Note: This item is not shipped
-
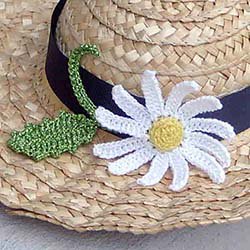
Daisy
- Note: this item is not shipped
- Design by Maggie Petsch
- Design Size: approximately 4 1/4" long x 3" wide
- Skill Level: Intermediate
Materials needed:
- Kreinik Medium #16 Braid (one 10m spool each) 091 Star Yellow and 015 Chartreuse
- Kreinik Blending Filament (one 50m spool) 032 pearl
- Crochet cotton size 10: small amount of white
- Size 7 steel crochet hook or size needed to obtain gauge
- Cotton ball
- Tapestry needle
Instructions:Gauge: Rnd 1 & 2 of Daisy = 5/8” in diameter. Check gauge to save time.
Pattern note: Join rnds with a sl st unless otherwise stated.
Pattern stitch: (referred to as p in instructions): P: Ch 2, sl st in last hdc or last tr made.
Daisy
- Rnd 1 (RS): With yellow Medium Braid, ch 2, 6 sc in 2nd ch from hook, do not join. (6 sc)
- Rnd 2: Working in back lps only this rnd, 2 sc in each sc around, join in beg sc, fasten off. (12 sc)
- Rnd 3: With RS facing, attach one strand white crochet cotton and one strand white Blending Filament held together with a sl st in back lp only of any dc, *ch 11, sc in 2nd ch from hook, dc in each of next 9 chs, sl st in back lp only of next sc on Rnd 1, rep from * around, ending with join in back lp only of a st at base of beg ch-11, fasten off. (12 petals)
Daisy Center
- Rnds 1 & 2: Rep Rnds 1 & 2 of Daisy; at end of Rnd 2, fasten off, leaving short length for finishing.
- With tapestry needle and length left for finishing, sew back lps of last rnd of Daisy Center to rem lps of Rnd 2 of Daisy, stuffing lightly with a small piece of cotton ball before closing.
Stem
- With green Medium Braid, ch 30, sc in 2nd ch from hook, sc in each rem ch across, fasten off, leaving short length for finishing. (29 sc)
- With tapestry needle and length left for finishing, tack end of stem to WS of Daisy at outer edge of Rnd 2.
Leaf
- With green Medium Braid, ch 16, 2 sc in 2nd ch from hook, *hdc in next ch, p, dc in next ch, tr in each of next 2 chs, p, {tr in each of next 3 chs, p} twice, tr in next ch, dc in next ch, hdc in next ch, p, * [sc, ch 1, sc] in last ch; working in rem lps across opposite side of foundation ch, rep from * to *, sc in same ch as beg sc, join in beg sc, sl st to stem approximately 2” from bottom of stem, fasten off.
Finishing as shown: Apply starch to daisy petals, stem and leaf with small paintbrush or sponge. Pin out to dry, shaping as desired. When completely dry, tack to band of straw bonnet.
-
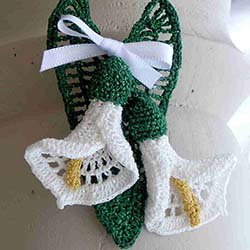
Calla Lilly
Note: This item is not shipped
A Kreinik website design by
Maggie Petsch
Design Size: 3-3/4-inches long x 2-3/4-inches wideWear this beautiful project as a lapel pin for Easter Sunday, Mother's Day, or anyday you need a floral pick-me-up.
Materials Needed:
- Kreinik Medium #16 Braid (one 10m spool each) 091 Star Yellow and 015 Chartreuse
- Kreinik Blending Filament (one 50m spool) 032 pearl
- Crochet cotton size 10: small amount of white
- Size 7 steel crochet hook or size needed to obtain gauge
- Cotton ball
- Tapestry needle
Instructions:
Gauge: Rnds 1 & 2 of calla lily = 5/8-inch in diameter
Pattern Note: Join rnds with a sl st unless otherwise stated.
Calla Lily (make 2)
- Rnd 1: (RS): Beg at center bottom, with 1 strand A and 1 strand BFA held tog, ch 1 (center ch), ch 3, 11 dc in center ch, join in top of beg ch-3. (12 dc, counting beg ch-3 as first dc)
- Rnd 2: Ch 3 (counts as first dc throughout), dc in same st as joining, 2 dc in each rem dc around, join in top of beg ch-3. (24 dc)
- Rnd 3: Ch 3, dc in same st as joining, 2 dc in each of next 7 dc, [ch 1, dc in next dc] 9 times, ch 1, 2 dc in each of rem 7 dc, join in top of beg ch-3. (39 dc, 9 ch-1 sps)
- Rnd 4: Ch 3, dc in same st as joining, [dc in next st, 2 dc in next st] 7 times, [ch 2, dc in next sp] 10 times, ch 2, sk next dc, [dc in next dc, 2 dc in next dc] 6 times, dc in last dc, join in top of beg ch-3. (52 dc, 11 ch-2 sps)
- Rnd 5: Ch 3, dc in same st as joining, [dc in each of next 2 dc, 2 dc in next dc] 7 times, [dc in next dc, 3 dc in next sp] 5 times, tr in next dc, [tr, dtr, ch 2, sl st in dtr, tr] in next sp, tr in next dc, [3 dc in next sp, dc in next dc] 5 times, [2 dc in next dc, dc in each of next 2 dc] 6 times, join in top of beg ch-3, fasten off. (94 dc, 5 tr)
Pistil (make 2)
- Row 1: With 1 strand C and 1 strand BFC held together, ch 21, sc in 2nd ch from hook, sc in each rem ch across, ch 1, turn. (20 sc)
- Row 2: Sc in each sc across, ch 1, turn. (20 sc)
- Rows 3 & 4: Rep Row 2; at end of Row 4, ch 1; do not turn.
- Row 5: Working over ends of rows across, sc dec over end sts of last 2 rows, sc dec over end sts of next 2 rows, ch 1, turn. (2 sts)
- Row 6: Sc dec over next 2 sts, fasten off, leaving length for finishing.
With tapestry needle and length left for finishing, sew 2 long edges of pistil together, do not cut thread.
Using photo as a guide, place pistil with seam down on calla lily so that tapered top of pistil touches top of Rnd 5 of calla lily over center of ch-2 sps of Rnd 4. Tack bottom of pistil in place with rem length left for finishing.
Lap right bottom of one calla lily over left bottom to form funnel shape. With tapestry needle and length left for finishing, tack in place approximately 1/3 of the way up calla lily. Lap left bottom of rem calla lily over right bottom to form funnel shape. Tack in place as for first calla lily.
Flower Base (make 2)
Note: Do not join rnds; mark first st of each rnd with safety pin or other small marker.
- Rnd 1: With 1 strand B and 1 strand BFB held together, ch 2, 6 sc in 2nd ch from hook. (6 sc)
- Rnd 2: 2 sc in each sc around. (12 sc)
- Rnd 3: (Sc in each of next 3 sc, 2 sc in next sc) rep around. (15 sc)
- Rnd 4: Sc in each sc around. (15 sc)
- Rnd 5: (2 sc in next sc, sc in each of next 4 sc) rep around. (18 sc)
- Rnds 6-8: Rep Rnd 4; at end of Rnd 8, join in beg sc, fasten off, leaving length for finishing. (18 sc)
With tapestry needle and length left for finishing, tack calla lily inside flower base through back lps only of Rnd 8 of flower base.
Leaf
- Row 1 (WS): With 1 strand B and 1 strand BFB held together, ch 30 (foundation ch), ch 6 more (counts as first dtr, ch-2 throughout), [dtr, ch 1, {tr, ch 1} twice] in 7th ch from hook, [sk next ch, tr in next ch, ch 1] 5 times, [sk next ch, dc in next ch, ch 1] 6 times, [sk next ch, sc in next ch, ch 1] 3 times, 5 sc in last ch, ch 1; working in rem lps across opposite edge of foundation ch, sc in next ch, [ch 1, sk next ch, sc in next ch] twice, [ch 1, sk next ch, dc in next ch] 6 times, [ch 1, sk next ch, tr in next ch] 5 times, ch 1, sk next ch, [{tr, ch 1} twice, dtr, ch 1, dtr] in last ch, turn.
- Row 2: Ch 6, [dtr, ch 1, {tr, ch 1} twice] in dtr, [sk next sp, tr in next st, ch 1] 8 times, [sk next sp, dc in next st, ch 1] 6 times, [sk next sp, sc in next st, ch 1] 4 times, sk next sc, 5 sc in next sc, ch 1, sk next sc, sc in next sc, [ch 1, sk next sp, sc in next st] 3 times, [ch 1, sk next sp, dc in next st] 6 times, [ch 1, sk next sp, tr in next st] 8 times, ch 1, sk next ch, [{tr, ch 1} twice, dtr, ch 1, dtr] in next ch, turn.
- Row 3: Ch 6, [dtr, ch 1, {tr, ch 1} twice] in dtr, [sk next sp, tr in next st, ch 1] 11 times, [sk next sp, dc in next st, ch 1] 6 times, [sk next sp, sc in next st, ch 1] 5 times, ch 1, sk next sc, 3 sc in next sc, ch 1, sk next sc, sc in next sc, [ch 1, sk next sp, sc in next st] 4 times, [ch 1, sk next sp, dc in next st] 6 times, [ch 1, sk next sp, tr in next st] 11 times, ch 1, sk next ch, {tr, ch 1} twice, dtr, ch 1, dtr] in next ch, ch 1, turn.
- Rnd 4: [2 sc in next ch-1 sp] 26 times, sc in next sc, [2 dc, tr, 2 dc] in next sc, sc in next sc, [2 sc in next ch-1 sp] 25 times, 7 sc in turning ch-6 sp; working over end sts of rows, [5 sc over end st of next row] twice; working up opposite side of leaf, [5 sc over end st of next row] 3 times, join in beg sc, fasten off
Finishing as a pin to wear
Steam press leaf lightly. With tapestry needle and B, using photo as a guide, tack one calla lily to leaf approximately 1/8-inch below top center of leaf, with bottom of calla lily extending over edge of leaf at a slight angle. Tack rem calla lily alongside first calla lily with top of flower base touching bottom of flower base of first calla lily and bottom of calla lily extending over opposite edge of leaf at a slight angle.
Make bow with 12-inch length of white satin ribbon. Trim ends to desired length. Place bow at top center of leaf above first calla lily and tack in place on back with sewing needle and thread. Sew pin back to top back of leaf vertically down center of spine. Spray flower and leaf with spray starch. Shape and let dry.
-
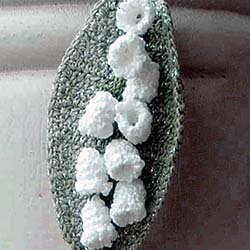
Lily Of The Valley
Note: this item is not shipped
Design by Maggie Petsch
Size: 3" long
Materials needed:
- Kreinik Blending Filament (one 50m spool each): 032 Pearl and 001 Silver
- Crochet cotton size 20: small amounts each white, light olive green and dark olive green
- Size 9 steel crochet hook or size needed to obtain gauge
- 3-inch silver metal barrette or pinback
- Tapestry needle
Instructions:
Gauge: 12 dc = 1 inch
Flowers (make 9):
Note: Do not join rnds unless otherwise stated; mark first st of each rnd with safety pin or other small marker.
Rnd 1: With one strand white crochet cotton and one strand white Blending filament held tog, ch 2, 6 sc in second ch from hook. (6 sc)
Rnd 2: [2 sc in next st, sc in next st] rep around. (9 sc)
Rnds 3 & 4: Sc in each sc around; at the end of Rnd 4, join with a sl st in first sc. (9 sc)
Rnd 5: [ch 2, sl st in next sc] around, fasten off. (9 ch-2 sps)
Leaf:
Row 1: Beg at bottom of leaf, with light olive green crochet cotton and one strand silver Blending Filament held tog, ch 4, 3 dc in 4th ch from hook, turn. (4 dc, counting last 3 ch of beg ch-4 as first dc)
Row 2: Ch 3 (counts as first dc throughout), dc in first dc, dc in each dc across to last st, 2 dc in last st, turn. (6 dc)
Rows 3-7: Rep Row 2. (16 dc at end of Row 7)
Row 8: Ch 3, dc in each rem dc across, turn. (16 dc)
Row 9: Rep Row 2. (18 dc)
Rows 10 & 11: Rep Row 8. (18 dc)
Row 12: Ch 2, sk first dc, dc in each rem dc across to last 2 sts, dc dec, turn. (16 sts)
Row 13: Ch 3, dc in each rem st across, turn. (16 dc)
Rows 14-19: Rep Row 12. (4 sts at end of Row 18)
Row 20: ch 2, sk first dc, dc in next dc, dc dec, do not fasten off; ch 1, turn.
Edging:
Beg at tip of leaf, sc evenly sp around, working 3 sc in point at top of leaf and 5 sc in point at bottom, join with a sl st in first sc, fast off, leaving a short length for finishing. Using photo as a guide, turn tip of leaf down and to one side, tack in place with end left for finishing.
Stem:
Beg at bottom of stem, with dark olive green crochet cotton only, ch 45 for main stem, sl st in 2nd ch from hook, sl st in each of next 18 chs, *ch 3 for offshoot, sl st in top of any flower, sk last ch made, sl st in each of next 2 chs of offshoot*, sl st in each of next 7 chs of main stem, rep from * to *, sl st in each of next 8 chs of main stem, rep from * to *, sl st in each of next 4 chs on main stem, rep from * to *, sl st in each of next 5 chs on main stem, rep from * to *, [sl st, ch 1, sl st] in last ch, turn; working in rem lps of foundation ch, sl st in each of next 3 chs on main stem, rep from * to *, sl st in each of next 10 chs on main stem, rep from * to *, sl st in each of next 3 chs on main stem, rep from * to *, sl st in each of next 5 chs on main stem, rep from * to *, sl st in each rem ch on main stem, fasten off.
Finishing Option:
With tapestry needle and length of dark green, letting bottom of stem extend approximately 1/4” below bottom of leaf, tack stem to center of leaf, rolling up ends of bottom of leaf and sewing together over bottom of stem.
Apply starch to leaf, stem and flowers with small paintbrush or sponge. Shape leaf, curling up edges slightly. Insert rounded end of crochet hook or other small round object into each flower to puff flower out. Let dry thoroughly.
Apply small amount of craft glue to center back of leaf and glue to center of barrette. With tapestry needle and dark green, tack top and bottom of leaf to barrette through holes in ends of barrette.
-
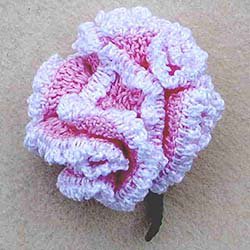
Carnation
Note: this item is not shipped
Design by Maggie Petsch • Skill Level: Intermediate
Size: 2 1/2" in diameter
Materials Needed:
- South Maid crochet cotton size 10 (350 yd per ball): Small amounts each orchid pink #401 (A), white #1 (B) and spruce #179 (C)
- Kreinik Metallics blending filament (55 yd per spool): 1 spool each #092 star pink (BFA) and star mauve #093 (BFB)
- Size 7 steel crochet hook or size needed to obtain gauge
- 3/4" pin back
- Small amount polyester fiberfill stuffing or cotton ball
- Tapestry needle
- Sewing needle and spruce green sewing thread
Instructions:
Gauge Rnds 1 & 2 of base = 7/16" in diameter. Check gauge to save time.
Base
Note: Do not join rnds unless otherwise stated; mark first st of each rnd with safety pin or other small marker.
- Rnd 1 (RS): With C, leaving a 36" length for finishing at beg, ch 2, 8 sc in 2nd ch from hook; pull 36-inch length to RS and leave for later use. (8 sc)
- Rnd 2: [Sc in next sc, 2 sc in next sc] rep around. (12 sc)
- Rnd 3: [Sc in each of next 2 sc, 2 sc in next sc] rep around. (16 sc)
- Rnds 4-9: Sc in each st around; at end of Rnd 9, join with a sl st in beg sc. (16 sc)
- Rnd 10: Ch 1, sc in same st as joining, ch 2, sk next sc, [sc in next sc, ch 2, sk next sc] rep around, join with a sl st in beg sc, fasten off. (8 ch-2 sps)
Flower
- Rnd 1: With RS facing, attach 1 strand BFA and 1 strand A held tog with a sl st in any ch-3 sp, ch 5 (counts as first tr, ch-1), [tr, ch 1] 10 times in same sp, [tr, ch 1] 11 times in each rem sp around, join with a sl st in 4th ch of beg ch-5.
- Rnd 2: Sl st into first sp, ch 4 (counts as first tr), 2 tr in same sp, 3 tr in each rem sp around, join with a sl st in 4th ch of beg ch-4, fasten off.
- Rnd 3: With RS facing, attach 1 strand BFB and 1 strand B held tog with a sl st in any tr, ch 1, sc in same st, ch 3, [sc in next tr, ch 3] rep around, join with a sl st in beg sc, fasten off.
Stem
- Insert hook into bottom center of base, pick up base of 36-in. length left for finishing, draw up a lp to RS, ch 13, sl st in 2nd ch from hook and in each rem ch across, sl st at bottom center of base, fasten off.
Finishing option
- Stuff base firmly with small amount of polyester fiberfill or small amount of cotton ball. With tapestry needle, weave 9" length of C through ch-2 sps of Rnd 10 of base. Pull tightly to close opening. Knot securely. Run ends into base with tapestry needle and cut off excess close to base.
- With sewing needle and spruce green sewing thread, sew pin back to base of carnation.
-
Crocheted Violets Pattern
Note: this item is not shipped
Design by Maggie Petsch
Skill Level: Intermediate
Size: 7/8" in diameter
Materials Needed:
- Kreinik Metallics blending filament (50m per spool): 1 spool each purple #012 (BFA), green #008 (BFB) and star mauve #093 (BFC)
- South Maid crochet cotton size 10 (350 yd per ball): small amounts each purple #458 (A), myrtle green #484 (B), white #1 (C), and soft yellow #143 (D)
- Size 7 steel crochet hook or size needed to obtain gauge
- 12" length 1/8" wide white satin ribbon
- 3/4" long pin back
- Tapestry needle
- Sewing needle and white sewing thread
Instructions:
Gauge
- Flower = 7/8" in diameter
- Check gauge to save time.
Pattern Note
- Join rnds with a sl st unless otherwise stated.
Pattern Stitches
- Tr cl: Holding back on hook last lp of each st, 2 tr in indicated st, yo, draw through all 3 lps on hook.
- P: Ch 3, hdc in last tr made.
- Shell: [{Tr, p} 4 times, tr] in indicated sp.
Violet (make 5)
- Rnd 1 (RS): With one strand A and one strand BFA held together, ch 2, 5 sc in 2nd ch from hook, join in beg sc.
- Rnd 2: [Ch 3, tr, ch 3, sl st] in same st as joining, [sl st, ch 3, tr, ch 3, sl st] in next sc, *[sl st, ch 3, tr cl, ch 3, sl st] in next sc*, [sl st, ch 3, 5 tr, ch 3, sl st] in next sc, rep from * to *, join in st at base of beg ch-3, fasten off.
Stems
- With one strand B and one strand BFB held tog, ch 10 for foundation ch, sc in 2nd ch from hook, **ch 21, sl st in 2nd ch from hook, sl st in each of next 19 chs**, sc in each of next 2 chs on foundation ch, *ch 17, sl st in 2nd ch from hook, sl st in each of next 15 chs, sc in each of next 2 chs on foundation ch*, ch 19, sl st in 2nd ch from hook, sl st in each of next 17 chs, sc in each of next 2 chs on foundation ch, rep from * to * once, rep from ** to ** once, sl st in last sc made on foundation ch, fasten off.
Doily
- Rnd 1 (RS): With one strand C and one strand BFC held together, ch 1 (center ch), ch 3 more (counts as first dc throughout), 11 more dc in center ch, join in top of beg ch-3. (12 dc)
- Rnd 2: Ch 3, dc in same st as joining, 2 dc in each rem dc around, join in top of beg ch-3. (24 dc)
- Rnd 3: Ch 3, 2 dc in next st, [dc in next st, 2 dc in next st] rep around, join with in top of beg ch-3. (36 dc)
- Rnd 4: Ch 1, sc in same st as joining, sc in each of next 3 dc, *ch 6, turn, sl st in last sc made, ch 1, turn, 11 sc in ch-6 lp**, sc in each of next 4 dc, rep from * around, ending last rep at **, join in beg sc. (9 ch-6 lps)
- Rnd 5: Sl st in next sc, ch 6 (counts as first tr, ch-2), *sl st in 4th sc on next ch-6 lp, ch 6, sk next 3 sc on same lp, sl st in next sc, ch 2**, tr in center sc of 3 unworked sc between same lp and next lp, ch 2, rep from * around, ending last rep at **, join in 4th ch of beg ch-6.
- Rnd 6: Ch 3, [shell in next ch-6 sp, dc in next tr] rep around, ending with shell in last ch-6 sp, join in top of beg ch-3, fasten off.
- Finishing
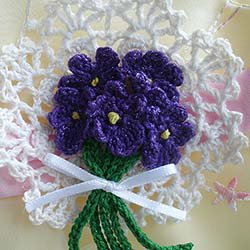
Press doily and violets gently on WS with steam iron. With tapestry needle and D, work one French knot in the center of each violet, leaving ends for finishing. Place foundation ch of stems on RS of doily just below center and sew to doily from WS. Using photo as a guide, position violets on center of doily and tack in place with ends from French knots left for finishing, covering foundation ch of stems. Gather stems together approximately 3/4" from top and tie together with length of white ribbon. Trim ends of ribbon to desired length. Sew pin back to center of doily on WS.
-
Gladiola
Note: this item is not shipped
August's flower, the Gladiola
Design by Maggie Petsch • Skill level: intermediate to Advanced • Design size: 3" wide by 5" long
- Materials needed:
- Kreinik Blending filament (55 yds per spool): 1 spool each #003 red (BFA), #093 star mauve (BFB), #007 pink (BFC), #008 green (BFD) and #091 star yellow (BFE)
- South Maid crochet cotton size 10 (350 yds per ball): Small amount #494 victory red (A), #1 white (B), #401 orchid pink (C) and #449 forest green (D)
- DMC Cebelia crochet cotton size 30 (50g per ball): Small amount light yellow (E)
- Size 7 steel crochet hook or size needed to obtain gauge
- Size 9 steel crochet hook
- 1-inch long pin back
- 7/8 inch x 2-1/2 inch strip plastic canvas
- Sewing needle and green sewing thread
- Starch
Instructions:GAUGE: With larger hook and size 10 crochet cotton: 10 dc = 1 inch
PATTERN NOTE: Join rnds with a sl st unless otherwise stated.
PATTERN STITCHES:
Beg dc dec: Ch 2, dc in next st.
2-dc dec: Holding back on hook last lp of each st, dc in each of next 3 sts, yo, draw through all 4 lps on hook.
RED FLOWER
Inner Section Base
Rnd 1 (RS): With one strand A and one strand BFA held tog, using larger hook, ch 1 (center ch), ch 3 more (counts as first dc throughout), 11 dc in center ch, join in top of beg ch-3. (12 dc)
Rnds 2 & 3: Ch 3, dc in each rem dc around, join in top of beg ch-3. (12 dc)
First Inner Petal
Row 1: Working in back lps only this rnd, 2 sc in first dc, sc in next dc, 2 hdc in next dc, dc in next dc, 2 dc in next dc, dc in each of next 2 dc, 2 dc in next dc, dc in next dc, 2 hdc in next dc, sc in next dc, 2 sc in next dc, turn.
Row 2: Ch 1, sk first st, sl st in next st, sc in each of next 2 sts, hdc in next st, dc in next st, 2 dc in each of next 6 sts, dc in next st, hdc in next st, sc in each of next 2 sts, sl st in next st, leave last st unworked, turn.
Row 3: Ch 1, sk first st, sc in next st, hdc in next st, [dc in next st, 2 dc in next st] 7 times, hdc in next st, sc in next st, sl st in next st, turn.
Row 4: Ch 1, sk first st, sc in next st, hdc in next st, [dc in next st, 2 dc in next st] 9 times, dc in next st, hdc in next st, sc in next st, sl st in next st, turn.
Row 5: [Ch 2, sl st in next st] rep across, fasten off.
Second Inner Petal
Row 1 (RS): Using larger hook, with bottom of Inner Section Base pointing away, working in rem lps of Rnd 3 toward opening at front of First Inner Petal, join one strand A and one strand BFA held tog with a sl st in third rem lp from beg of Rnd 3, ch 3, 2 dc in same st, 2 dc in next st, 3 dc in next st, turn. (8 dc)
Row 2: Ch 3, dc in each rem dc across, turn. (8 dc)
Row 3: Beg dc dec, [dc in next st, dc dec] twice, turn.(5 sts)
Row 4 Ch 3, 2-dc dec, dc in last st, turn. (3 sts)
Row 5: Ch 2, dc dec, fasten off.
Row 6: With RS of petal facing, working over end sts of rows around petal, join one strand A and one strand BFA held tog with a sl st in rem lp of Rnd 3 at base of end st of Row 1, [{ch 2, sl st} twice over end st of next row] 5 times, [ch 2, sl st] twice over end st on opposite side of same petal, as last sl st made, [{ch 2, sl st} twice over end st of next row] 4 times, ch 2, sl st in rem lp of Rnd 3 at base of end st of bottom row, do not fasten off.
Third Inner Petal
Row 1 (RS): Working in rem lps of Rnd 3, sl st in last rem lp of Rnd 3, ch 3, 2 dc in same st, 2 dc in next st, 3 dc in next st, turn. (8 dc)
Rows 2-6: Rep Rows 2-6 of Second Inner Petal.
Outer Section Base
Rnd 1: Rep rnd 1 of Inner Section Base.
Rnd 2: Ch 3 (counts as first dc throughout), 2 dc in next dc, [dc in next dc, 2 dc in next dc] rep around, join in top of beg ch-3. (18 dc)
Rnds 3 & 4: Ch 3, dc in each rem dc around, join in top of beg ch-3. (18 dc)
First Outer Petal
Row 1: Ch 3; working in front lps only this row, dc in same st as joining, dc in each of next 2 dc, 2 dc in next dc, turn. (6 dc)
Row 2: Ch 3, dc in first st, 2 dc in each rem dc across, turn. (12 dc)
Row 3: Ch 2, dc in next st (beg dc dec made), dc in each rem dc across to last 2 dc, dc dec, turn. (10 sts)
Row 4: Ch 2, dc in next st (beg dc dec), dc in next st, 2 dc decs, dc in next st, dc dec over last 2 sts, turn. (6 sts)
Row 5: Beg dc dec, dc dec across, turn. (3 sts)
Row 6: Ch 2; dc dec, fasten off.
Second Outer Petal
Row 1: Sk next 2 dc on Rnd 4 of Outer Section Base, with larger hook, join one strand A and one strand BFA held tog with a sl st in front lp only of next st, rep Row 1 of First Outer Petal.
Rows 2-6: Rep Rows 2-6 of First Outer Petal.
Third Outer Petal
Rows 1-6: Rep Rows 1-6 of Second Outer Petal.
Edging
With RS facing, using larger hook, join one strand A and one strand BFA held tog with a sl st in first sk dc of any pair of skipped dc on Rnd 4, sl st in next st, **sl st over end st on row 1 of next petal, ch 2, sl st over same st, *[ch 2, sl st] twice over end st of next row, rep from * to end st on bottom row of opposite side of same petal++, sl st in each of next 2 dc on Rnd 4 of Outer Section Base, rep from **around, ending last rep at ++, join in beg sl st, fasten off.
WHITE FLOWER
Inner Section Base
Rnds 1-3: With one strand B and one strand BFB held tog, rep Rnds 1-3 of Inner Section Base for Red Flower.
First Inner Petal
Rows 1-4: With one strand B and one strand BFB held tog, rep Rows 1-4 of First Inner Petal for Red Flower. Fasten off at end of Row 4.
Row 5: With larger hook, join one strand C and one strand BFC held tog in last st of Row 4, rep Row 5 of First Inner Petal for Red Flower.
Second Inner Petal
Rows 1-5: With one strand B and one strand BFB held tog, rep Rows 1-5 of Second Inner Petal for Red Flower.
Row 6:With one strand C and one strand BFC held tog, rep Row 6 of Second Inner Petal for Red Flower. Fasten off.
Third Inner Petal
Rows 1-5: With larger hook, join one strand B and one strand BFB held tog with a sl st in last rem lp of Rnd 3, rep Rows 1-5 of Third Inner Petal for Red Flower.
Row 6: Rep Row 6 of Second Inner Petal.
Outer Section Base
Rnds 1-4: With one strand B and one strand BFB held tog, rep Rnds 1-4 of Outer Section Base for Red Flower.
First Outer Petal
Rows 1-6: With one strand B and one strand BFB held tog, rep Rows 1-6 of First Outer Petal for Red Flower.
Second Outer Petal
Rows 1-6: With one strand B and one strand BFB held tog, rep Rows 1-6 of Second Outer Petal for Red Flower.
Third Outer Petal
Rows 1-6: With one strand B and one strand BFB held tog, rep Rows 1-6 of Third Outer Petal for Red Flower.
Edging
With one strand C and one strand BFC held tog, rep Edging for Red Flower.
PISTIL (make 2)
With one strand E and one strand BFE held together, using smaller hook, ch 28, yo, insert hook in third ch from hook, *yo, draw up a lp, yo, insert hook in same ch, yo, draw up a lp, yo, draw through all 5 lp on hook, ch 1 tightly to secure*, sl st in each rem ch across to last ch, ch 2, yo, insert hook in last ch, rep from * to *, fasten off.
PIN BASE COVER
Front
Row 1: With one strand D and one strand BFD held tog, using larger hook, ch 9 for foundation ch, ch 3 more (counts as first dc throughout), dc in fourth ch from hook, dc in each rem ch across, turn. (10 dc)
Rows 2-10: Ch 3, dc in each rem dc across, dc in top of beg ch-3, turn. Fasten off at end of Row 10.
Back
Rows 1-10: Rep Rows 1-10 of Front. Do not fasten off at end of Row 10; turn.
Join Front and Back
Holding Front and Back together and working through both thicknesses at once, sc in each st across last row to corner, sc evenly spaced over ends sts of long edge to next corner, 3 sc in corner st, sc in each rem lp across next edge to corner, insert plastic canvas strip between Front and Back, 3 sc in corner, sc evenly spaced across long edge to next corner, 2 sc in same st as first sc, join in first sc. Fasten off.
LEAF (make 3)
Row 1:Beg at base of leaf with one strand D and one strand BFD held together, using larger hook, ch 29, tr in fifth ch from hook, tr in each of next 8 chs, dc in each of next 10 chs, hdc in each of next 4 chs, sc in next ch, 3 sc in last ch; working in rem lps across opposite side of foundation ch, sc in next ch, hdc in each of next 4 chs, dc in each of next 10 chs, tr in each of next 8 chs, 2 tr in last ch, turn.
Row 2 (RS): Sl st in each st across to center sc of 3-sc group at tip of leaf, (sl st, ch 1, sl st) in center sc, sl st in each rem st across. Fasten off.
FINISHING
Fold pistil in half, Cut six-inch length of A and tie around center of pistil. With crochet hook, reach up through bottom center of Inner Section Base for Red Flower and draw both ends of A from inside to outside. Insert hook into bottom of Outer Section Base for Red Flower. Insert Inner Section Base into Outer Section Base so that any leaf from Outer Section Base is centered under opening of First Petal on Inner Section Base, drawing 2 strands of A from bottom of Inner Section Base through to outside of Outer Section Base. With tapestry needle tie strands of A onto bottom of Outer Section Base and weave in ends.
Rep for White Flower with six-inch length of B and rem Pistil.
With paper towel or small sponge, apply starch to each flower including pistils and to each Leaf. Pin flowers and leaves out and shape. Let dry thoroughly.
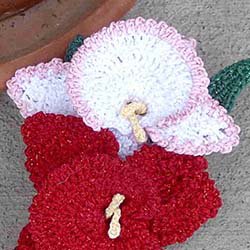
Sew pin back to bottom center of Pin Base Cover with sewing needle and green sewing thread. Using photo as a guide, sew one leaf to top of Pin Base Cover so that tip of leaf extends approximately 1-1/4-inches beyond lower edge of Cover. Sew another leaf so that it extends, at an angle, approximately 1-inch from top right corner. Sew rem leaf slightly lower down on Pin Base so that it extends, at an angle, approximately 3/4-inch beyond edge of Cover. Sew White Flower to top of Cover over leaves. Overlapping petals, sew Red Flower to bottom of Cover.
-
Irish Roses Picture Frame
Note: this item is not shipped
Designed by Maggie Petsch
Size: For 7 3/4” x 5 3/4” wood frame with 4” x 6” openingSurround that lovely baby girl with delicate pink Irish roses. For a boy, try white roses on a pale blue frame. Or, change the colors to match a graduation picture, wedding picture, grandmother’s picture, etc. These roses can also be stitched individually and made into pins and appliques for decorating clothing and purses.
Materials needed:- Kreinik Blending Filament (one 50m spool) 092 Star Pink
- DMC Cebelia crochet cotton size 20 (415 yd per ball): 1 ball each pink and olive green
- Size 9 steel crochet hook or size needed to obtain gauge
- alphabet beads: A, G, I (two), L, R, S, T to spell “It’s a girl”
- three 1/4-inch in diameter pearl beads
- craft glue
- sewing needle and pink sewing thread
Instructions:
Gauge: Rose = 1” in diameter. Check gauge to save time.
Pattern note: Join rnds with a sl st unless otherwise stated.
Pattern Stitch (referred to as ‘p’ in instructions):
Picot (p): Ch 2, sl st in last sc or dc made.Rose (make 11):
- Rnd 1: With pink cotton and pink Blending Filament, ch 1 (center ch), ch 2 more (beg ch-2), 9 hdc in center ch, join in 2nd ch of beg ch-2. (10 hdc, counting beg ch-2 as first hdc)
- Rnd 2: [ch 3, sk next hdc, sl st in next hdc] rep around, ending with sl st in st at base of beg ch-3. (5 ch-3 sps)
- Rnd 3: Sl st in first sp, ch 1; beg in same sp, [sc, 5 hdc] in each sp around, do not join. (5 petals)
- Rnd 4: Working behind petals of last rnd, sl st between last petal made and next petal, [ch 4, sl st between next 2 petals] rep around. (5 ch-4 sps)
- Rnd 5: Sl st in first sp, ch 1; beg in same sp, [sc, 7 dc] in each petal around, join in beg sc, fasten off, leaving short length for finishing.
- Individual leaf (make 10):
With olive green, ch 8, 2 sc in 2nd ch from hook, hdc in next ch, dc in next ch, p, 2 dc in next ch, dc in next ch, p, hdc in next ch, [2 sc, p, sc] in last ch; working in rem lps across opposite side of foundation ch, rep from * to *, sc in same ch as beg sc, join in beg sc. Fasten off. - Leaf pair:
With green, ch 8, 2 sc in 2nd ch from hook, hdc in next ch, dc in next ch, p, 2 dc in next ch, dc in next ch, p, hdc in next ch, [2 sc, p, sc] in last ch; working in rem lps across opposite side of foundation ch, rep from * to *, sc in same ch as beg sc, join in beg sc, ch 9, [2 sc, p, sc] in 2nd ch from hook, hdc in next ch, dc in next ch, p, 2 dc in next ch, dc in next ch, p, hdc in next ch, [sc, ch 1, sc] in next ch; working in rem lps across opposite side of ch, rep from * to *, join in next sc, fasten off
Finishing:
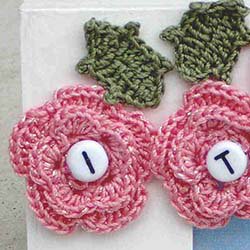
- With sewing needle and pink sewing thread, sew one alphabet letter bead to center of each of 8 roses. Sew one pearl to center of each of three rem roses. Using photo as a guide, glue roses and leaves around edges of frame.
-
July's Sunflower in Crochet
Note: this item is not shipped
July's Flower: The Sunflower
Design by Maggie Petsch
Size: 2-1/2 inches x 3-1/4 inches
Skill Level: Intermediate
Materials needed:- Kreinik's Blending Filament (50m per spool): 1 spool each brown #022 (BFA), citron #028 (BFB) and chartreuse #015 (BFC)
- South Maid crochet cotton size 10 (350 yds per ball): Small amounts each: cappuccino #434 (A), soft yellow #143 (B) and spruce #479 (C)
- Size 7 steel crochet hook or size needed to obtain gauge
- 1-inch pin back
- Sewing needle, green sewing thread and brown sewing thread
- Starch
- Paper towels or sponge
Instructions:
GAUGE: Check gauge to save time.
Rnds 1-5 = 1 inch in diameter
PATTERN NOTE: Join rnds with a sl st unless otherwise stated.
FLOWER
Center
Rnd 1 (RS): With one strand A and one strand BFA held together, ch 2, 6 sc in second ch from hook, join in first sc. (6 sc)
Rnd 2: Ch 1, 2 sc in same st as joining, 2 sc in each rem sc around, join in first sc. (12 sc)
Rnd 3: Ch 1, sc in same st as joining, 2 sc in next sc, [sc in next sc, 2 sc in next sc] rep around, join in first sc. (18 sc)
Rnd 4: Ch 1, 2 sc in first sc, sc in each of next 2 sc, [2 sc in next sc, sc in each of next 2 sc] rep around, do not join. (24 sc)
Rnd 5: Working in back lps only this rnd, sl st in each sc around, join in beg sl st, fasten off. (24 sl sts)
Petals
Rnd 1:With RS facing, working in front lps only around, join one strand B and one strand BFB held tog with a sl st in any sl st, *ch 9, sc in second ch from hook, dc in next ch, tr in each of next 5 chs, hdc in next ch**, sl st in each of next 3 sl sts on Rnd 4, rep from * around, ending last rep at **, sl st in each of next 2 sl sts, join in rem lp of sl st at base of beg ch-9 behind first petal. (8 petals)
Rnd 2: Working in back lps only this rnd behind petals of last rnd, sl st in next st, *ch 10, sc in second ch from hook, dc in next ch, tr in each of next 6 chs, dc in next ch, sk next sl st on Rnd 4**, sl st in each of next 2 sl sts, rep from * around, ending last rep at **, join in next sc, fasten off. (8 petals)
Pin petals of sunflower out and apply starch with paper towel or sponge. Let dry.
LEAF (make 4)
With 1 strand C and 1 strand BFC held tog, ch 16, dc in fourth ch from hook, dc in each of next 7 chs, hdc in each of next 2 chs, sc in each of next 2 chs, (sl st, ch 1, sl st) in last ch; working in rem lps across opposite side of foundation ch, sc in each of next 2 chs, hdc in each of next 2 chs, dc in each of next 7 chs, 2 dc in next ch, fasten off.
FINISHING
Pin leaves out and apply starch with paper towel or sponge. Let dry.
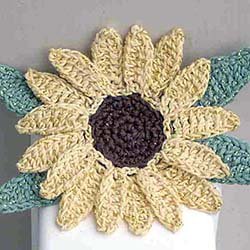
With sewing needle and green sewing thread, using photo as a guide, sew 2 leaves at each side of sunflower along outer edge of Center on WS , overlapping ends slightly. Sew pin back to back of center with sewing needle and brown sewing thread.


