
Valentines
Make special, sparkling Valentine's Day gifts
-

A Redwork Heart
Note: This item is not shipped; the pattern is a PDF you download onto your computer or device
Cross Stitch Project Designed by Pam Kellogg using sparkling Kreinik Threads
Design size: 47w x 56h, or about 3 1/4” x 4” when stitched on on 14-count fabric
Materials needed:
- Kreinik Metallic Thread as listed in color key,
- DMC embroidery floss as listed in color key,
- 9” x 10” piece of 14-ct White Aida by Zweigart,
- #24 Tapestry needle
Instructions:
Each square on the chart equals one fabric thread. Stitch the design centered on your fabric. Use two strands of floss or one strand of Braid for cross stitching. Use one strand of Braid or floss for backstitching.
Click here to download the FREE instructions for this design. -
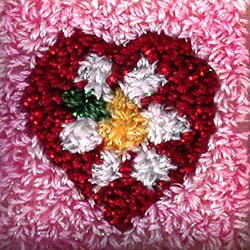
He Loves Me, He Loves Me Knot Punchneedle
NOTE: This item is not shipped. Click the link below to download the PDF.
He Loves Me, He Loves Me Knot
Designed by: Susan Davis of AuntSusie's House
Skill Level: IntermediatePunchneedle is like making hundreds of tiny knots, coloring in lines on fabric with thread. The thinner Kreinik metallic threads like Blending Filament are easy to use with punchneedles, and they add a touch of sparkle to make your design more exciting. This month we feature a quick little project that would make a sweet Valentine's gift or wedding present.
Materials needed:
- 3-strand punch needle
- piece of weavers cloth,
- 9" x 9"
- 4-inch Susan Bates Hoopla Hoop
- Kreinik Blending Filament in 032, 015HL, 003V, 092
- DMC embroidery floss in White, 367 Green, 743 Yellow, 815 Red
- Weeks Dye Works 1138 Sophie's Pink
- For finishing as a locket, we used Satin Ribbon: 1/8" x 24" and Antique Silver Locket (By Jupiter! Inc.®)
- For finishing in a box, we used Locket Box: small (2 5/8" x 2 5/8" x 2") by Provo Craft: Home Accents
- Small scrap of perfect mount matte board
- Fray check
- Pencil
Instructions:
Click here to download the FREE instructions for this design. You will need the Adobe Reader to view and print this file.
-
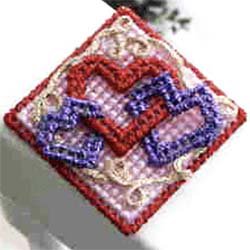
Funky Hearts Pin or ornament
NOTE: this is not a product that is shipped. Click the link below to download the PDF.
Funky Hearts Pin or Ornament
- Designed by Mary Cosgrove
Mary gives us another great plastic canvas pin project with this quick Valentine’s Day project. The red and purple metallics are so festive!
Materials needed:
- QuickCount® 10-count plastic canvas by Uniek*
- Kreinik Heavy (#32) Braid 002 Gold, 003 Red
- Kreinik 1/8” Ribbon 012HL Purple Hi Lustre
- DMC Embroidery floss 3689 Mauve
- FabriTac™ Permanent Adhesive by Beacon™
- Scissors
- Plastic Canvas needle (No. 18)
- Backing material: fabric, perforated paper, card stock, etc.
- Pinback
Instructions:
Click here to download the FREE instructions for this design.You will need the Adobe Reader to view and print this file.
-

Beaded Mosaic Mirror
Note: this item is not shipped
Designed by: Sue & Suzanne
Skill Level: BeginnerKids will enjoy this creative craft project (keep the materials on hand for any snow-days when school has been cancelled), or teens can use it to make a locker mirror. Personalize the mirror with favorite colors or school colors.
Materials needed:
- a mirror form from a craft store or discount store
- Treasure Tape 1" roll
- scrap papers
- Beadlets®
- Kreinik metallic 1/8" Ribbon and other embellishments as desired
- shallow pan, pot or tray
Instructions:
1. Patch entire surface of mosaic mirror with pieces of Treasure Tape, peeling back tape's protective liner as you go.
2. With scissors, trim around heart frame to remove excess tape.
3. Tear scrap papers into small bits and adhere randomly to mirror, alternating colors. Apply other embellishments as desired.
4. Place mirror in large pan and pour Beadlets® over remaining exposed tape areas.
5. Apply ribbon around edges of mirror by adhering with trim tape.
-
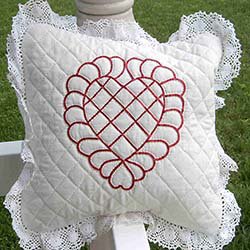
Feathered Heart Pillow
NOTE: this is not a product that is shipped. Click the link below to download the PDF.
Feathered Heart Pillow
- by Linda Lindgren
- Design Size: 14" x 14"
Some sewing is required to complete this sweet pillow, but the iron-on thread makes the embellishment quick and easy.
Materials needed:
- Kreinik Iron-on 1/8" Ribbon in Red
- 9" x 12" Kreinik Teflon Press Cloth
- Mini Iron or household iron
- DMC Quilting thread in off-white color
- four 16" muslin squares
- Quilt batting, 16-in square
- 1 2/3-yard eyelet trim
- scissors, pen, quilting needle, sewing thread, pins, quilt ruler, 14" pillow form, white paper
Instructions:
- Click here to download the FREE instructions for this design.You will need the Adobe Reader to view and print this file.
-
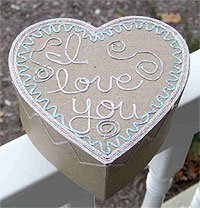
I LOVE YOU gift box
NOTE: This product is not shipped. Click the link below to download the PDF.
I LOVE YOU gift box
Materials needed:
- Kreinik Iron-on #16 Braid in 6120 pink, 6420 sky blue, 6410 confetti pink, 6010 pearl
- Kreinik Adhesive Press Cloth if using a mini iron, regular press cloth if using regular iron
- Mini Iron or household iron
- undecorated, heart-shaped paper mache box (medium size) from a craft store
- pencil
Instructions:
Click here to download the FREE instructions for this design. You will need the Adobe Reader to view and print this file.
- Turn your iron onto the highest heat setting and let it heat thoroughly.
- Lay the iron-on thread at a starting point on the desired spot, cover with a press cloth, and press with the hot iron for a few seconds until the thread adheres. Continue ironing the thread along the outline as desired.
-
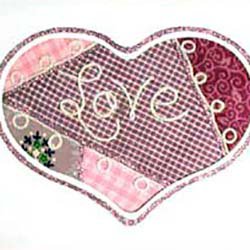
"Quilted" Heart Card
NOTE: this item is not shipped
"Quilted" Heart Card
Designed by: Amy Law
Skill Level: BeginnerIron-on threads give you an embroidered, crazy-quilted look when you don't have time to sew or embroider. This card is a fun way to use fabric scraps. With the colors and sparkling threads, it's sure to bring some cheer and love to a special person.
Materials needed:
- blank white card with heart cutout
- plain cardstock
- pink fabric scraps, various patterns
- Kreinik Iron-on 1/8" Ribbon in 6120 Pink
- Kreinik Iron-on #16 Braid in 6010 Pearl
- mini iron or household iron
- Kreinik Press Cloth
- Tools: glue stick, scissors
Instructions:
1. First, turn your iron on to it's highest setting and allow it to heat up. Then cut a piece of cardstock to the size of your card. Center it under the front of your card and trace your the cutout shape onto the cardstock as a guide.
2. Begin cutting pieces of fabric and arranging them on your cardstock so that they cover all of the traced shape. Once you have laid out all of your pieces you can begin gluing them in place.
3. Using your iron and pink ribbon, begin covering the seams between your fabric pieces. (Lay your thread at a starting point, cover with the Press Cloth, and press for several seconds until the thread adheres. Continue this way until your design is completed.) Next, embellish along each seam with your pearl braid. To finish, use the braid to write "Love" in script across the middle of your heart shape.
4. When finished, use your glue stick to attach your cardstock piece to your card, so that the design shows through the cutout. Finish your card by adding a pink ribbon border to the outside of your heart shape.


