
Kids Crafts
Fun, creative projects for kids to make
-
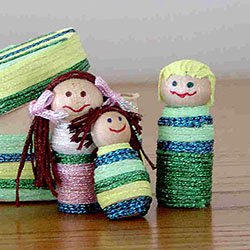
Mini dolls
- Note: this item is not shipped
Design by Brenda Spitzer
The easy way! No messy glue!
Materials needed:
- Kreinik 1/8" Ribbon in 052F, 053F, 092
- Kreinik #32 Braid 080HL, 339, 008
- Wood turnings from a craft store, 1" to 1 1/2" high (for this project Wood Shoppe Turnings by Crafts, Etc were used #165563 Boy, #065555 Girl, and #371831 Bumble Bee)
- Small oval wooden box (unfinished) or small oval paper mache box
- Treasure Tape, 1-inch roll, and 1/4-inch roll
- Fine Point Permanent markers for facial features (we used red, brown, blue and green)
- Scissors
Instructions:- To make clothing on the worry dolls, begin at the neckline and lay a thin line of 1/4” Treasure Tape around the woodturning. Peel off the red liner and lay braid or ribbon of your choice around the neckline by wrapping it and lightly pressing it onto the tape. Change colors of thread to make stripes. Continue wrapping to the bottom of the wood turning.
- Lay pieces of Treasure Tape on the top of each ‘head’. Remove red liner to expose the sticky part. Cut lengths of braid or ribbon for hair and lay on the taped head. For the boy and baby, cut lengths approximately 1-inch. For the girl, cut lengths 4 inches long. For the girl, pull strands together near the side of her face and tie with 1/8” Ribbon to make pony tails.
- Use fine point permanent markers to draw eyes and mouth on dolls.
- To decorate the box, begin at the bottom edge, and lay the larger roll of Treasure Tape all the way around the box. Do not put tape around the top of the box where the lid will hang over. Remove the red liner to expose sticky tape. Lay braid and ribbon around sides of box in stripes, covering the tape.
- For the lid, lay Treasure Tape to cover the whole lid. Remove red liner to expose sticky tape. Decorate with the braid and ribbon. Do the same around the side of the lid.
-
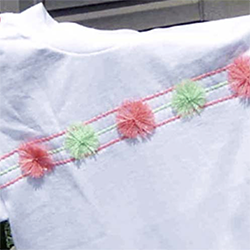
No-Sew T-Shirt With A Glow
NOTE: This item is not shipped.
Designed By eXpresSew
No one wants to fade away when the sun goes down. Keep your “glow” when the lights go out by decorating this plain t-shirt with fluorescent flowers.
Get everything together:
- Plain t-shirt in white or other solid color
- Glow-in-the-Dark thread by Kreinik, 1/8” ribbon or #32 Braid weight – 2 colors that look good together. You’ll need 1 spool of each color.
- Sewing thread that matches the t-shirt
- Disappearing pencil that can be seen on your t-shirt and erased later
- Ruler
- Sewing machine
- Embroidery hand sewing needle with large eye
- Small piece of paste board or tag board (like from a cereal box) – about 2” wide and 3” long
- Iron with steam setting
- Ironing board
Instructions:
Place the t-shirt flat on a table with the front facing up. Draw a line straight across the chest from sleeve to sleeve. Draw 2 more lines each _” apart. (Diag. 1).
Set up your sewing machine with the matching thread. Starting at one sleeve seam, lay one color thread over the top line and zigzag it to the shirt. (Diag. 2). Try NOT to stretch the shirt as you sew.Leave a thread tail at both ends of the line about 3” long.(By the way, zigzagging over a thick thread is called “couching”.) Zigzag or couch over the middle line with the second color thread. Couch the last line with the first color thread.
Push the embroidery needle through the shirt where the line meets the sleeve seam. Thread the tail through the large eye in the needle and pull the tail end through to the inside of the shirt. (Diag. 3). Repeat for the tails at each line end. Turn the shirt wrong side out. Stitch the tails back and forth securely to the seam allowance at each sleeve. Trim the tails off.
Print the pattern guide and use it to cut a template from the tag board for making the flowers.
For flowers, cut one piece of Glow-in-the-Dark thread about 6” long and keep it handy to tie the middle of the flower. Next wrap the thread around the template 8 full times and cut it off. (Diag. 4). Slide the tie piece through the space in the template and tie around the thread very tightly. (Diag. 5). Tie again and knot. Slide the flower off the template and cut the top and bottom loops. Trim the ends evenly. Make three flowers with the first color and two flowers with the second color.
Place the flowers on the ironing board and set the iron to the lowest setting for steam. Fan the threads out and press lightly with the iron until your flowers have a nice rounded shape.
Handstitch the flowers onto the middle line, alternating colors from left to right.


-
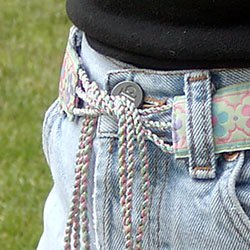
Lo Sew CORDED BELT COMBO
Note: this item is not shipped
Designed ByeXpresSew®
Two belt styles inspired by the Custom Corder™ by Kreinik. Combine colorful twisted cords with ribbons or webbing for subtle style that won’t quit.
Before you can get your supplies, figure out how you plan to wear your belt, either around your waist or upper hips. Find this measurement with a tape measure to see out how much ribbon or webbing you’ll need.
Now, read over the instructions that came with the Custom Corder™: See how to knot together a combination of threads and use the Custom Corder™ to twist the threads together into a “ply”. Each part of a twisted cord is called a ply. You’ll be making 2-ply cord.
Measure out each cord as long as you need. Knot threads together at each end. If you want a certain color to stand out, cut 2 lengths of that thread. Experiment.Sometimes the cords turn out differently than you expect, but they’re always fun to see.
Loop one knotted end around a drawer knob or somewhere similar and hook the other end around on the Custom Corder™. Stand back so the threads are pulled tightly. To twist the threads, turn the handle of the Custom Corder™ until they start to kink, or twist back on themselves. Hang the weight in the middle of the cord. Step in closer to loosen the twisted cord and the weight will cause the threads to double up and twist on themselves. This is the fun part. Once you’re happy with the cord, lift the far end off the knob and knot ends together.
REVERSIBLE RIBBON BELTSupplies to gather:
- Tape measure.
- Two pieces of ribbon that look good together each long enough to equal the body measurement you found earlier.
- Metallic thread by Kreinik, in a variety of colors to match both ribbons – two spools each in 2 or 3 different colors. (You’ll have trouble deciding which to choose, there are so many great colors.) Stick with the following thicknesses: #16 Medium Braid, #32 Heavy Braid, 1/16” Ribbon, 1/8” Ribbon or Facet.
- Custom Corder™ by Kreinik.
- Thread to match.
- Sewing machine.
- Iron.
Cut pieces of thread 50” long and use the Custom Corder™ to create the first cord. Make 5 more exactly alike until you have 6 altogether. Adjust the knots on one end so each cord is approximately 15” long. Trim the loose ends and let the tails fray. (Diag. 1)
Stitch three cords each to the end of one ribbon. Press the seam allowances back toward the ribbon. (Diag. 2). Press under the ends of the second ribbon so that ribbons are still the same length.
With wrong sides together, pin the ribbons together. Stitch completely around the outside edges of the ribbon and stitch twice at each end to secure the cords. (Diag. 3). Press the ribbon flat if necessary.
WEBBING BELT WITH CORDS AND BEADSSupplies to gather:
- Tape measure.
- Nylon webbing - one piece long enough to equal the body measurement you found earlier.
- Metallic thread by Kreinik, in a variety of colors to match both ribbons – two spools each in 2 or 3 different colors. (You’ll have trouble deciding which to choose, there are so many great colors.) Stick with the following thicknesses: #16 Medium Braid, #32 Heavy Braid, 1/16” Ribbon, 1/8” Ribbon or Facet.
- Custom Corder™ by Kreinik.
- Thread to match webbing.
- Pony beads in colors that match.
- White glue for jewels or beads.
- Sewing machine.
- Iron.
Cut pieces of thread 3 times as long as the webbing measurement and use theCustom Corder™ to create your cord. Cut cord in the same colors 50” long and make two additional cords for the ties. Adjust the knots on one end so each cord is approximately 15” long. Trim the loose ends and let the tails fray. (Diag.1). click here to see diagrams
Thread the belt cord with pony beads in any one color or combination of colors you like. (Diag. 4). Add pony beads to make five sets of colors altogether. Add one set of beads to the tie cords.
Pin the belt cord to the webbing. Make sure both are equal in length. Baste the cord and webbing ends together. Baste one tie end to each webbing end right on top of the belt cord. Fold the ends in half and stitch with the sewing machine.(Diag. 5).
Pull the tie cord out at each end so webbing is right side out. Glue each end neatly. Place belt out flat on a table and space the sets of beads evenly. Glue beads to the webbing with jewel glue or stitch securely. (Diag. 6). -
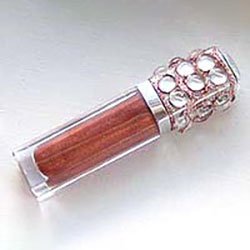
Embellished Lip Gloss
Note: this item is not shippedA girl’s gotta glow! Decorate your tube of lip gloss and be truly glamorous. The secret is double-sided tape.
Materials needed:- lip gloss container tube (it helps to have one with a flat, squared lid)
- Treasure Tape 1-inch roll
- Diamond Beadlets
- Flat-backed sequins or beads
- Kreinik 1/16” Ribbon in 273 Red orange or a color to match your gloss
Instructions:
- Make sure the lid of your lip gloss is clean and smooth.
- Wrap lid with Treasure Tape roll.
- Remove the red liner to expose sticky tape.
- Lay flat-backed sequins or buttons on this tape as desired.
- Lay your 1/16” Ribbon around each sequin, or in any decorative way.
- Put your tube in a shallow tray and cover with Diamond Beadlets. Make sure all remaining sticky areas are covered with beads.
-
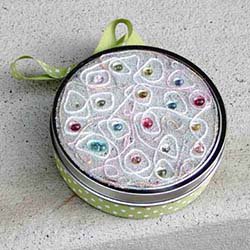
Beaded Earring Box
Note: this item is not shipped
Of course, you don’t have to use this cute little box as an earring holder—it can hold any treasure, or act as a gift box. It just takes minutes to do, but looks like you bought it in a trendy boutique!
Materials needed:
• round tin box from a craft store
• 1-inch Treasure Tape™ roll
• 1/4-inch Treasure Tape™ roll
• Diamond Beadlets®
• Kreinik #12 Braid 032 Pearl and 092 Star Pink
• flat-backed sequins or cabochons
• decorative satin ribbon to fit around the rim of your tin box
• shallow pan or tray
Instructions:- Cover entire top of the tin box with the 1-inch Treasure Tape.
- Peel back red liner to expose sticky part, and place cabochons randomly on the lid.
- Using the colors of #12 Braid, decorate tin lid with thread. Follow the photograph as a guide, or make your own pattern.
- Lay the lid in a shallow pan or tray, cover the sticky areas with Diamond Beadlets®.
- Put lid back onto your container.
- In the space below the lid and the bottom of the tin, wrap 1/4” Treasure Tape around, using more than one strip if needed to fill in the space with the tape.
- Remove red liner to expose sticky tape, and lay your decorative ribbon on the tape, pressing to make sure it sticks well. Tie ends into a bow.
-
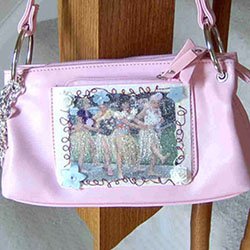
Photo Purse
Note: this item is not shippedMaterials needed:- Kreinik small Bag O'Bits
- Flat-backed flower buttons
- Diamond Beadlets®
- 1-inch roll of Treasure Tape™
- 4” x 6” or smaller photo
- purchased purse with flat area on which you can put a photo (such as a pocket, or flat front)
- shallow tray or pan
Instructions:
- Cover the back of your photo with strips of the 1-inch Treasure Tape. Leave the red liner on it for now.
- Cover the top of the photo with strips of the 1-inch Treasure Tape. Remove the red liner to expose the top sticky area.
- On the sticky area, decorate with the metallic thread from the Bag O' Bits as desired.
- Add buttons or other flat-back cabochons as desired.
- Trim your photo down to the desired size
- When embellishing is complete, lay your photo in the shallow tray and cover with Diamond Beadlets, swirling with your fingers to make sure all sticky areas are covered.
- Remove the red liner from the tape on the back of your photo to expose the sticky area. Position it on the desired location on your purse and press firmly, making sure it adheres completely.
-
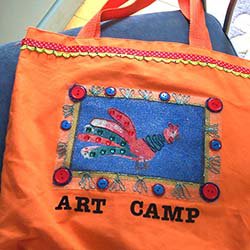
Camp Projects
Note: this item is not shipped
Time for summer camp!
Summer is a great time to craft with your kids. They’ve got the energy, interest, and time. Here are a few ideas for adding a creative and homemade touch to camp this year. Decorate with beads, tape and thread, and you’ll have as much fun as your kids!Materials needed:
- Kreinik Large Bag O'Bits
- 1-inch roll Red-liner Treasure Tape
- tube of Diamond Beadlets
Gear up before campBefore they go to camp, the kids can decorate and personalize their basic gear (alarm clocks, hairbrushes, backpacks even lip gloss and small tin containers). Decorate these items with red-liner double-sided tape, threads and beads — everyone will know who owns the colorful gear. Have your child pick a favorite color thread (like purple), and decorate all of their camp stuff with that thread.
Make a “Care Package” for your childGet a cool organizer and fill it with a variety of projects, from bunk activities to birthday party crafts (for those away during their birthdays) to stationery kits.
Organizer idea: Embellished Tote Bag (orange bag pictured above)Embellish a plain tote bag from a discount store. Lay pieces of the double-sided Treasure Tape on the bag, remove the red liner to expose the sticky area, then cover with a sheet of your child’s own artwork (or your artwork) the same size or smaller. Then lay more strips of Treasure Tape on top. Remove the red liner to expose the sticky part, and embellish with threads, buttons, and beads. Write your child’s name, or “Art Camp” or another message with a paint pen.Memory crafts after camp
With all the pictures taken at camp, build a fun project for your child around the whole theme of “Memories.” Buy an unfinished wooden frame at a discount or craft store, then embellish it using the same technique: cover with Treasure Tape, then decorate with beads, flowers, threads, buttons and more. Your child may want to make a frame for each friend or counselor from camp. What a special gift! -
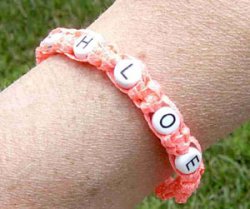
Glow-in-the-dark Name Bracelet
Note: this item is not shipped
Designed by Brenda Spitzer
Materials needed:- Kreinik 1/8” Ribbon 055F and 052F
- letter beads for your name
- two #3 embroidery needles
- scissors
- tape measure
- masking tape
Instructions:- To make a 6-inch bracelet, cut a 72-inch length of 055F Ribbon. This will be your knotting cord. Cut a 36-inch length of 052F Braid. This will be your filler cord. Fold both cords in half. Place folded ends together and tie an overhand knot 1/2-inch from end. (See diagrams A and B)
- Place knotted end of cords on a flat surface like a table. Tape the knot to the surface with masking tape. Make sure that knotting cords lay on the outside and filler cords on the inside.
- Tie a series of square knots to measure 2 inches in length. (See diagram for square knot. Bring knotting cord on left across filler cords and under right knotting cord as in “C”. Then bring right knotting cord under filler cords and then through and over the loop made by left knotting cord. Now grasp the end of knotting cord that is on the left. Bring this cord under the filler cords. Grasp the end of knotting cord that is on the right. Bring it over the filler cords. Bring knotting cords through loops on both sides, pull snuggly.)
- Thread the two center, filler cords through the needles. Add the bead for the first letter of your name to the two filler cords by threading the needles and cords through the hole of the bead. Tie two more square knots and add the next letter of your name. Repeat this process for all the letters in your name.
- After all of the letter beads have been added, tie another series of square knots measuring two inches in length. (Note: depending on the number of letters in your name, you may want to make the series of square knots before and after your name, either longer or shorter than two inches. The overall length of the bracelet should be the same as the measurement of your own wrist.)
- To finish the bracelet, tie the cords into three overhand knots. Trim the ends of the cord. To fasten the bracelet, push the ending knot through the beginning loop.
-
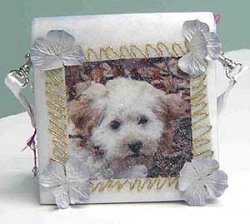
Little Girls' Pet Purse
Little Girls' Pet Purse
-
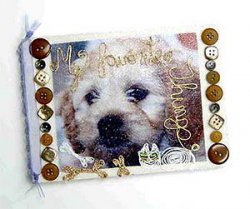
Beaded Dog Album
Beaded Dog Album
-
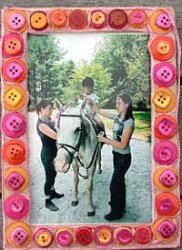
Button Frame
Button Frame designed by Treasure It
-
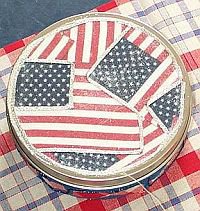
All American Tin
All American Tin designed by Treasure It


