
Autumn & Halloween
Fun and creative projects for Halloween and Autumn to wear, give, or decorate all season long.
-
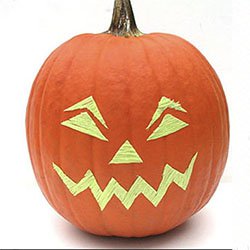
Save The Pumpkins Free Craft Pattern
Note: This item is not shipped
By Jim Cargo
I don't particularly care for pumpkin carving. It's just too darn messy. Sure you can try to roasting the seeds and making a pie, but at the end of the day you end up with a "one-and-done" decoration. Toss in the fact that in colder climates these darn things are apt to rot on your front step before Ole Hallows Eve even gets here.
What if you can "SAVE" that pumpkin from such invasive carving procedures and use it for both Halloween and Thanksgiving without the colossal mess? Now you have my attention. The following project needs only a few simple items to let you save your pumpkin from unnecessary invasive carving procedures. Oh, and my Jack is waterproof!
You will need:
- A computer to print out a template from the web
- Pen or Magic Marker
- Scissors
- One, 10m spool of Kreinik 1/8" Ribbon in color #054F
- 1-inch roll of heavy duty double-sided tape (available from craft stores)
- Black-light bulb
- Medium size pumpkinDirections:
- Bring your pumpkin inside. We want it at room temperature and dry.
- Start off by finding a template you want to use. There are tons of free templates out there. All you have to do is put pumpkin template into any search engine and away you go. Once you have found the template you would like to use, save it to your computer and print out two copies. The second copy will serve as a reminder how your template looked before cutting it.

- Take your print out and see how well the template will fit on your pumpkin. In some instances, you might have to reduce the size of the image so it will fit better. You can do that using programs such as Microsoft Word.
- Now, take one of your copies and cut out the components of your pumpkins face. Lay pieces of tape down and lay the template pieces you just cut out on top of it. Use your pen or marker to trace the outline of the template onto the tape.
- Once you have traced all of the pieces onto the tape, use your scissors to cut out the pieces that will go on your pumpkin.
- Take the piece of tape that will be the mouth piece you just cut out and using the blade of
your scissors, gently peel the red liner off. This will expose the sticky tape.

- Attach the 1/8" Ribbon at one of the corners of the mouth piece and press the 1/8" Ribbon in place so that it will extend just beyond the edge of the tapped piece. Using a zig-zag pattern, continue pressing the ribbon into place so that each piece of ribbon is butted against the previous piece to "fill" in the tape.
- Once you have covered all of the tape with the ribbon, use your scissors to trim away any ribbon that has extended beyond the tape for a nice clean look.
- Continue with the eyes and nose using steps 7 & 8.

 Once all of your pieces have been cut, its time to
adhere them to your pumpkin. Starting with the
mouth piece, turn the piece over to remove the white
paper backing. At one of the corners, use the blade of
your scissors and pry the white paper backing to
expose the sticky side. Place the piece on your
pumpkin by pressing them in place using your
fingers. Continue with the remaining face pieces until
you are done.
Once all of your pieces have been cut, its time to
adhere them to your pumpkin. Starting with the
mouth piece, turn the piece over to remove the white
paper backing. At one of the corners, use the blade of
your scissors and pry the white paper backing to
expose the sticky side. Place the piece on your
pumpkin by pressing them in place using your
fingers. Continue with the remaining face pieces until
you are done.- Here is the fun part. Place your pumpkin where your blacklight bulb will shine on it and see your creation glow. You can use a blacklight bulb for a lamp or you can find them for your flood lights as well.
- It's now November 1 and Halloween is over. Less than 30 days until Thanksgiving. Take that decorated pumpkin and get it ready for Thanksgiving. Using your fingernail, or scissor blade, gently scrape the edge of the tape to pull it up. The pieces should pull off easily and you'll have a perfect pumpkin to use for Thanksgiving decor or anything else you would want to do with it.
-
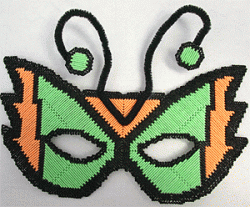
Martian Mask
NOTE: This item is not shipped. Click the link below to download the PDF.
Design by Carole Rogers
Stitch a Halloween mask using Kreinik glow-in-the-dark threads on plastic canvas.
Materials needed:
- Kreinik Medium (#16) Braid - 051F Tangerine, 053F Lime, 005 Black
- 14 ct plastic canvas
- 12" black chenille stem
- 1 1/2 yds elastic
- #22 tapestry needle
- thick tacky glue
Instructions:
Click here to download the instructions for this design.
You will need the Adobe Reader to view and print this file. -
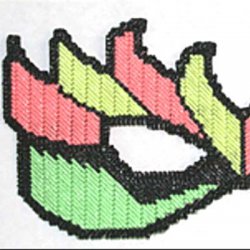
Neon Flames Plastic Canvas Mask
NOTE: This item is not shipped. It is a file that you download to your computer.
Stitch a plastic canvas mask using Kreinik glow-in-the-dark threads.
Design by Carole Rogers
Materials needed:
- Kreinik Medium (#16) Braid - 055F Watermelon, 054F Lemon-Lime, 053F Lime,005 Black
- 14 ct plastic canvas
- 1 1/2 yds elastic
- #22 tapestry needle
- thick tacky glue
Instructions:
Click here to download the instructions for this design. You will need the Adobe Reader to view and print this file.
-
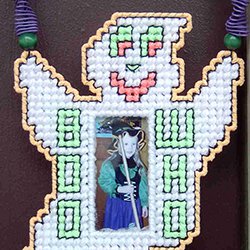
“Boo Who?” Glowing Ghost Frame Door Hanger
NOTE: this is not a product that is shipped. Click the link below to download the PDF.
“Boo Who?” Glowing Ghost FrameDoor Hanger- Designed by Mary Cosgrove
Skill Level: Intermediate
Materials needed:Uniek QuickCount™ 7-count plastic canvas
Uniek Needleoft® plastic canvas yarn as listed in color key
Kreinik Fine (#8) Braid 005HL
Kreinik 1/8” Ribbon 051F, 053F, 055F
Wire-Art Jewelry Kit by Duncan Enterprises: 24-inch wires (2 black, 2 orange,3 purple, 1 white); 2 black pony beads; 6 green wood beads; 2 large orangewood beads
Fabri-Tac™ Permanent AdhesiveScissors
Plastic canvas needle
PhotoInstructions:
Click hereto download the instructions for this design. You willneed the Adobe Reader to view and print this file.
-
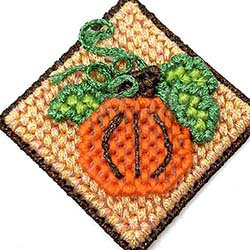
Pumpkin Patch Pin or Magnet
NOTE: this is not a product that is shipped. Click the link below to download the PDF.
Pumpkin Patch Pin
- Designed by Mary Cosgrove
Materials needed:
- QuickCount® 10-count plastic canvas by Uniek
- Kreinik Heavy (#32) Braid in 008 Green
- Kreinik 1/8” Ribbon in 052HL Bronze Hi Lustre, 9192 Light Peach
- DMC embroidery floss in 608 Bright Orange-Red, 704 Chartreuse
- Fabri-Tac™ Permanent Adhesive by Beacon™
- Scissors, Plastic canvas needle (No. 18), Backing material such as fabric, perforated paper
- card stock, Pinback or magnet
Instructions:
Click here to download the FREE instructions for this design.You will need the Adobe Reader to view and print this file.
-
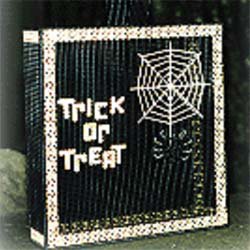
Trick or Treat Bag Free Plastic Canvas Pattern
NOTE: this is not a product that is shipped. Click the link below to download the PDF.
Trick Or Treating Bag
- Designed by Jeanette Vanetta
Skill Level: Intermediate
Make this tote bag for the little trick-or-treater in your life to use on October 31. It uses Kreinik's fun glow-in-the-dark threads.
Glow-in-the-dark threads will glow when exposed to direct light. However, they should not be relied upon for safety-rated reflective material. Instead, have your child wear reflectors, a flashlight, or similar safety device to make the child visible to drivers at night.
Materials needed:
- Kreinik 1/8" Ribbon in 054F Lemon-Lime (21 yards), 051F Tangerine (21 yards), and 052F Grapefruit (11 yards)
- Kreinik Medium (#16) Braid in 053F Lime (3 yards)
- 3 sheets 7-count black plastic canvas
- 1/2 sheet 7-count clear plastic canvas
- 21.5 yards black plastic canvas yarn
- hot glue gun recommended by the designer for attaching letters and spider
Instructions:
- Click here to download the FREE instructions for this design.You will need the Adobe Reader to view and print this file.
-

Metallic Mohawk Skull
Note: this item is not shippedA metallic thread mohawk is what all the best-dressed skeletons will be wearing this Halloween.
Materials needed:- styrofoam skull from the dollar store
- Kreinik Bag O' Bits
- a few nails (optional)
- Kreinik Treasure Tape 1/2" Roll
Instructions:
Lay a strip of Treasure Tape from the top of the head to the back of the head. Remove the red liner to expose the sticky area. Begin to lay bits of metallic threads on the tape, pressing as you go. If needed to fill out the mohawk, add layers of tape underneath rows of thread where you can add even more thread. Trim the thread so ends are even in length. Add nails on skull if desired.
-

Braided Autumn Metallic Bracelet
Note: this item is not shippedThis project came out of a hopeless search for an autumn-looking bracelet. Searching department stores high and low, the bracelets were either too big, too flashy, heavy, not enough brown, too many other colors, etc. A handmade bangle solves the problem — you can customize the colors and fasteners plus set your own width and length. Kreinik 3/8" Trim was chosen to make the bracelet because it comes in a wired form (easy to shape), looks high end for a fraction of the cost, and comes in a variety of colors.
Try your hand at designing your own bracelets. Beads can easily be added as you braid to make it even more interesting. Bonus idea: make bracelets for gifts...in school colors for homecoming dance...for charity campaigns...here is the link to the other colors available in Kreinik 3/8" Trim.
Materials needed:- Kreinik 3/8" Trim (wired), any 3 colors
- Kreinik Cord in a color to match one of your trim colors
- toggle clasp and ring, or other fastener with medium to large sized holes
- scissors, needle
- decorative beads with medium to large sized holes, if desired
Instructions:
- Make sure a small piece of tape is wrapped around the end of each piece of 3/8" Trim; this will keep the ends from separating as you work.
- Measure your wrist or determine how long you want your bracelet to be.
- Start braiding the 3 colors together, keeping the trim flat as you braid.
- When you get to the end, fold two of your 3/8" Trim colors to the back, and wrap the Cord tightly around them to secure (stitch in and out with the Cord to make sure these two ends are secured together. Cut the taped ends off of these two, trimming as needed close to your wrapped area.
- Take your other trim length and insert it into the ring on your clasp. Turn it under, and secure by wrapping with your Cord. Use your needle to stitch in and out and around the ends to secure and fasten off with a stitcher's knot. Trim the tape off this piece of 3/8" Trim as close to your wrapped area as possible.
- Repeat step #5 for the other end.
Note: if desired, you can add decorative beads as you braid the Trim together.
-

Fab Felt Leaf Placemat
Note: this item is not shippedThis plain round placemat from the dollar store was too tempting to pass up - the curved edge made a perfect spot for adding felt-leaf appliques. The stitches of metallic threads make the leaves more visually interesting with extra texture.
Materials needed:- plain placemat
- scraps of felt: we used shades of brown, purple and green
- miscellaneous buttons
- Kreinik Fine #8 Braid in colors to match your felt. We used 012 Purple, 5982 Forest, 4002 Spiced Chai, 4005 Sugar Cube
- sharp embroidery needle with large eye
- needle threader
- Kreinik Treasure Tape 1/2" roll
Instructions:
- Draw freehand leaves paper, or look for leaf templates online or from a child's coloring book. Following your pattern or freehand, cut out your leaves from your felt pieces.
- Using the Kreinik Braid colors, create straight stitches (or the Seed Stitch) on each leaf. Make a random pattern or follow a natural vein pattern.
- Use extra pieces of Braid to fill in the holes in your buttons for added color.
- When embellishing is complete, arrange and attach your leaves and buttons using double-sided Treasure Tape. Note: If you plan on washing your placemat, you may want to use sewing thread to attach the pieces.


