
Christmas
Add sparkle to Christmas crafts with Kreinik threads
-

Felt Angel Ornaments
NOTE: this item is not shipped.
You can do this same technique on any felt shape. Look for these ready-made felt shapes in craft stores.
In one West Virginia county, the local Hospice organization creates holiday trees with angel themes each year. Residents are encouraged to write a loved one's name on the angel and place it on the tree for remembrance. This simple Felt Angel design came out of such a project. Whether you make them for charity or for decorations on your own tree, they're fast, easy, and simply beautiful. They would also make lovely package decorations on your holiday gifts this year.
Materials needed:
- craft felt (or craft felt already cut into angel shapes)
- cookie cutter in an angel shape (if you can't find cut-out angels) and pen for tracing cutter shape onto felt
- scissors
- household iron or mini iron
- Kreinik Press Cloth (the adhesive version if you're using a Clover Mini Iron)
- Kreinik Iron-on #16 Braid in 6225 Gold, or your choice of colors
- Kreinik Iron-on 1/8" ribbon in 6225 Gold, or your choice of colors
Note: if your iron is not Teflon-coated, you will want to use a press cloth between the thread and the iron, or apply a Kreinik Adhesive Press Cloth to your iron (several sizes are available). Apply the Adhesive Press Cloth while your iron is cool and unplugged.
Instructions:
1. Turn your iron onto the highest heat setting and let it heat thoroughly.
2. Trace your desired shape onto the felt, then cut out.
3. Begin decorating the angel as desired with iron-on thread: lay the thread at a starting point, cover with the Teflon Press Cloth, and press for several seconds until the thread adheres. Continue this way, working your design in sections.
DESIGN IDEAS:
- write someone's name with the iron-on braid
- add a halo with a piece of iron-on ribbon, ironing just the ends of the thread on the back of your angel's head
- add buttons or charms by stringing the iron-on Braid through the holes in the button/charms, then iron down the thread to secure
- tie a bow with the iron-on thread then iron it onto your felt
- add an ornament hanger to the back by ironing the ends of the iron-on ribbon
-
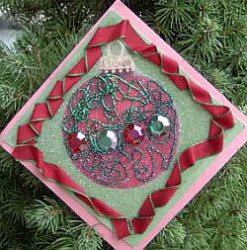
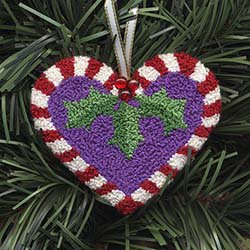
Beaded Paper Ornament
Note: This item is not shipped"Draw" on a picture with metallic threads, then fill in the spaces with clear beadlets to allow the image beneath to show. You can create sparkling ornaments, gift tags, and cards using the same technique.
Skill level: beginner
Materials used in the project pictured; modify sizes and thread colors for your particular design:- Kreinik #12 Braid 009HL Emerald Hi Lustre
- Four flat-backed red and green cabochons or sequins
- Red and green satin ribbon
- 3" x 3" picture of a Christmas ornament (like from a catalogue, magazine, etc)
- 1-inch Kreinik Treasure Tape
- Glue stick
- Diamond Beadlets®
- cardstock
- Shallow pan or tray
- Scissors
- Hole punch
Instructions for our model:
- With the glue stick, attach the ornament picture centered onto your cardstock.
- Cut the Treasure Tape to be 3" x 3". Remove the white backing and lay centered on your ornament image. Remove the red liner to expose the top sticky area.
- Lay the green and red cabochons on the ornament.
- Lay the Emerald metallic braid on the ornament in curls, swirls, etc. as desired.
- Lay the satin ribbon around the edge of the tape area, overlapping, folding and pressing into the tape as you go along.
- When thread decorating is complete, lay the design in a shallow pan or tray and cover remaining sticky areas with Diamond Beadlets®
- Punch a hole in the top and run an extra piece of thread through as the ornament hanger.
-
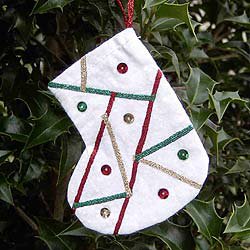
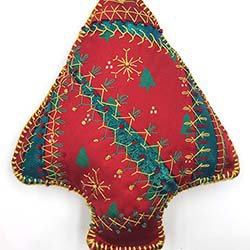
Iron-On Stocking
NOTE: this item is not shipped.
Iron-On Stocking
Designed by: Nancy Billetdeaux
Skill Level: IntermediateThis is a fun way to make a quick fabric ornament that looks like it was crazy quilted. You can take it a step further and make it a ‘signature’ ornaments– having family or friends sign their names in the sections of the design.The iron-on threads give you a quick decorative thread embellishment.
Materials needed:
• Iron-on 1/8” Ribbon in 6130 Red, 6225 Gold, 6350 Green
• 3” x 4” Kreinik Press Cloth if using a regular iron, or Kreinik adhesive press cloth if using a Clover Mini Iron
• Mini iron or household iron
• 4 1/2” X 4 1/2” white print fabric
• sequins (small) 6 red, 4 green, 4 gold
• sewing machine
• white all-purpose thread
• fabric glue
Instructions:
If using the adhesive press cloth on a mini iron, tear off the backing and apply to the mini iron while cool and unplugged.Turn your iron onto the highest heat setting and let it heat thoroughly.
1. Trace and cut out the stocking template. Place template onto doubled white print fabric and cut out.
2. Referring to template for placement, iron the 1/8’ Ribbon; lay the thread at a starting point, cover with the Teflon press cloth, and press for several seconds until the thread adheres. Continue in this way, working the design n sections. Refer to the photo for color location.
3. Pin stocking right sides together and sew around stocking, leaving top open, using a 1/4” seam allowance. Turn under 3/8” to inside of stocking and stitch around top of stocking 1/4” from edge.
4. Cut a piece of 1/8” red Iron-on Ribbon 8 1/2” long, and fold in half.Iron the raw ends to inside of stocking (always use your Teflon press cloth).
5. Glue sequins to stocking using fabric glue; refer to photo for color and placement. -
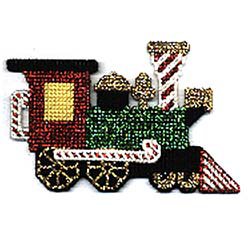
Candy Cane Railroad
NOTE: this is not a product that is shipped. Click the link below to download the PDF.
Candy Cane Railroad
- Designed Rosemarie Walter
This is a fun holiday project. Stitch it for someone who loves trains, toys, candy canes or Christmas "or all of the above" or make it as holiday decor for your own home. There are five 'cars' in this train. Attach clear fishing line to make into ornaments, or add magnets to make into a refrigerator decoration
Materials needed:
- Kreinik Medium (#16) Braid" in 031 Crimson, 002HL Gold Hi Lustre, 008HL Green Hi Lustre
- Cotton embroidery floss in white, black and yellow (see color key)
- 14-count plastic canvas, 1/4 sheet each white and clear
- #24 Tapestry needle
Instructions:
Click here to download the FREE instructions for this design.You will need the Adobe Reader to view and print this file.
-
Ornament Coasters
NOTE: this is not a product that is shipped. Click the link below to download the PDF.
Ornament Coasters
- Designed by Kathryn Rubinstein
Materials needed:
- Kreinik Very Fine (#4) Braid 009 Emerald, 2 spools
- Kreinik Very Fine (#4) Braid 015 Chartreuse, 1 spool
- Kreinik Fine (#8) Braid 061 Ruby, 1 spool
- Kreinik Very Fine (#4) Braid 202HL Aztec Gold Hi Lustre, 2 spools
- Anchor Embroidery Floss in the following: Red #19 (2 skeins), Gold #307 (1), Yellow #298 (2), White #1 (6), Light Blue #160 (1), Light Green #257 (1)
- Darice 10-mesh plastic canvas
- Embroidery needle, scissors
- Optional: white Flexi-Foam (1 sheet), craft glue
Instructions:
Clickhere to download the FREE instructions for this design.You will need the Adobe Reader to view and print this file.
-
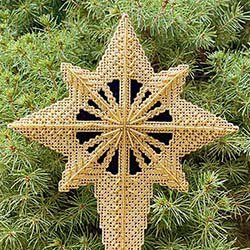
Star Tree Topper
NOTE: this is not a product that is shipped. Click the link below to download the PDF.
Star Tree Topper
- Designed by Rosemarie Walter
A stunningly gorgeous tree topper sparkling from Kreinik metallic threads.
Materials needed:
- 10 spools of Kreinik 1/8" Ribbon in 202HL Aztec Gold,
- Kreinik Japan #1 002J Gold for attaching beads
- 10-count plastic canvas
- 8" x 4" piece of blue velvet
- Gold bugle beads: large, medium and small, also gold seed beads
Instructions:
Click here to download the FREE instructions for this design.You will need the Adobe Reader to view and print this file.
-
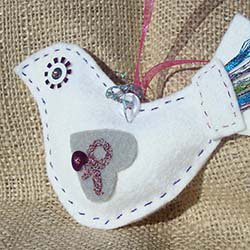
Felt Dove Ornament
Note: this item is not shipped
Materials needed:- dove template below, reduced or enlarged as desired
- white felt
- scrap of gray felt
- sequins or buttons as desired
- Kreinik holographic thread colors in Fine #8 Braid for any stitching, and 1/8" Ribbon for the tail—the holographic colors have an "L" in the color number, such as 002L, 001L, 005L etc.
- sewing needle, stuffing or fiberfill, scrap of ribbon
Instructions:
Note: we decorated only one side of the dove, but feel free to decorate both sides if desired.Enlarge or reduce the size of the template as desired.
- Using the dove template, cut out two dove shapes from your white felt. Place them together.
- Using a color of Fine #8 Braid, Tapestry #12 Braid, or Very Fine #4 Braid, straight stitch (or running stitch) around the inside edge of the doves. Leave a small opening, insert stuffing, then finish sewing closed.
- Use sequins or buttons for the eye, securing onto your felt using your Kreinik Braid or Blending Filament.
- Cut your gray felt into the shape of a small heart. Set it on its side and position it near the middle of the dove to look like a wing. Stitch down using a color of Kreinik Braid or Filament. We stitched a breast-cancer awareness ribbon on the gray wing, then attached a heart sequin right next to it.
- Attach your ribbon scrap to thte dove as an ornament hanger. We covered the spot where we knotted the ribbon onto the dove by placing a button there, embellished with Kreinik Braid.
- Cut 2” pieces of holographic threads and lay at the taiil. Secure with fabric glue or hold with your hand as you cover the base ends with a small white rectangle of felt. Sew it onto the front of the dove just at the base of the
- If desired, add a poem or message by writing or typing it on paper, then inserting the paper between the felt layers at the tail.

-
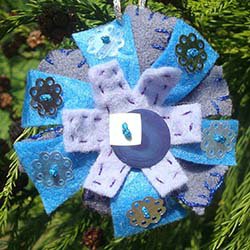
Felt Snowflake Ornament
Note: this item is not shipped
Take scraps of felt, add a little bling with metallic thread embroidery, and you have a fabulous snowflake ornament for your tree or to give as a gift. (Sews up quickly if you need a hostess gift at the last minute).
Materials needed:- Kreinik threads: Tapestry #12 Braid 033L, 1/8” Ribbon 001L and Fine #8 Braid 026L
- three 5” pieces of felt in various blue or gray shades
- blue, silver, or white sequins
- #22 Tapestry needle
- embroidery needle
Instructions:
1. Using the templates below (enlarge or reduce size as desired), cut out the snowflake shapes from your felt pieces.
2. Embroidery on each felt piece using the Tapestry #12 Braid and Fine #8 Braid. Use any stitch you desire; we used a basic running stitch on one and a buttonhole or blanket stitch on one.
3. Layer the three snowflake pieces on top of each other, largest in the back, smallest on top. Sewing through all three layers, attach the sequins using French knots, tacking stitches or similar using the embroidery needle (which has a sharper point than a Tapestry needle) and the Fine #8 Braid. You can also add buttons or other
ephemera as desired.
4. Add an ornament hanger by sewing the 1/8” Ribbon in a loop at the top.
-
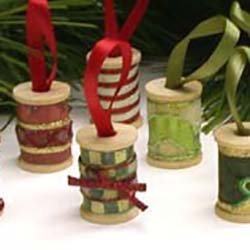
Wooden Spool Ornaments
Note: this item is not shipped
Quilters and sewers will love these handmade ornaments. With vintage charm, they can be easily-and quickly-made up in batches for a sewing club, nursing home, or even to sell at a holiday bazaar.
Materials needed:
- Bag of large wooden spools (available in wood aisle of craft store)
- Fabric scraps trimmed to width of spool
- Red and green satin ribbon (we used 1/4" wide ribbon)
- glue
For beaded ornaments:
- Treasure Tape 1" roll (if using spools with 1" wide design area)
- Treasure Tape 1/8" roll
- Diamond Beadlets
- Kreinik #12 Braid in 015, 003, 002
- Kreinik 1/16" Ribbon in 008, 002, 032
- shallow pan or tray
For iron-on ornaments:
- Kreinik Iron-on 1/8" Ribbon in Pearl and in Red
- Kreinik Iron-on #16 Braid in Pearl
- Kreinik Teflon Press Cloth
- Mini iron
Instructions for Iron-on ornaments:
1. Turn your iron onto the highest heat setting and let it heat thoroughly.
2. Using double-sided Treasure Tape or your favorite glue, attach fabric scraps to the spool.
3. Begin thread decorating by laying one end of your Iron-on Braid or Ribbon on the fabric-covered spool. Cover with the Teflon Press cloth and press with your hot iron for several seconds until the thread adheres. Continue this way, working your design in sections. We used the braid and ribbon to write the word "Joy" but you can create your own design too.
4. Attach the satin ribbon as a hanger either by knotting the ends and slipping it through the spool's hole, or by gluing the ends inside the spool's hole.
Instructions for beaded ornaments:
1. Using double-sided Treasure Tape or your favorite glue, attach fabric scraps to the spool.
2. Lay strips of the thin Treasure Tape roll on the spool. Remove the red liner to expose the top sticky area.
3. Begin thread decorating by laying the Kreinik ribbon in your desired pattern. Fill in with the Kreinik braid as desired.
4. When thread decorating is complete, lay your spool in a shallow pan and cover remaining sticky areas with Diamond Beadlets.
5. Attach the satin ribbon as a hanger either by knotting the ends and slipping it through the spool's hole, or by gluing the ends inside the spool's hole.
-
Candy Cane Heart Punchneedle
NOTE: this is not a product that is shipped. Click the link below to download the PDF.
Design By: Linda Connors of Calico Crossroads®
Finished size: 3 1/4" x 3" high
Materials needed:- Kreinik Silk Mori® in 1117 Very Dark Christmas Red, 8000 White, 6107 Very Dark Lavender, 4034 Medium Kelly Green, 4036 Dark Kelly Green — one 2.5m skein of each color, except for a 5m skein of 6107
- one 9" square of natural Weaver's Cloth
- 4" embroidery hoop
- 3-strand punchneedle
- one 8" x 4" piece of template plastic
- one 8" x 4" piece of batting
- one 4" x 4" piece of color-coordinated cotton backing fabric
- one package Mill Hill Glass Treasures #12110 (6mm red/gold balls, 3)
- 6" length of Kreinik 1/8" ribbon in pearl or gold for hanger
- white glue
- pencil or Sharpie pen
- light box or window
- Fray Check™ or similar product
- needle and strong sewing thread in red or white
Printing Instructions:
Click here to download the FREE instructions for this design. You will need the Adobe Reader to view and print this file.
-
Crazy Quilt Tree Ornament Pattern
NOTE: this is not a product that is shipped. Click the link below to download the PDF.
Crazy Quilt Tree Ornament
- Designed by Linda Lindgren
Linda has created a fun, quick-to-make holiday ornament. Use fabrics from a family member to make a special gift (Linda likes to use men's old ties). The Kreinik silk threads are perfect crazy quilt embellishments; the colors are rich, and the look is timeless. For crazy quilting, silk is nice and easy
Materials needed:
- Kreinik Silk Bella in 4164 Medium Victorian Green, 2014 Medium Gold, and 1117 Very Dark Christmas Red (one spool each)
- Kreinik Silk Serica in 2014 Medium Gold (one spool)
- 9-inch square firm interfacing and red velveteen
selection of red silks, satins, and Christmas prints, plus 1-inch wide green metallic ribbon - also: scissors, needles, matching sewing thread, polyester fiber fill
Instructions:
- Click here to download the FREE instructions for this design.You will need the Adobe Reader to view and print this file.
-

Santa's Pack Crazy Quilted Ornament
- Santa's Pack Crazy Quilt Ornament
- Designed by J Marsha Michler
- J. Marsha Michler has written extensive, informative and inspiring books on crazy quilting, so we asked her to design a special ornament for our web site visitors. You will be delighted at the effects of Kreinik metallic and silk threads for crazy quilting; for many projects, they're the only decorative threads you need to create beautiful work. The light-catching metallics and smooth, rich silk threads dance off the medley of fabrics and help you achieve exciting results. Use them in all kinds of stitches.
Materials needed:
For crazy patching:
- scissors, dry iron, spray bottle of water, pins, ironing board
- 1/2 yard of 100% cotton unbleached muslin fabric, pencil, ruler
- Silk fabric scraps such as jacquard, crepe de chine
- 1 1/2" x 10 1/2" piece of silk fabric for shoulder strap
- 100% cotton sewing thread, size 12 Sharp needle for basting
For embroidery:
- Embroidery hoop, scissors, needles in various sizes
- Kreinik Silk Serica in 8-10 shades of red, gold and green, such as: 3017, 1119, 1098, 4077, 1092, 4163, 4164, 2026, 2016
- Kreinik Heavy (#32) Braid or Medium (#16) Braid for couching in 202HL and 5982, or any shades of gold and green
- size 18 Chenille needle
- Kreinik Silk Bella in gold, green (such as 2016 and 4164)
For assembling the pack:
- 100% cotton sewing thread, any color that blends with the fabrics
- two 1" metal rings (the type used for cafe curtains)
- 24" soft 1/2" rayon ribbon, deep red
- small amount of poly stuffing
- miniature toys and other small objects
- sturdy wire (I used paper clips bent open), pliers
- white glue
- fine beading needle, white beading thread
- 18-inch length of Kreinik's Medium (#16) Braid, any shade of gold such as 202HL or 221
Instructions:
- Click here to download the FREE instructions for this design. You will need the Adobe Reader to view and print this file.


