

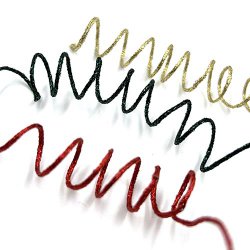
Metallic Braids
Round, braided fibers in various weights/widths and 200+ colors. Premier material for bodies. You can also fray the ends to create wings.
Please note: We are moving from West Virginia to California, and right now no threads are being made. Any order placed on this site may take six weeks to get to you.
-
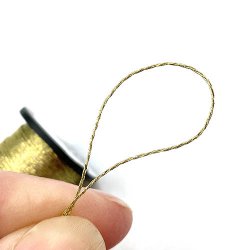
Wired Braid for fly tying
Kreinik Wired Braid™ is exactly what it sounds like: a wired metallic thread the size of our Medium #16 Braid. Use it with our furling tool to create body patterns. Available in 2.5-meter skeins.
-
Very Fine #4 Braid for fly tying
Our thinnest braid size. It comes in basic metallic colors plus hi lustre (HL), glow in the dark (F), antique (V), corded (C) and holographic (HL). Once you have selected your colors, scroll down and click "Add to cart."
-
Fine #8 Braid for fly tying
Slightly thicker than #4 Braid. It comes in basic metallic colors plus antique (V), hi lustre (HL), holographic (L), corded (C) and glow in the dark (F). It is used straight off the reel (not plied or separated). Once you have selected your colors, scroll down and click "Add to cart."
-
Tapestry #12 Braid for fly tying
Thinner than #16 Braid but thicker than #8 Braid. It comes in basic metallic colors plus holographic (L), antique (V), glow in the dark (F), high lustre (HL), and corded (C) colors. Once you have selected your colors, scroll down and click "Add to cart."
-
Medium #16 Braid for fly tying
Round metallic thread, our mid-size in the Braid line. Thinner than #24 Braid, twice as thick as #8 Braid. Available in basic metallic colors plus glow in the dark (F), antiqued (V), holographic (L), high lustre (HL) and corded (C). Once you have selected your colors, scroll down and click "Add to cart."
-
Canvas #24 Braid for fly tying
Round metallic braid slightly thinner than Heavy #32 Braid. Twice as thick as #12 Braid. Available in basic colors plus glow in the dark (F), vintage (V), Japan (J) and Hi Lustre (HL). Once you have selected your colors, scroll down and click "Add to cart."
-
Heavy #32 Braid for fly tying
This is our thickest Braid, a round thread approximately 1.5mm in diameter. Available in basic metallic colors plus glow in the dark (F), and Hi Lustre (HL). Once you have selected your colors, scroll down and click "Add to cart."
-
Cable for fly tying
A 3-ply gently twisted cord that offers a unique texture for lures.
-
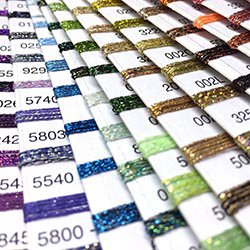
Kreinik Metallic Braids Color Card
See the fantastic colors and explore the creative options with panels of Kreinik thread colors—actual thread swatches for true color matching.
-
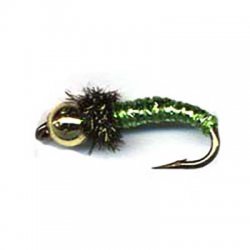
Caddisfly Pupae Pattern
This item is not shipped
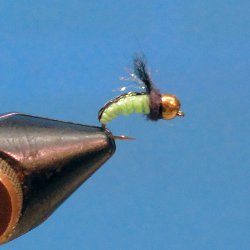
Caddisfly Pupae
Designed by Al Hafner
Materials Needed:
- Hook: #12 - 16 Tiemco 2487, Mustad 3906
- Thread: 6/0 Black
- Body: Kreinik Fine or Medium Braid in Chartreuse (015)
- Head: 1/8 inch brass bead
- Collar: Peacock Herl
Tying Directions:
- Pinch barb down and slide bead on to eye. The bead adds weight and make the fly drop head first into the water. If using this fly without a bead head, fish with a sink tip line and a short leader.
- Tie on the body material. If your using Medium Braid: tie in at bend of hook, wrap to head and tie off. If you're using Fine Braid: tie in at head, wrap to bend and return to head, then tie off.
- If desired, a collar can be tied in between the bead head and the body braid, using one strand of peacock herl. Tie off and add head cement. This collar is needed if a bead head is not used. Emergent Pupa Version: Do not use a bead head. Add a marabou or hackle collar to simulate wings and legs. Add a small peacock herl collar. Other body colors often used for this pattern are: Red (003), Emerald (009HL), Copper (021), Brookie (034), Bronze (052HL), and Mallard (850).
-
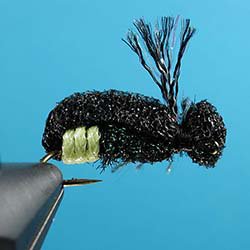
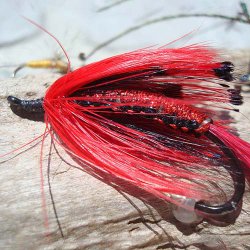
Steeves’ Firefly Pattern
This item is not shipped
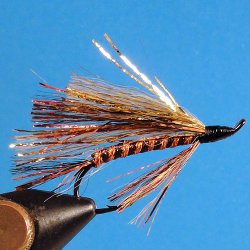
Steeves FireflyDesigned by Harrison Steeves
Materials Needed:- Hook: #12, 14,16: Tiemco 5212, Orvis 1638, Mustad 94831
- Thread: 6/0 Black or Orange
- Wing Case: Kreinik 1/8” Ribbon Black Hi Lustre #005HL
- Body: Orvis 1/8” thick closed cell black foam, cut into 1/8” wide strips
- Underbody: 3-4 strands of peacock herl
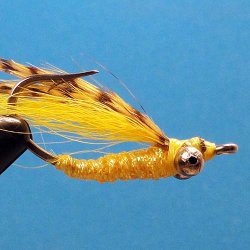
- Butt: Kreinik Medium #16 Braid Glow in the Dark Lemon-Lime (Yellow) #054F
- Wing: Either 1/8” Kreinik Ribbon or Kreinik Heavy #32 Braid in Mallard #850 or 085
Tying Directions:
1. Wrap first half of hook shank with thread. Tie in wing case material (use about a 6 inch piece) to the bend of the hook (end of shank).
2. Wrap thread forward 2/3 length of hook shank, tie in foam strip and wrap backward to bend of hook, even with wing case material.
3. Tie in butt material (about a 6” piece) and wrap thread forward enough to allow two to four wraps of butt material forward (two on the smallest hook, and four or more on larger fireflies). Wrap butt material forward(3 wraps on a #14 hook), and tie down on top. Trim off excess butt material.
4. Tie in 3-4 strands of peacock herl in front of butt and wrap thread forward to within about 1/8” of hook eye. Wrap peacock herl forward and tie down. Trim off excess herl. Wrap thread back and then forward through herl for reinforcement.
5. Fold foam over and forward to form body, tie it down about 1/8”back from the eye of hook and trim to leave a head extending to or slightly over the hook eye. Save excess foam for more bodies.
6. Tie in winging material at the point where the head and body join. Wings should extend back no further than the butt. Trim forward portion even with front of head.
7. Separate winging material evenly on both sides of the body, fold wing case material forward and tie down. Trim wing case material even with front of head and save excess for more flies. Whip finish.
Note: You can substitute brighter colors of 1/8” Ribbon for the wing case such as 051F, 052F, 053F, 054F or 055F. These colors will make the fly easier to see in the water.
-
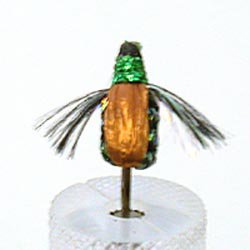
Sinking Japanese Beetle Pattern
This item is not shipped
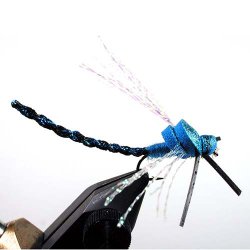
Sinking Japanese Beetle
Designed by Harrison Steeves, III
Materials Needed:
- Hook: #10 - Tiemco 3769, Orvis 1641, Mustad 3906
- Thread: 6/0 Olive or Green
- Body: Kreinik Heavy Braid in Mallard #850, Emerald #009HL
- Wing Case: Copper colored Swiss Straw or rafia
- Wing: Kreinik 1/8” Ribbon Mallard #850
- Head/Thorax: Kreinik Fine Braid Chartreuse #015
Tying Directions:
1. Wrap the rear half hook shank with thread.
2. Tie in Swiss Straw, use about a 4” piece. Tie in the Swiss Straw at the end of the hook, almost to the bend of the hook. Wrap thread forward to the middle of the hook shank.
3. Tie in two 9-10” strands of Kreinik Heavy Braid on each side of the hook shank. Tie them down by wrapping the thread backward to the same point at which the Swiss Straw exits the wraps. Wrap thread forward to about 1/16” behind the hook eye, half hitch (or whip finish) and cut thread.
4. Form the body of the beetle by using the overhand knot technique, passing the eye of the through the middle of the knot. Tie so that the 009HL strand form the back (top), and the 085 strands forms the belly (bottom). Use seven (7) knots to form the body on #10 hook. This will assure the proportions. When the body has been formed, tie down both body strands of material and cut. Note: When forming the knots, use PLENTY OF TENSION. If you don’t, the body looks really loose, and there won’t be enough room at the front of the hook to finish the fly.
5. Tie in the wing material, length extending back to the butt of the fly. Tie it in at the point where the body material cords were tied down and then wrap thread firmly toward, but not to the eye of the hook. Cut off the winging material piece extending forward and save for more wings. (use about a 6” piece - it’s easy tie in the correct length and then trim the forward portion. A 6 “ piece will tie a bunch of wings.)
6. Separate wing material into 2 equal halves and pull these laterally to the sides of the fly. I use a fine pair of tweezers for this, but a needle does fine.
7. Tie in about a 6” piece of Head/Thorax material - tie it in backwards to wing butts and on the side of the fly.
8. Fold Swiss Straw forward between wings to keep them separate, and tie down the Swiss Straw firmly from the wing butts almost to the hook eye. Trim to leave a small shelf of material pointing forward. Save the remainder of the Swiss Straw for more wing cases.
9. Wrap head/thorax material forward, 3-5 wraps depending upon how much space you have. After the last wrap, pull the material under the hook shank, tight into the eye of the hook and give it a couple of good thread wraps. Do not cut it.
10. At this point there is going to be some Swiss Straw visible, so tho finish the head neatly, first cock the fly at about a 45 degree angle in the vise. Bring the head/thorax material backward with the left hand and start building up the head with 6 wraps of thread. This will not only secure the head/ thorax material, but will give a neat head on the fly.


