
- Shop Fly Fishing
-
Shop Needlework
- Metallic Threads
- Silk Threads
- Kits & Sets
- Accessories
- Free Patterns
- How To
109 products found
Sort by:
Recommended
Shop Needlework > Free Patterns > Cosplay & Costumes
-
Martian Mask
NOTE: This item is not shipped. Click the link below to download the PDF.
Design by Carole Rogers
Stitch a Halloween mask using Kreinik glow-in-the-dark threads on plastic canvas.
Materials needed:
- Kreinik Medium (#16) Braid - 051F Tangerine, 053F Lime, 005 Black
- 14 ct plastic canvas
- 12" black chenille stem
- 1 1/2 yds elastic
- #22 tapestry needle
- thick tacky glue
Instructions:
Click here to download the instructions for this design.
You will need the Adobe Reader to view and print this file. -
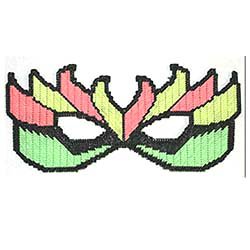
Neon Flames Mask
NOTE: This item is not shipped.
Stitch a plastic canvas mask using Kreinik glow-in-the-dark threads.
Design by Carole Rogers
Materials needed:
- Kreinik Medium (#16) Braid - 055F Watermelon, 054F Lemon-Lime, 053F Lime,005 Black
- 14 ct plastic canvas
- 1 1/2 yds elastic
- #22 tapestry needle
- thick tacky glue
Instructions:
Click here to download the instructions for this design. You will need the Adobe Reader to view and print this file.


Shop Needlework > Free Patterns > Crafts > Autumn & Halloween
-
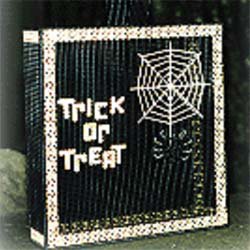
Trick or Treating Bag
NOTE: this is not a product that is shipped. Click the link below to download the PDF.
Trick Or Treating Bag
- Designed by Jeanette Vanetta
Skill Level: Intermediate
Make this tote bag for the little trick-or-treater in your life to use onOctober 31. It uses Kreinik's fun glow-in-the-dark threads.
Glow-in-the-dark threads will glow when exposed to direct light. However, they should not be relied upon for safety-rated reflective material. Instead, have your child wear reflectors, a flashlight, or similar safety device to make the child visible to drivers at night.
Materials needed:
- Kreinik 1/8" Ribbon in 054F Lemon-Lime (21 yards), 051F Tangerine (21 yards), and 052F Grapefruit (11 yards)
- Kreinik Medium (#16) Braid in 053F Lime (3 yards)
- 3 sheets 7-count black plastic canvas
- 1/2 sheet 7-count clear plastic canvas
- 21.5 yards black plastic canvas yarn
- hot glue gun recommended by the designer for attaching letters and spider
Instructions:
- Click here to download the FREE instructions for this design.You will need the Adobe Reader to view and print this file.
-
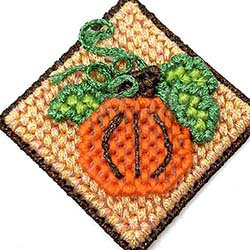
Pumpkin Patch Pin or Magnet
NOTE: this is not a product that is shipped. Click the link below to download the PDF.
Pumpkin Patch Pin
- Designed by Mary Cosgrove
Materials needed:
- QuickCount® 10-count plastic canvas by Uniek
- Kreinik Heavy (#32) Braid in 008 Green
- Kreinik 1/8” Ribbon in 052HL Bronze Hi Lustre, 9192 Light Peach
- DMC embroidery floss in 608 Bright Orange-Red, 704 Chartreuse
- Fabri-Tac™ Permanent Adhesive by Beacon™
- Scissors, Plastic canvas needle (No. 18), Backing material such as fabric, perforated paper
- card stock, Pinback or magnet
Instructions:
Click here to download the FREE instructions for this design.You will need the Adobe Reader to view and print this file.
-
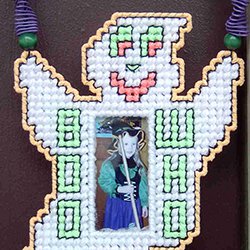
“Boo Who?” Glowing Ghost Frame Door Hanger
NOTE: this is not a product that is shipped. Click the link below to download the PDF.
“Boo Who?” Glowing Ghost FrameDoor Hanger- Designed by Mary Cosgrove
Skill Level: Intermediate
Materials needed:Uniek QuickCount™ 7-count plastic canvas
Uniek Needleoft® plastic canvas yarn as listed in color key
Kreinik Fine (#8) Braid 005HL
Kreinik 1/8” Ribbon 051F, 053F, 055F
Wire-Art Jewelry Kit by Duncan Enterprises: 24-inch wires (2 black, 2 orange,3 purple, 1 white); 2 black pony beads; 6 green wood beads; 2 large orangewood beads
Fabri-Tac™ Permanent AdhesiveScissors
Plastic canvas needle
PhotoInstructions:
Click hereto download the instructions for this design. You willneed the Adobe Reader to view and print this file.
-
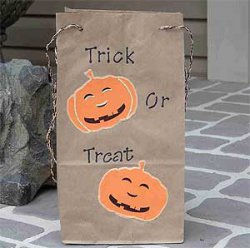
Trick or Treat Party Bag
NOTE: this item is not shipped.
Trick or Treat Party Bag
Designed by: Amy Law
Skill Level: beginnerMaterials needed:
• brown paper lunch sack
• orange cardstock
• large jack o’lantern rubber stamp and black stamp pad (or print a black and white drawing of a jack o’lantern onto your orange cardstock)
• Kreinik adhesive press cloth if using a mini iron, or regular press cloth if using a regular iron
• Kreinik Iron-on #16 Braid 6700, 6710, 6720
• mini iron or household iron
• 1-inch Treasure Tape
• black magic marker (thin)
• Kreinik Custom Corder with weight
• Kreinik #16 Braid 005, 052F, 051F
• hole punch
Instructions:(instructions are for a regular iron; if using a mini iron, we recommend applying the adhesive press cloth while the iron is cool and unplugged)
1. Turn your iron onto the highest heat setting and let it heat thoroughly.
2. Stamp the jack o’lantern image onto your cardstock or print it from a computer. Cut out. You will need two.
3. Iron over the outline of the pumpkin using the orange iron-on braid: lay the thread at a starting point, cover with the press cloth, and press for several second or until the thread adheres. Continue this way, working the design in sections.
4. Use the 6720 iron-on braid to outline the eyes, nose, and mouth of the jack o’lantern.
5. Adhere the decorated pumpkin images to the front of your bag using TreasureTape.
6. Write the words “Trick or Treat” using the black magic marker.
7. Punch holes at the top of your bag to use for stringing the handles.
8. Following the directions that come with the Custom Corder, make twisted cording out of the #16 Braid colors. Make two. String these through the holes in your bag, knotting the ends, to become handles.


Shop Needlework > Free Patterns > Crafts > Christmas
-
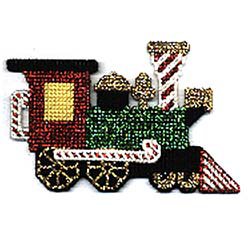
Candy Cane Railroad
NOTE: this is not a product that is shipped. Click the link below to download the PDF.
Candy Cane Railroad
- Designed Rosemarie Walter
This is a fun holiday project. Stitch it for someone who loves trains, toys, candy canes or Christmas "or all of the above" or make it as holiday decor for your own home. There are five 'cars' in this train. Attach clear fishing line to make into ornaments, or add magnets to make into a refrigerator decoration
Materials needed:
- Kreinik Medium (#16) Braid" in 031 Crimson, 002HL Gold Hi Lustre, 008HL Green Hi Lustre
- Cotton embroidery floss in white, black and yellow (see color key)
- 14-count plastic canvas, 1/4 sheet each white and clear
- #24 Tapestry needle
Instructions:
Click here to download the FREE instructions for this design.You will need the Adobe Reader to view and print this file.
-
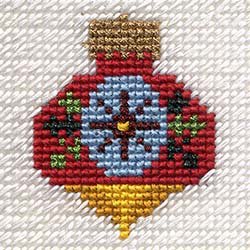
Ornament Coasters
NOTE: this is not a product that is shipped. Click the link below to download the PDF.
Ornament Coasters
- Designed by Kathryn Rubinstein
Materials needed:
- Kreinik Very Fine (#4) Braid 009 Emerald, 2 spools
- Kreinik Very Fine (#4) Braid 015 Chartreuse, 1 spool
- Kreinik Fine (#8) Braid 061 Ruby, 1 spool
- Kreinik Very Fine (#4) Braid 202HL Aztec Gold Hi Lustre, 2 spools
- Anchor Embroidery Floss in the following: Red #19 (2 skeins), Gold #307 (1), Yellow #298 (2), White #1 (6), Light Blue #160 (1), Light Green #257 (1)
- Darice 10-mesh plastic canvas
- Embroidery needle, scissors
- Optional: white Flexi-Foam (1 sheet), craft glue
Instructions:
Clickhere to download the FREE instructions for this design.You will need the Adobe Reader to view and print this file.
-
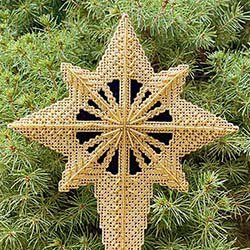
Star Tree Topper
NOTE: this is not a product that is shipped. Click the link below to download the PDF.
Star Tree Topper
- Designed by Rosemarie Walter
A stunningly gorgeous tree topper sparkling from Kreinik metallic threads.
Materials needed:
- 10 spools of Kreinik 1/8" Ribbon in 202HL Aztec Gold,
- Kreinik Japan #1 002J Gold for attaching beads
- 10-count plastic canvas
- 8" x 4" piece of blue velvet
- Gold bugle beads: large, medium and small, also gold seed beads
Instructions:
Click here to download the FREE instructions for this design.You will need the Adobe Reader to view and print this file.
-
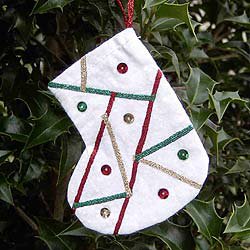
Iron-On Stocking
NOTE: this item is not shipped.
Iron-On Stocking
Designed by: Nancy Billetdeaux
Skill Level: IntermediateThis is a fun way to make a quick fabric ornament that looks like it was crazy quilted. You can take it a step further and make it a ‘signature’ ornaments– having family or friends sign their names in the sections of the design.The iron-on threads give you a quick decorative thread embellishment.
Materials needed:
• Iron-on 1/8” Ribbon in 6130 Red, 6225 Gold, 6350 Green
• 3” x 4” Kreinik Press Cloth if using a regular iron, or Kreinik adhesive press cloth if using a Clover Mini Iron
• Mini iron or household iron
• 4 1/2” X 4 1/2” white print fabric
• sequins (small) 6 red, 4 green, 4 gold
• sewing machine
• white all-purpose thread
• fabric glue
Instructions:
If using the adhesive press cloth on a mini iron, tear off the backing and apply to the mini iron while cool and unplugged.Turn your iron onto the highest heat setting and let it heat thoroughly.
1. Trace and cut out the stocking template. Place template onto doubled white print fabric and cut out.
2. Referring to template for placement, iron the 1/8’ Ribbon; lay the thread at a starting point, cover with the Teflon press cloth, and press for several seconds until the thread adheres. Continue in this way, working the design n sections. Refer to the photo for color location.
3. Pin stocking right sides together and sew around stocking, leaving top open, using a 1/4” seam allowance. Turn under 3/8” to inside of stocking and stitch around top of stocking 1/4” from edge.
4. Cut a piece of 1/8” red Iron-on Ribbon 8 1/2” long, and fold in half.Iron the raw ends to inside of stocking (always use your Teflon press cloth).
5. Glue sequins to stocking using fabric glue; refer to photo for color and placement.


Shop Needlework > Free Patterns > Crafts > Valentines
-
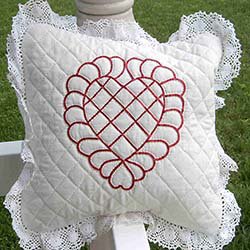
Feathered Heart Pillow
NOTE: this is not a product that is shipped. Click the link below to download the PDF.
Feathered Heart Pillow
- by Linda Lindgren
- Design Size: 14" x 14"
Some sewing is required to complete this sweet pillow, but the iron-on thread makes the embellishment quick and easy.
Materials needed:
- Kreinik Iron-on 1/8" Ribbon in Red
- 9" x 12" Kreinik Teflon Press Cloth
- Mini Iron or household iron
- DMC Quilting thread in off-white color
- four 16" muslin squares
- Quilt batting, 16-in square
- 1 2/3-yard eyelet trim
- scissors, pen, quilting needle, sewing thread, pins, quilt ruler, 14" pillow form, white paper
Instructions:
- Click here to download the FREE instructions for this design.You will need the Adobe Reader to view and print this file.
-
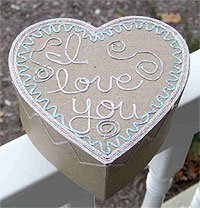
I LOVE YOU gift box
NOTE: This product is not shipped. Click the link below to download the PDF.
I LOVE YOU gift box
Materials needed:
- Kreinik Iron-on #16 Braid in 6120 pink, 6420 sky blue, 6410 confetti pink, 6010 pearl
- Kreinik Adhesive Press Cloth if using a mini iron, regular press cloth if using regular iron
- Mini Iron or household iron
- undecorated, heart-shaped paper mache box (medium size) from a craft store
- pencil
Instructions:
Click here to download the FREE instructions for this design. You will need the Adobe Reader to view and print this file.
- Turn your iron onto the highest heat setting and let it heat thoroughly.
- Lay the iron-on thread at a starting point on the desired spot, cover with a press cloth, and press with the hot iron for a few seconds until the thread adheres. Continue ironing the thread along the outline as desired.

